Convertible top issue

Tiny
NASER NASER
  • MEMBER
  • 2006 AUDI A4
  • 4 CYL
  • TURBO
  • 2WD
  • AUTOMATIC
  • 117,000 MILES
Bought this car with the top not hatching on one of the sides t the windshield, closed it with the tool, tried to reset it, by opening it fully and closing it fully, still nothing. I don't hear anything other than the switch when I turn to open or close, no motor or humming or hydraulic noise whatsoever. All windows work. Trunk wouldn't open except with key before I was able to close the top fully, now it opens with button or handle. Only code it had is 2000. Switch position-implausible, not very helpful. I can't find anything broken. The top light was flashing before, now after I got it to itch right it just stays on. Can't find anything broken. Removed the trunk tray in case something isn't right, but all look good.
Monday, September 14th, 2020 AT 3:00 PM

48 Replies

Tiny
JACOBANDNICKOLAS
  • MECHANIC
  • 108,125 POSTS
Hi,

I found a technical service bulletin related to this code and an inoperative top. Take a look through it and let me know if it helps. Note that you will need to check the convertible top control module number which is located behind the side panel, rear seat passenger side.

This TSB does explain why this is happening as well:

_____________________________________

2006 Audi A4 Cabriolet (8H7) L4-1.8L Turbo (AMB)
Body - Convertible Top is Inoperative/DTC 2000
Vehicle Body and Frame Technical Service Bulletins By Symptom Body - Convertible Top is Inoperative/DTC 2000
BODY - CONVERTIBLE TOP IS INOPERATIVE/DTC 2000
61 08 05

2010940/5

December 1, 2008. Supersedes Technical Service Bulletin Group 61 number 07-10 dated October 9, 2007 for reasons listed below.

61 Convertible top inoperative

pic 1

Condition

pic 2

During opening sequence, tension bow has fallen out of range and top operation ceases. DTC 2000 (Switch position incorrect signal) will be stored in the Convertible Top Control Unit. This condition is more common when the vehicle is on an incline with the front of the vehicle elevated, such as when parked in a sloped driveway.

DTC 2000 will be the only fault present for this bulletin to apply. If there are any other faults in the convertible top control unit, these malfunctions must be corrected first. Only after these are corrected and the above condition is still present, accompanied by DTC 2000, should you continue.

Only technicians who have successfully completed Self Study Program 991203 - The Audi A4 Cabriolet and course number 991202 - Audi A4 Cabriolet Introduction are permitted to service the A4 Cabriolet. If you have not completed these prerequisites, do not continue with this bulletin. Have the case dispatched to a qualified A4 Cabriolet technician.

Technical Background

During the opening phase of the convertible top run, the front lock lifts from the windshield and the tension bow lifts to a vertical position to allow clearance for the convertible top box lid to open. The lid is then unlatched. During the unlatching of the top box lid and at the point when the tension bow is vertical, the opening strategy calls for the hydraulic pump to shut off momentarily. During this "off period" the tension bow is not under pressure and can slowly drift backwards before the top box lid can unlatch completely. Within this time period, the tension bow may have exceeded its plausible operating range. This will cause the top operation to cease. DTC 2000 (Switch position incorrect signal) is stored.

Production Solution

Optimized Convertible Top Operation Control Module beginning with software 9.0, part number 8H0 959 255B.

Service

1. Address the Convertible Top Operation Control Module and check the control module part number. If the vehicle is already equipped with Convertible Top Operation Control Module 8H0 959 255B, this Technical Service Bulletin does not apply. Any malfunction in the convertible top system with this part number module installed will likely not be related to the subject matter contained in this Technical Service Bulletin. Carry out the appropriate diagnosis and repair relevant to the failure according to the information in ElsaWeb.

2. Should the top operation fail under the conditions outlined in the Condition, do not clear fault memory. Diagnose as follows:

a. Check battery and charging system condition by performing a test with the Midtronics tester. Print results.

B. Check and adjust, if necessary, the convertible top box lid and puller tabs according to the specifications in ElsaWeb.
C. If the top is currently not operating, fully open and fully close the top manually. Power operation should resume.

D. Perform the Guided Fault Finding test plan completely for DTC 2000, checking all five top positions (test of import conv. Top positions w. Spec. Values). Save and print this diagnosis log.

E. If the VIN of the subject vehicle is after VIN 8H_5K009649 for A4 Cabriolet and after VIN 8H_5K901294 for S4 Cabriolet, please also save and print measuring value blocks 6 and 7 to the test plan protocol.

3. If all four of these conditions are met:

- Battery tests good.

- All other top components are without malfunction.

- Convertible top box lid and puller tabs are correctly adjusted.

- All five top positions tested reveal that all switch positions in measuring value block 1 are as specified (no switch implausibility found).

Continue with diagnosis as follows:

a. Connect the diagnostic tester and address 26-Convertible Top Operation Control Module. View MVB 1, field 4. This is the value for Convertible Top Frame Position Sensor G356.

B. Move the top into position 4 from test of import conv. Top positions w. Spec. Values. This position has the tensioning bow up and the cover closed.

C. Turn the key off. MVB 1 will stay live. The tensioning bow can now be moved freely.

D. With the tensioning bow held to its uppermost position note the value for G356 in field 4. Write this value down.

E. At this time note the switch positions in field 2, specifically position 6 (3rd from left). This character will read 1 with the tensioning bow in its uppermost position. Slowly move the tensioning bow down while observing position 6. When this character changes to 0 note the G356 value in field 4 and write this value down.

F. Subtract these two values. If the difference is less than 22, replace Convertible Top Frame Position Sensor G356 (8H0 959 613) with the improved version, which is identified with a yellow dot.

G. After installation, perform J256-adaptation-Convertible top frame position sensor in Guided Fault Finding.

Warranty

Replaced Convertible Top Frame Position Sensors requested by the Warranty Test Center must have a copy of the Guided Fault Finding diagnosis protocol attached. Requested sensors that have Guided Fault Finding diagnosis protocol that does not support this symptom as described in this Technical Service Bulletin or is not attached to the requested sensor will be denied.

Pic 3

Required Parts and Tools

Description Part No:

Convertible Top Frame Position Sensor8H0 959 613

All part and service references provided in this TSB are subject to change and/or removal. Always check with your Parts Dept. And service manuals for the latest information.

__________________________________

Let me know if this helps.

Joe
Was this
answer
helpful?
Yes
No
Monday, September 14th, 2020 AT 5:58 PM
Tiny
NASER NASER
  • MEMBER
  • 836 POSTS
Wow, that is going to be some insane testing, hoping I can find all these numbers in the scanner. What about fuses and the such that isn't possible? The top motor?
Was this
answer
helpful?
Yes
No
Monday, September 14th, 2020 AT 6:16 PM
Tiny
JACOBANDNICKOLAS
  • MECHANIC
  • 108,125 POSTS
Naser, I didn't even realize it was you when I answered. I have the same car and had the same problem. Before you go crazy testing, remove the passenger side rear panel and confirm the part number on the control module. Interestingly, mine was a combination. Someone had installed a remote control for the roof and when I disconnected the wiring from it and plugged it in directly to the module, it worked. However, the module eventually failed.

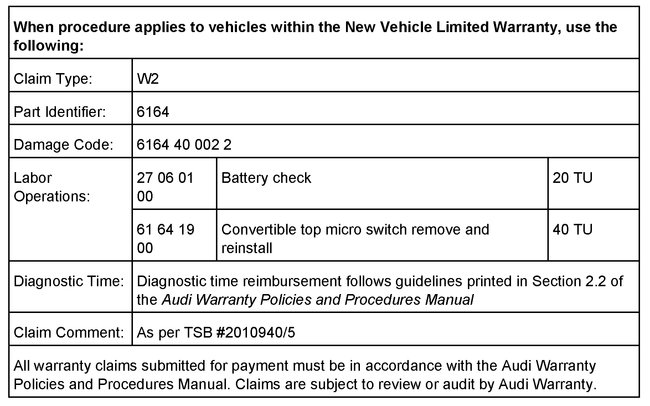
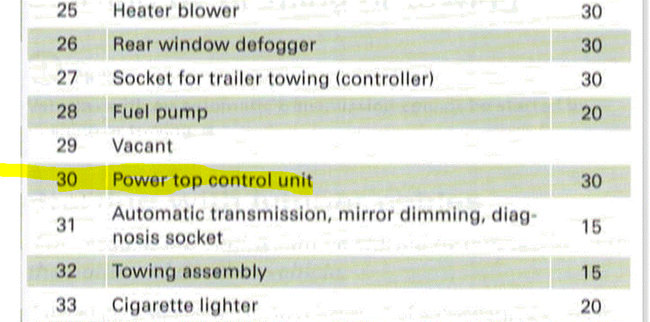
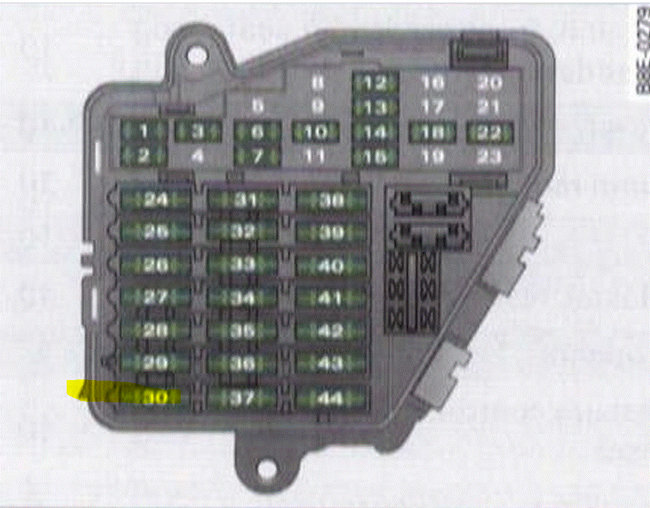
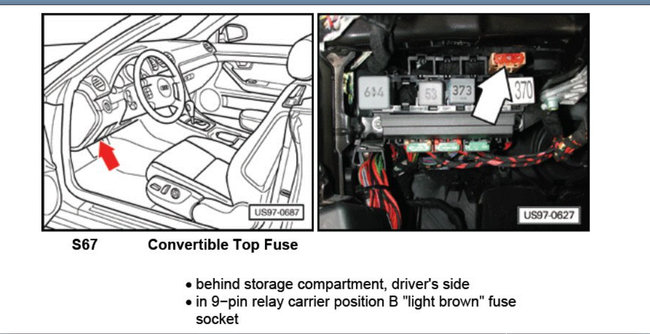
I attached three pics below for you related to fuses.

Let me know if I can help.

Joe
Was this
answer
helpful?
Yes
No
Monday, September 14th, 2020 AT 7:04 PM
Tiny
NASER NASER
  • MEMBER
  • 836 POSTS
Thanks. You mean the plastic panel on rear right of the seat?
Was this
answer
helpful?
Yes
No
Monday, September 14th, 2020 AT 7:06 PM
Tiny
JACOBANDNICKOLAS
  • MECHANIC
  • 108,125 POSTS
Yep, that's it.

2006 Audi A4 Cabriolet (8H7) L4-1.8L Turbo (AMB)
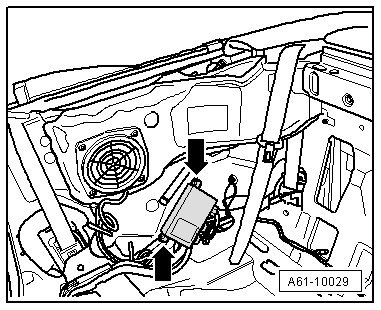
Convertible Top Control Module
Vehicle Body and Frame Relays and Modules - Body and Frame Convertible Top Control Module Service and Repair Removal and Replacement Convertible Top Control Module
CONVERTIBLE TOP CONTROL MODULE
Convertible Top Control Module

- Remove rear side trim.

- Disconnect electrical connectors.

- Remove control module nuts - arrows -.

Pic 1

Installation is reverse of removal.

Tightening torque => [ Convertible Top Compartment Cover Latch Assembly Overview ] See: Convertible Top Deck Lid Latch > Removal and Replacement > Convertible Top Compartment Cover Latch Assembly Overview.

_________________

Here are the directions for the removal of the panel.

2006 Audi A4 Cabriolet (8H7) L4-1.8L Turbo (AMB)
Rear Side Trim
Vehicle Body and Frame Interior Moulding / Trim Trim Panel Service and Repair Removal and Replacement Rear Side Trim
REAR SIDE TRIM
Rear Side Trim

Rear Side Trim

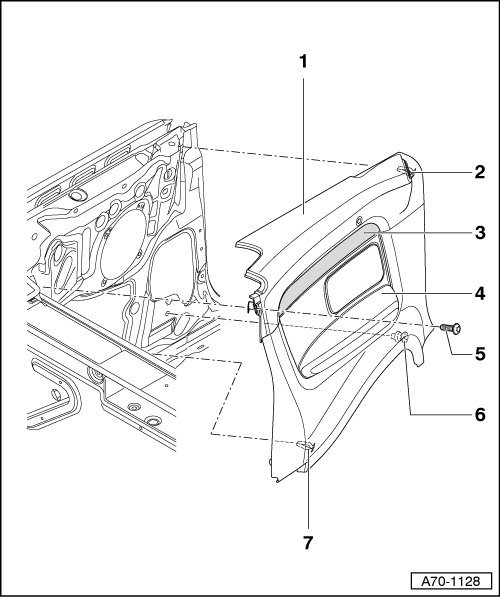
pic 2

1 - Side Trim

Removing

- Remove the rear bench seat. Refer to => [ Rear Bench Seat ] See: Seats > Removal and Replacement > Rear Seats.

- Remove rear seat backrest. Refer to => [ Rear Seat Backrest ] See: Seats > Removal and Replacement > Rear Seats.

- Remove trim pane. Refer to l => [ Trim Molding ] See: Front Door Panel > Removal and Replacement.

- Remove the center part - 4 -.

- Remove screw - 5 -.

- Reach into the side trim - 1 - and release the side trim - 1 - at the clips - 2 -, - 7 - and - 6 -.

- Remove the side trim - 1 -.

To replace the side trim - 1 -:

- Remove anchorage point for outer floor assembly. Refer to => [ Outer Front Floor Assembly Anchorage Point ] See: Seat Belt Systems > Removal and Replacement > Seat Belts Overview.

Installing

After installing, make sure the seal is correctly pulled over the side trim.

- Pull back on the clip - 6 - to release the tension on it - 6 -.

- Install the side trim - 1 - in reverse order of removal.

2 - Clip

3 - Trim Panel

4 - Center Section

5 - Bolt

6 - Clip

7 - Clip

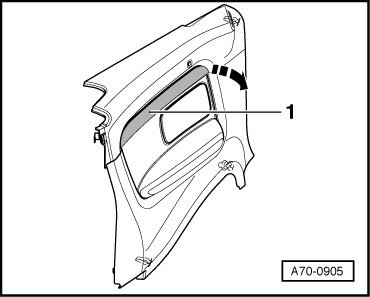
Trim Molding

- Carefully pry off the trim - 1 - at the rear end in direction of - arrow -.

Pic 3

- Unclip decorative panel - 1 -.

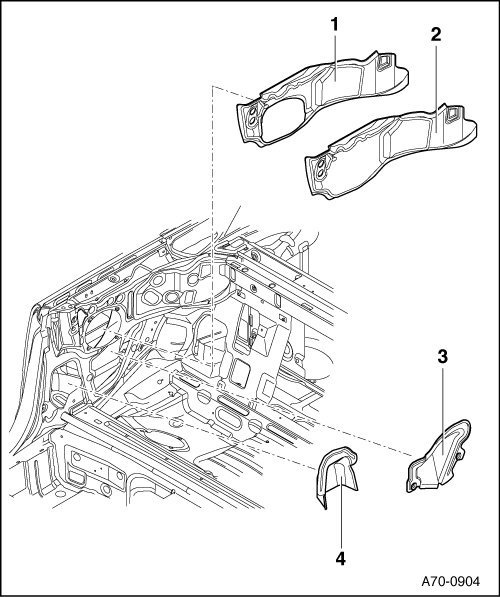
Insulation

pic 4

1 - Insulation with the Speaker Installed

2 - Insulation with the Speaker Not Installed

3 - Insulation

4 - Belt Roller Insulation

Removing

- Remove the rear bench seat. Refer to => [ Rear Bench Seat ] See: Seats > Removal and Replacement > Rear Seats.

- Remove rear seat backrest. Refer to => [ Rear Seat Backrest ] See: Seats > Removal and Replacement > Rear Seats.

- Remove side trim. Refer to => [ Rear Side Trim ] See: Trim Panel > Removal and Replacement > Rear Side Trim

- Belt roller insulation: remove the front safety belt roller. Refer to => [ Front Three-Point Seat Belt with Belt Tensioner ] See: Seat Belt > Removal and Replacement.

- All insulation: Be careful not damage the insulation when removing.

- Remove the insulation.

Installing

- Press the insulation securely to the body.

- Belt roller insulation: install the belt roller. Refer to => [ Front Three-Point Seat Belt with Belt Tensioner ] See: Seat Belt > Removal and Replacement.

_________________________

Let me know if I can help. Also, the fuses I indicated above should be checked as well. I suspect you already have done that.

Joe
Was this
answer
helpful?
Yes
No
Monday, September 14th, 2020 AT 7:39 PM
Tiny
NASER NASER
  • MEMBER
  • 836 POSTS
Excellent, I can tell you this, and am sure you would agree, I have never bought an Audi that had a normal issue, it has to be complicated.
Was this
answer
helpful?
Yes
No
Monday, September 14th, 2020 AT 7:53 PM
Tiny
JACOBANDNICKOLAS
  • MECHANIC
  • 108,125 POSTS
LOL. I have owned several. When they are right, I love driving them. When something breaks, I want to run. LOL I just paid $200.00+ (my cost) for two heater hoses. Ugh! One was leaking and I couldn't find anything aftermarket that would work. It's the 3.0L AWD Convertible. It has been a great vehicle other than the part prices.

Regardless, let me know if I can help.

Take care,
Joe
Was this
answer
helpful?
Yes
No
Monday, September 14th, 2020 AT 7:57 PM
Tiny
NASER NASER
  • MEMBER
  • 836 POSTS
I believe Audi's drive the beat, si smooth, very responsive, love them until they break like you mentioned.
Was this
answer
helpful?
Yes
No
Monday, September 14th, 2020 AT 8:01 PM
Tiny
NASER NASER
  • MEMBER
  • 836 POSTS
Fuses are good. Unfortunately module has the right numbers so this one does not apply to it. I am thinking the latch motor or the hydraulic pump, not sure which to start with, say if the too latch by windshield isn't working should the hydraulic pump still makes a noise when I try the switch? Or maybe the switch itself since nothing happens when I reset it or try to take it down with the switch.
Was this
answer
helpful?
Yes
No
Wednesday, September 16th, 2020 AT 7:54 AM
Tiny
NASER NASER
  • MEMBER
  • 836 POSTS
Turning ignition on foot on brake pedal no power to any of the wires in the switch.
Was this
answer
helpful?
Yes
No
Wednesday, September 16th, 2020 AT 8:03 AM
Tiny
NASER NASER
  • MEMBER
  • 836 POSTS
Also read somewhere that the power will come back after the reset, which I have tried twice, I will try it one more time and see what happens ugh.I say this because when you roll the windows up and down all and work, but when you hit the switch the windows are supposed to roll down a bit, even if the top hydraulic and motor aren't working, am I right here? Relay maybe?
Was this
answer
helpful?
Yes
No
Wednesday, September 16th, 2020 AT 8:22 AM
Tiny
NASER NASER
  • MEMBER
  • 836 POSTS
Also checked on rear hydraulic pump on back right and no water damage there, fluid is full. Only thing I hear is if you hit the power switch for the top the module on the right side of passenger seat makes a sound once, until you turn ignition off and on then it does it again once. There is power not going to something somewhere, my main thing is getting power to the windows when I hit the switch.
Was this
answer
helpful?
Yes
No
Wednesday, September 16th, 2020 AT 1:50 PM
Tiny
JACOBANDNICKOLAS
  • MECHANIC
  • 108,125 POSTS
Naser,

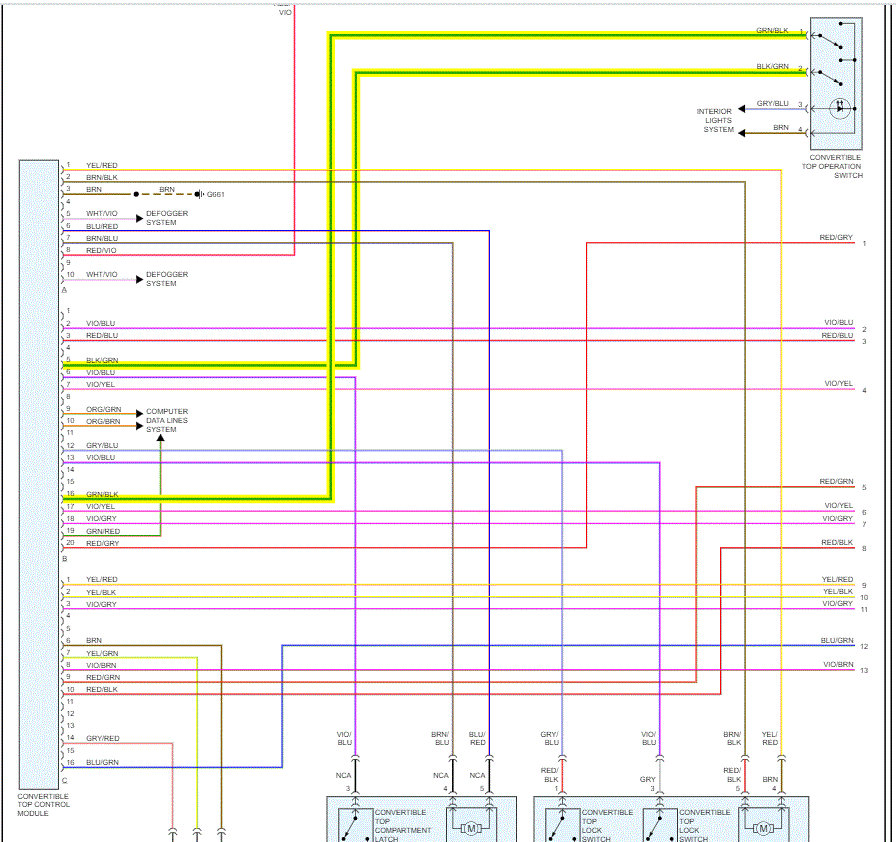
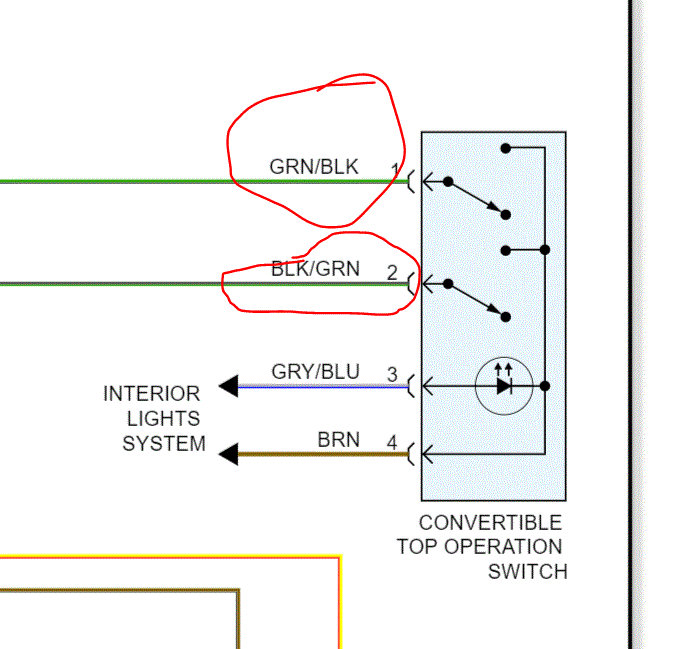
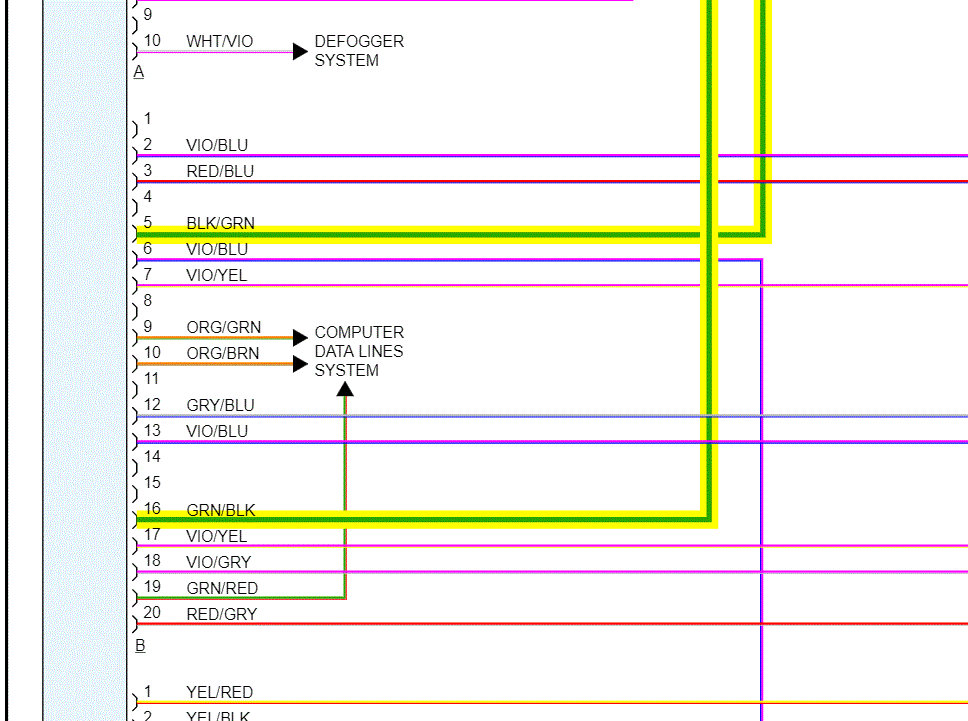
The power to the switch comes from the convertible top module. I attached a pic below showing it.

Have you tried scanning the can system to see if it shows a fault? As far as the windows, mine drop about eight inches before the top moves.

As far as power to the switch, I can't find specifics in the manual. If you can wait until tomorrow night, I can pull my switch and check to see if one is hot when the key is on. To be honest, it only would make sense. I attached a close up of the switch and one on the module where the wiring comes from. See if one of them has power at the module. Also, confirm continuity at the switch when it's disconnected. You should have it either way (up or down).

If you have the module exposed, see if there is power.

Let me know.

Joe
Was this
answer
helpful?
Yes
No
Wednesday, September 16th, 2020 AT 5:59 PM
Tiny
NASER NASER
  • MEMBER
  • 836 POSTS
That is helpful, will check. Thanks
Was this
answer
helpful?
Yes
No
Wednesday, September 16th, 2020 AT 6:22 PM
Tiny
JACOBANDNICKOLAS
  • MECHANIC
  • 108,125 POSTS
Naser, let me know if you need me to check mine. The only concern is mine is an 2005. I had the switch apart years ago, but I think it only had two wires. Regardless, I pull it if you need me to.

Take care,
Joe
Was this
answer
helpful?
Yes
No
Wednesday, September 16th, 2020 AT 6:27 PM
Tiny
NASER NASER
  • MEMBER
  • 836 POSTS
I think mine has more than 2, don't know if it matters. Let me check mine and let you know what I find first before getting into the trouble of pulling it. Thanks
Was this
answer
helpful?
Yes
No
Wednesday, September 16th, 2020 AT 6:30 PM
Tiny
NASER NASER
  • MEMBER
  • 836 POSTS
Even with the panel off it is pain to test the wires, the harness is so short, but on the first group of thick wires there is power on the reddish wire, the second middle set is the largest with 20 pins, can't find but one green/black no black green, there maybe a black, but no black/green. Same at the switch only green/black, no power at the switch at any of the wires, no power on the module green/black wire, whether attached or removed, ignition on or running, only power at the first wire.
Was this
answer
helpful?
Yes
No
Thursday, September 17th, 2020 AT 8:24 AM
Tiny
NASER NASER
  • MEMBER
  • 836 POSTS
Only makes this sound when turning ignition on.
Was this
answer
helpful?
Yes
No
Thursday, September 17th, 2020 AT 8:39 AM
Tiny
NASER NASER
  • MEMBER
  • 836 POSTS
No black/green.
Was this
answer
helpful?
Yes
No
Thursday, September 17th, 2020 AT 8:41 AM
Tiny
NASER NASER
  • MEMBER
  • 836 POSTS
Checked the black as it's the only other color I can think of on both sides and there is continuity, same for the green/black. So they are the one. No power whether connected or disconnected at the module, only the red wire has power. Delete the 2000 code about the switch and it comes back, but how does the computer know that? There is no power to it but am still hearing some click similar to the relay under the right side of dash. No power to it and still being picked up by the scanner, weird.
Was this
answer
helpful?
Yes
No
Thursday, September 17th, 2020 AT 9:10 AM

Please login or register to post a reply.

Sponsored links