Before you check the the wiring by the taillight, just for the whirl of it, check your brake switch on top of your brake pedal. It may be defective.
1. Ensure ignition is off. Disconnect brake switch connector. Brake switch is located near top of
brake pedal.
2. Turn ignition on with engine off. Using voltmeter, check voltage at terminal No. 1 (White/Red wire) on brake switch connector. If voltage is more than 9 volts, go to next step. If voltage is 9 volts or less, go to step 5 .
3. Ensure ignition is on with engine off. Connect jumper wire between terminals No. 1 (White/Red
wire) and No. 2 (Black/Light Green wire) on brake switch connector while using scan tool to monitor brake switch status. If brake switch status does not change from PRESSED to RELEASED, go to next step. If brake switch status changes from PRESSED to RELEASED, replace or adjust brake switch.
4. Turn ignition off. Using ohmmeter, check resistance between ground and terminal No. 2
(Black/Light Green wire) on brake switch connector. If resistance is less than 5 ohms, replace PCM. PCM is located at driver's side front corner of engine compartment, just below air cleaner assembly. If resistance is 5 ohms or more, repair open ground circuit on Black/Light Green wire between brake switch and terminal No. 12 on Body Control Module (BCM) connector C1, as BCM controls ground circuit for brake switch. BCM connector C1 is a Black 14-pin connector. The BCM is located on rear of junction block at driver's side of instrument panel. See Fig. 49 .
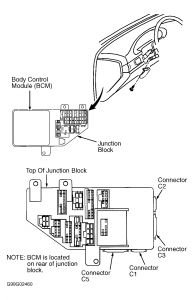
Fig. 49: Locating BCM & Identifying Connectors
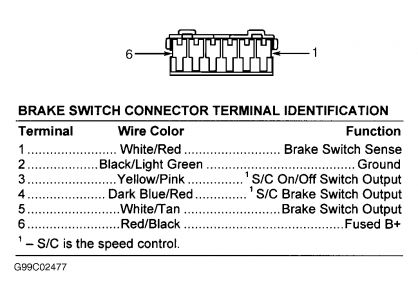
5. Ensure ignition is off and brake switch connector is still disconnected. Disconnect PCM connectors. PCM is located at driver's side front corner of engine compartment, just below air cleaner assembly.
6. Using ohmmeter, check resistance between terminal No. 1 (White/Red wire) on brake switch
connector and terminal No. 62 (White/Red wire) on PCM connector C2. If resistance is less than 5 ohms, go to next step. If resistance is 5 ohms or more, repair open on White/Red wire between PCM and brake switch.
7. Ensure brake switch connector is still disconnected. Using ohmmeter, check resistance between ground and terminal No. 62 (White/Red wire) on PCM connector C2. If resistance is 5 ohms or
more, go to next step. If resistance is less than 5 ohms, repair short to ground on White/Red wire
between PCM and brake switch.
8. Inspect brake switch connector and PCM connectors for corroded, pushed out, miswired or
damaged terminals. If terminals are not corroded, pushed out, miswired or damaged, replace PCM. If terminals are corroded, pushed out, miswired or damaged, repair connectors as necessary.
If there is nothing wrong with the brake switch, then you need to find the electrical short in the circuit.
Jan 22, 2009 at 8:31 PM