Glass replacement

Tiny
MKNIGHT1944
  • MEMBER
  • 1991 CHEVROLET S-10
  • 6 CYL
  • 2WD
  • AUTOMATIC
  • 158,000 MILES
How do I replace the passenger's side glass?
Monday, November 8th, 2010 AT 3:03 PM

4 Replies

Tiny
BLUELIGHTNIN6
  • MECHANIC
  • 16,542 POSTS
The door glass, or window, in a Chevrolet S-10 truck is supported and held in place by two tracks, a side track and a bottom track. Removing the window isn't difficult; in fact, the hardest part is removing the door panel. Once the panel is off, you can remove the window with ease.

Things You'll Need:

Gloves
Pliers
Phillips screwdriver
Window crank tool (optional)
Door-trim-panel tool
Socket wrench
Assistant (recommended)

Removing the Door Panel

Lower the window three-quarters of the way down. This will help you access the bottom portion of the door glass when you are removing it.

Disconnect the negative battery cable. The negative battery cable is black and usually marked with a "-" symbol. Use the pliers to unhook it before removing the door panel.

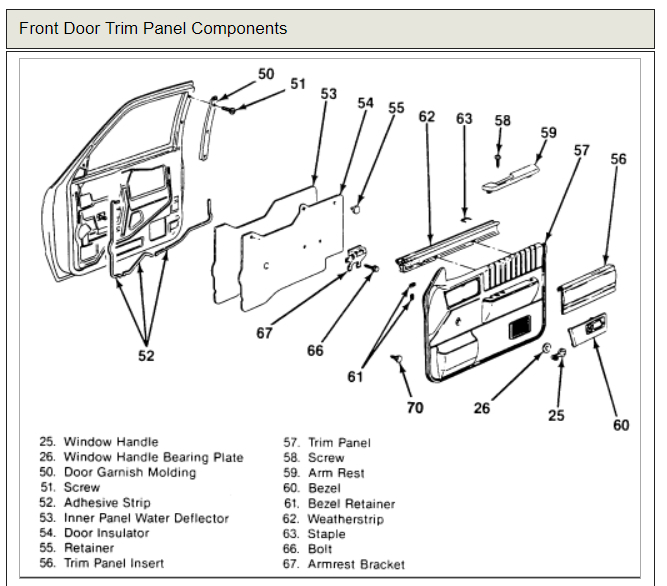
Remove the screw from the interior door handle. Pull the handle open to access the screw and remove it with the Phillips screwdriver. Slide the door-handle-surround panel away from the door panel.

Remove the power window panel or manual window crank. To remove the power window panel, pull the panel up and unhook the connections from behind it. If your S-10 has manual windows, insert the window crank tool between the crank and the door panel to release the clip, then pull off the crank.

Remove the screw from the arm rest. The arm-rest storage compartment has a single Phillips screw.

Remove the door panel clips. The S-10 door panel is attached to the door by seven clips, three on each side and one along the bottom. Insert the door-trim-panel tool between the metal part of the door and the panel until you touch the clip. Push the tool back to release the clip.

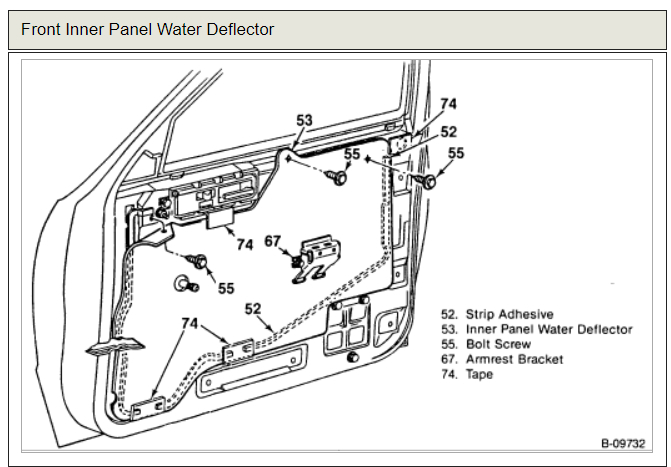
Remove the door panel. Push up the door panel several inches to unhook the door lock rod, then pull the panel away and set it aside. Peel back the plastic water deflector.

Removing the Window

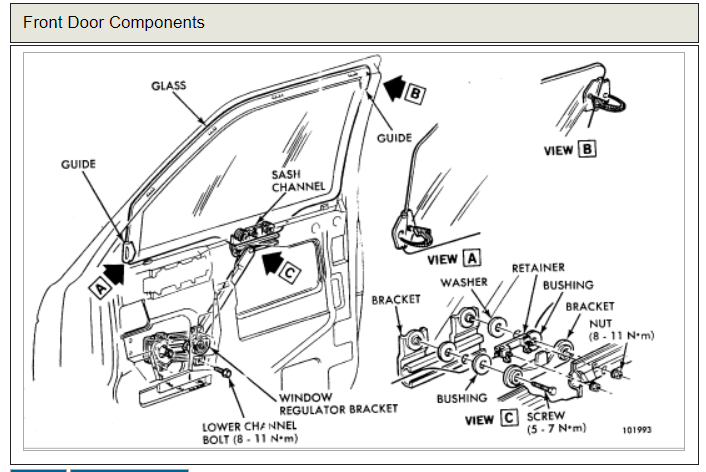
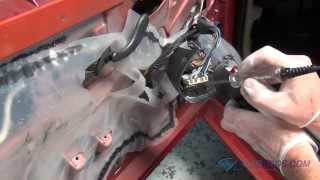
Remove the two 10 mm bolts that secure the front glass run channel (toward the front). Slide the run channel from the door glass.

Push the window toward the front part of the door panel to release the window from the sash-panel roller.

Slide the window back to release the front part of the window from the sash-panel roller. The window is now completely released from the roller.

Grasp the window firmly on each side. Make sure you have a good grip. Lift it up and away from the door. Set it aside carefully. Ask someone to help you, if possible.
Was this
answer
helpful?
Yes
No
+2
Monday, November 8th, 2010 AT 5:08 PM
Tiny
ELDONCOOPER
  • MEMBER
  • 1 POST
  • 1989 CHEVROLET S-10
4 cyl Two Wheel Drive Manual

What is the best technique for installing a new passenger side window glass that has been broken out?
Was this
answer
helpful?
Yes
No
Wednesday, July 24th, 2019 AT 6:40 PM (Merged)
Tiny
KEN L
  • MASTER CERTIFIED MECHANIC
  • 42,833 POSTS
Hello,

You will need to remove the door panel first. this guide will give you an idea of what to do:

https://www.2carpros.com/articles/door-panel-removal

This guide will show you how to get the door glass out:

https://www.2carpros.com/articles/how-to-check-and-replace-a-electric-power-window-motor

The water deflector is secured by a strip of adhesive between the deflector and door, as well as waterproof sealing tape. Upon installation, make sure a good seal is achieved to keep water from entering into the body. If necessary, use strip caulking as a sealant between the deflector and door.

Lower the window until it and the sash channel can be seen in the door panel opening, then remove the sash assembly-to-window bolts. Remove the sash assembly and the window from the door.

On some late model vehicles it may be necessary to remove the sash assembly, then cut the clips from the glass in order to remove the glass from the door. If this is done, new clips must be installed on the glass before it is lowered into the door and rotated into the run channel.

Check out the diagrams (Below) on how tot do the job on your car

Please let us know if you need anything else to get the problem fixed.

Cheers, Ken
Was this
answer
helpful?
Yes
No
Wednesday, July 24th, 2019 AT 6:40 PM (Merged)
Tiny
MICHAEL352
  • MEMBER
  • 1 POST
These are instructions for 83 to 94 s10 Blazer and Pickups. There are none in the shop manuals, Mitchel, or Alldata.

There are two phillips screws in the door handle coming down from the top. Remove them and slide the door handle rearward to lift it out. Now starting at the bottom of the door take a screwdriver and pick a spot between the door panel and the inner door to put pressure on. Where ever the panel won’t come away from the inner door is where the lock buttons are. Insert the panel button removal tool where the panel is tight and pry to pull the button. Repeat all across the bottom and up the sides. There is one last button behind the plastic by the mirror. When you get it loose, wiggle and lift the panel up and away from the window.

Now lower the window about 1/3 of the way down till you see the two 10mm bolts going through the glass and the regulator channel. Wedge either a wood or plastic wedge in between the inner door metal and glass to hold the glass in place. Remove the bolts, regulator channel, and plastic mount from the bottom of the glass.

Now let the window go to the bottom of the channel. Rotate the window from the back towards the front (counter clockwise rotation) and when the window clears the channel lift it out of the door.

To reinstall reverse the removal procedure. Insert window in door and rotate counter clockwise into both channels. You should now be able to raise the window by hand, in the channel, and put a wood wedge to pinch the window so it won’t fall. Now you can put the regulator bracket bolts, plastic and guide in place and secure.

When you put the bolts and regulator guide on the window make sure your plastic, the regulator guide, and bolts are all lined up through the window. Use blue loctite to hold the bolts. Snug the bolts enough to hold the window. Do not overtighten or you could break the glass. The loctite will hold the bolts. There isn’t any torque spec that I could find. I tightened mine with a 1/4" nut driver with 10mm socket. Not as tight as I could get it just snug. Be sure the regulator lever is installed in the regulator channel before you snug the bolts. Now remove your wedges, hook up you window switch and power the window up and down to make sure it moves freely.

If all is good install your inner panel, inserting the top edge in first and down far enough so your panel buttons line up with the holes they are supposed to go in. Work your way around the door starting at the sides and gently push the door panel in a little at a time. When all buttons are started go around and press them in till the panel is tight against the inner metal. You are done!

You can also use this procedure for replacing the channel rubber. There are two screws in the back section of the channel and one in the front. Remove them, pull the channel out, take the guide out of your old channel and install in the new. Put in channel and secure with the 3 screws.
Was this
answer
helpful?
Yes
No
Saturday, March 14th, 2020 AT 5:02 PM

Please login or register to post a reply.

Sponsored links