2.0L (VIN 1) and 2.2L (VIN 4 & G) Engines
Disconnect the negative battery cable at the battery.
Raise and safely support the vehicle.
For vehicles equipped with a manual transaxle, remove the bending brace from around the starter.
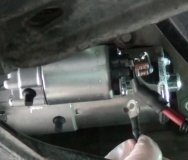
Unfasten the starter motor-to-engine bolts, then carefully lower the starter. Remember, the leads are still attached to the starter.
Remove the nuts/bolts that hold the starter bracket to the starter and engine.
Detach the electrical leads, then remove the starter from the vehicle.
To install:
Raise the starter into position, then connect the electrical leads. Tighten the "S" terminal to 22 inch lbs. (2.5 Nm) and the battery terminal to 106 inch lbs. (12 Nm).
Secure the starter using the retaining bolts. Tighten to 32 ft. Lbs. (43 Nm). Install the nuts/bolts that hold the start bracket to the starter and the engine. Tighten the bracket-to-engine bolt to 24 ft. Lbs. (32 Nm) and the brace-to-starter motor nut to 106 inch lbs. (12 Nm).
If equipped with a manual transaxle, install the bending brace.
Carefully lower the vehicle, then connect the negative battery cable.
2.8L (VIN W) and 3.1L (VIN T) Engines
On 3.1L engines, an "Idle Learn" procedure must be performed which requires the use of a scan tool. You may wish to have the starter replaced at a proper service facility.
Disconnect the negative battery cable at the battery.
Raise and safely support the vehicle.
Remove the starter motor-to-engine bolts, then carefully lower the vehicle.
Detach the starter electrical leads, then remove the starter from the vehicle.
To install:
Position the starter in the vehicle, then connect the electrical leads.
Raise and safely support the vehicle, then install the starter-to-engine bolts and tighten to 32 ft. Lbs. (43 Nm).
Carefully lower the vehicle.
Connect the negative battery cable. Tighten the cable to 11 ft. Lbs. (15 Nm). Be careful not to over-tighten.
On 3.1L engines, this test must be done before the engine is started and requires the use of a Tech 1� or equivalent scan tool.
If equipped with the 3.1L engine, perform the idle learn procedure to allow the ECM/PCM memory to be updated with the correct IAC valve pintle position and provide for a stable idle speed.
Install a suitable scan tool.
Turn the ignition to the ON position, engine not running.
Select IAC SYSTEM, then IDLE LEARN in the MISC TEST mode.
Place the transaxle in park or neutral, as applicable.
Proceed with idle learn as directed by the scan tool.
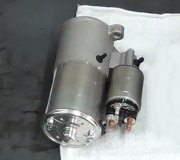
SOLENOID REPLACEMENT
Most vehicles covered by this information are equipped with replaceable solenoids. In all cases, the starter must first be removed from the vehicle for access.
Remove the starter and place it on a workbench.
If equipped, remove the heat shield.
Detach the field strap/lead from the solenoid.
Unfasten the solenoid-to-drive housing attaching screws, motor terminal bolt, and clamp (if equipped) then remove the solenoid by twisting.
To install:
Twist or place the solenoid in position.
Secure the solenoid using the retaining clamp, bolt and/or screws, as applicable.
Connect the field strap/lead to the solenoid.
Install the starter into the vehicle, as outlined earlier.
Thursday, February 28th, 2008 AT 11:30 AM