Hello -
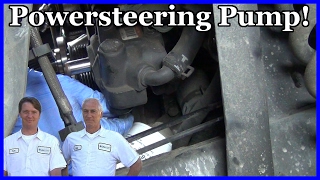
I have attached how to remove the pump. Yes, it is tight and not easy.
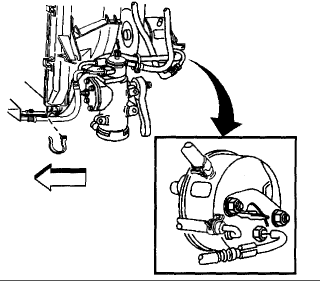
Power Steering Pump Replacement
Removal Procedure

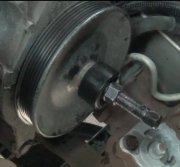
Remove the power steering pump pulley.
Place a drain pan under the vehicle. Important: Cap or plug the ends of the power steering hoses to prevent fluid loss.
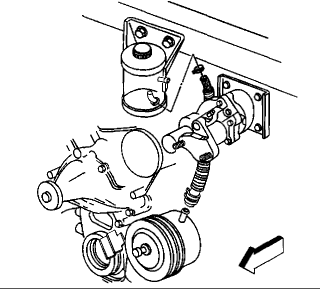
Disconnect the power brake booster inlet hose from the power brake booster.

Disconnect the power steering cooler hose from the power steering pump.
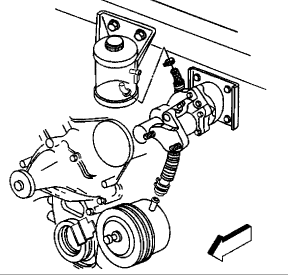
Disconnect the power steering pump remote reservoir hose from the power steering pump.

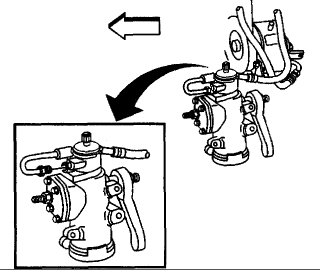
Raise and support the vehicle. Refer to Vehicle Lifting.
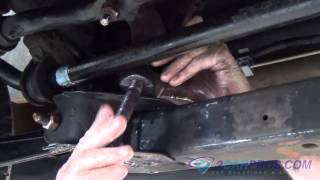
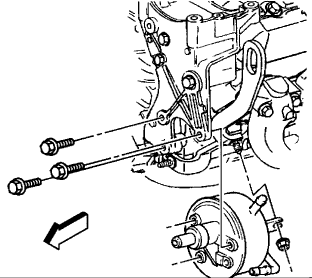
Remove the power steering pump rear mounting bracket nut.
Lower the vehicle.
Loosen the accessory bracket bolts and nut. Pull the accessory bracket forward.
Remove the power steering pump mounting bolts.
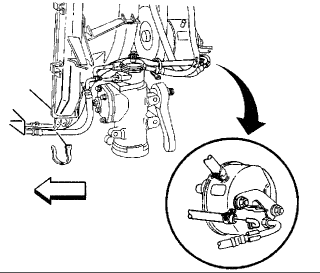
Remove the power steering pump and the power brake booster inlet hose from the vehicle.
Remove the power brake booster inlet hose from the power steering pump.
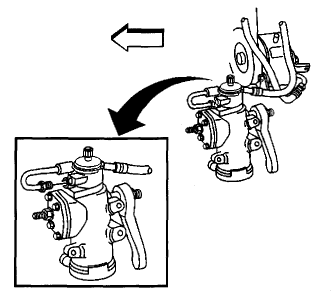
Installation Procedure
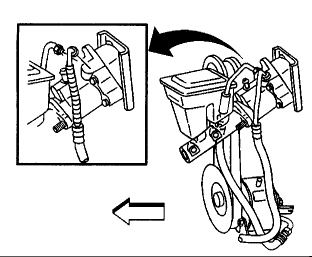
Install the power brake booster inlet hose to the power steering pump.
Install the power steering pump and the power brake booster inlet hose to the vehicle. Notice: Refer to Fastener Notice in Service Precautions.
Install the power steering pump mounting bolts.
Tighten the power steering pump mounting bolts to 50 Nm (37 ft. lbs.) .
Reposition the accessory mounting bracket and tighten the bolts and nut.
Tighten the accessory mounting bracket bolts to 50 Nm (37 ft. lbs.) .
Tighten the accessory mounting bracket nut to 41 Nm (30 ft. lbs.) .
Raise the vehicle. Refer to Vehicle Lifting.
Install the power steering pump rear mounting bracket nut.
Tighten the power steering pump rear mounting bracket nut to 41 Nm (30 ft. lbs.) .
Lower the vehicle.
Uncap the ends of the power steering hoses.
Connect the power steering pump remote reservoir hose to the power steering pump.
Connect the power steering cooler hose to the power steering pump.

Connect the power brake booster inlet hose to the power brake booster.
Tighten the power brake booster inlet hose to the power brake booster to 27 Nm (20 ft. lbs.) .
Remove the drain pan from under the vehicle.
Install the power steering pump pulley.
Bleed the power steering system.
Inspect the power steering pump for leaks and the hoses for proper clearance from the frame and from other components.
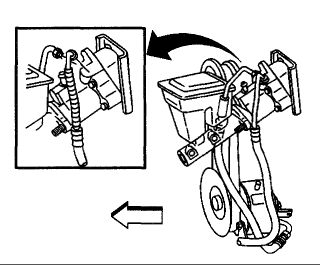
Power Brake Booster Inlet Hose Replacement
Power Brake Booster Inlet Hose Replacement
Removal Procedure

Raise and support the vehicle. Refer to Vehicle Lifting.
Disconnect the hydraulic brake booster inlet hose from the of the power steering pump.
Lower the vehicle.

Disconnect the hydraulic brake booster inlet hose from the hydraulic brake booster.
Remove the hydraulic brake booster inlet hose from vehicle.
Installation Procedure
Notice: Do not start the engine with any power steering hose disconnected, or damage to the components could occur.
Install the hydraulic brake booster inlet hose to vehicle.
Connect the hydraulic brake booster inlet hose to the hydraulic brake booster.
Raise the vehicle. Refer to Vehicle Lifting.
Notice: Refer to Fastener Notice in Service Precautions.
Connect the hydraulic brake booster inlet hose to the power steering pump.
Tighten the hydraulic brake booster inlet hose to the power steering pump to 27 Nm (20 ft. lbs.) .
Bleed the system.
Power Brake Booster Outlet Hose Replacement
Removal Procedure
Important: Note the position of all the tie-straps, power steering hoses and the hose insulators for proper re-installation.
Remove the power brake booster outlet hose tie-straps.
Place a drain pan under the vehicle.
Disconnect the power steering cooler hose from the power steering gear.
Disconnect the hydraulic brake booster outlet hose from the steering gear.
Disconnect the hydraulic brake booster outlet hose from the hydraulic brake booster.

Remove the hydraulic brake booster outlet hose from the vehicle.
Installation Procedure
Notice: Do not start the engine with any power steering hose disconnected, or damage to the components could occur.
Install the hydraulic brake booster outlet hose to the vehicle. Notice: Refer to Fastener Notice in Service Precautions.
Connect the hydraulic brake booster outlet hose to the hydraulic brake booster.
Tighten the hydraulic brake booster outlet hose to the hydraulic brake booster to 27 Nm (20 ft. lbs.) .
Connect the hydraulic brake booster outlet hose to the power steering gear.
Tighten the hydraulic brake booster outlet hose to the power steering gear to 27 Nm (20 ft. lbs.) .
Remove the drain pan.
Install the hydraulic brake booster outlet hose tie straps.
Bleed the system.
Bleeding the Power Steering System
Tools Required
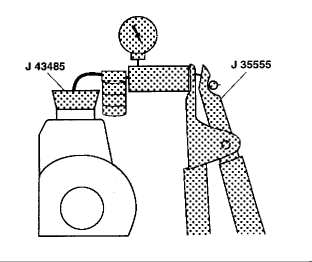
J 35555 Metal Mity vac
J 43485 Power Steering Bleeder Adapter
Important: Hoses touching the frame, body, or engine may cause system noise.

Verify that the hoses do not touch any other part of the vehicle. Important: Loose connections may not leak, but could allow air into the steering system.
Verify that all hose connections are tight. Notice: If the power steering system has been serviced, an accurate fluid level reading cannot be obtained unless air is bled from the steering system. The air in the fluid may cause pump cavitation noise and may cause pump damage over a period of time. Important: Maintain the fluid level throughout the bleed procedure.
Remove the pump reservoir cap. Important: Use clean, new power steering fluid only.
Fill the pump reservoir with fluid to the FULL COLD level.

Attach the J 43485 to the J 35555 or equivalent.
Place the J 43485 on or in the pump reservoir filler neck.
Apply a vacuum of 68 kPa (20 in Hg) maximum.
Wait 5 minutes. Typical vacuum drop is 7 - 10 kPa (2 - 3 in Hg) . If the vacuum does not remain steady, refer to Excessive Vacuum Drop Diagnosis.
Remove the J 43485 and the J 35555.
Reinstall the pump reservoir cap.
Start the engine. Allow the engine to idle.
Turn off the engine.
Verify the fluid level. Repeat steps 11-13 until the fluid stabilizes. Important: Do not turn steering wheel to lock.
Start the engine. Allow the engine to idle.
Turn the steering wheel 180-360 degrees in both directions 5 times.
Switch the ignition off. Notice: When adding fluid or making a complete fluid change, always use the proper power steering fluid. Failure to use the proper fluid will cause hose and seal damage and fluid leaks.
Verify the fluid level.
Remove the pump reservoir cap.
Attach the J 43485 to the J 35555 or equivalent.
Place the J 43485 on or in the pump reservoir filler neck.
Apply a vacuum of 68 kPa (20 in Hg) maximum.
Wait 5 minutes.
Remove the J 43485 and the J 35555.
Verify the fluid level.
Reinstall the pump reservoir cap.
Excessive Vacuum Drop Diagnosis

If the vacuum continues to drop, remove the pressure and return hose from the pump.
Install the plugs (1,2) supplied with the J 43485 into the pressure and return port.

Attach the J 43485 to the J 35555 or equivalent.
Place the J 43485 on or in the pump reservoir filler neck.
Apply a vacuum of 68 kPa (20 in Hg) maximum.
If the vacuum drops again, repair or replace the pump. If the vacuum holds steady, continue to check the other parts of the steering system. Important: Fluid must be free from bubbles and foam. Be aware of periodic bubbles that indicate a loose connection or leaking O-ring seal in the return hose or the pressure hose. Fluid must be free from discoloration.
Observe the fluid.
If condition persists, replace the following parts:
The return hose clamps
The return hose O-rings
The pressure hose O-rings
The gear cylinder line O-rings
The reservoir to pump O-ring
Repeat the bleed procedure from the beginning.
Drive the vehicle approximately 16 km (10 mi) in order to warm the system to operating temperature. Evaluate vehicle on a smooth flat surface.
Verify the following conditions:
There is smooth power assist.
The vehicle operates quietly.
The pump maintains the proper fluid level.
There is not any leaking in the steering system.
The fluid is free of foam or discoloration.
Monday, November 10th, 2008 AT 4:44 PM