Check engine soon light

Tiny
SUMTINGWONG
  • MEMBER
  • 1999 PLYMOUTH VOYAGER
  • 6 CYL
  • 2WD
  • 175 MILES
I pulled code PO403. I changed out both the solenoid an EGR valve twice. Tried to clear the codes with a computer cannot clear the check engine light.

Not sure where to go from her.
Thursday, August 24th, 2017 AT 12:56 AM

9 Replies

Tiny
STEVE W.
  • MECHANIC
  • 12,963 POSTS
P0403 is a problem with the EGR control circuit. That usually means a broken wire or grounded out wiring in the control side of the EGR system. I would start at the valve and follow the wiring harness, look for loose connection pins, broken or scraped wires or wires that got hot.

Do you have access to a scan tool that can control the EGR system?
Which engine do you have in it? 3.0, 3.3 or 3.8? Different locations and wiring for each.
Was this
answer
helpful?
Yes
No
Thursday, August 24th, 2017 AT 2:26 AM
Tiny
SUMTINGWONG
  • MEMBER
  • 7 POSTS
The scan tool, not sure if it can control EGR.
I go to Autozone to check and clear codes.
I did check for power at the plug and was getting a signal.

Engine is 3.0.
Was this
answer
helpful?
Yes
No
Thursday, August 24th, 2017 AT 5:01 AM
Tiny
STEVE W.
  • MECHANIC
  • 12,963 POSTS
Yeah the Autozone tools just read codes they do not have bi-directional controls.
For that you need a better tool.
The control side is ground switched through the ECM, so having power to the pieces is good but you need to test the ECM's ability to control the EGR's position and verify that it is actually working. For that you need a better scan tool that can control it.

Here is a mechanical way to verify the EGR is operational:

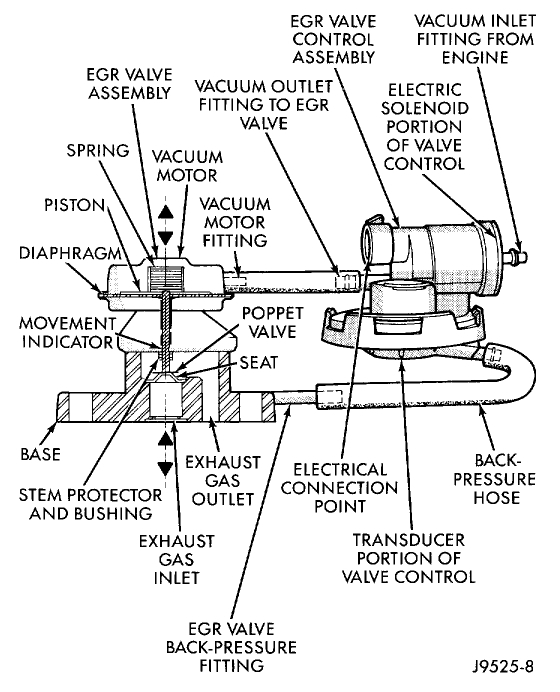
Disconnect the rubber back-pressure hose from the fitting at the bottom of EGR valve.
Connect a hand-held vacuum pump to this fitting.
Apply ten inches of vacuum to this fitting.
If vacuum falls off, the valve diaphragm is leaking.
Replace the Complete EGR valve assembly. Proceed to next step for further testing

Reconnect hose to EGR valve.
Remove the vacuum supply hose at the vacuum inlet fitting on the EGR solenoid.
Connect a vacuum gauge to this disconnected vacuum line.
Start the engine and bring to operating temperature. Hold engine speed at approximately 1500 rpm.
Check for steady engine vacuum full-manifold. At this hose.
If engine vacuum full-manifold. Is not present, check vacuum line to engine and repair as necessary before proceeding to next step.

Reconnect the rubber hose to the vacuum inlet fitting on the EGR valve.
Disconnect the rubber hose at the vacuum outlet fitting on the EGR valve.
Connect a vacuum gauge to this fitting.
Disconnect the electrical connector at the valve control. This will simulate an open circuit no ground from the PCM. At the valve, activating the valve. A DTC will be set in the PCM that must be erased after testing is complete.
Start the engine and bring to operating temperature.
Hold the engine speed to approximately 2000 rpm while checking for engine vacuum (full-manifold) at this fitting. To allow full manifold vacuum to flow through the valve, exhaust back-pressure must be present at valve. It must be high enough to hold the bleed valve in the transducer portion of the valve closed. Have a helper momentarily a second or two. Hold a rag over the tailpipe opening to build some exhaust back-pressure while observing the vacuum gauge. Heavy gloves should be worn. Do not cover the tailpipe opening for an extended period of time as damage to components or overheating may result.
As temporary back-pressure is built, full manifold vacuum should be observed at the vacuum outlet fitting. Without back-pressure, and engine at approximately 2000 rpm, the gauge reading will be low. This low reading is normal. At idle speed, the gauge reading may be erratic. This is also normal.
If full manifold vacuum is not present at the outlet fitting, but was present at the inlet fitting, replace the valve.
Was this
answer
helpful?
Yes
No
Thursday, August 24th, 2017 AT 11:04 AM
Tiny
SUMTINGWONG
  • MEMBER
  • 7 POSTS
This is great I was looking for a way to troubleshoot this problem.
Thanks!

Sumtingwong
Was this
answer
helpful?
Yes
No
Thursday, August 24th, 2017 AT 2:02 PM
Tiny
KEN L
  • MASTER CERTIFIED MECHANIC
  • 42,883 POSTS
Yes Steve is one of our best guys!

Let us know what happens.

Cheers, Ken
Was this
answer
helpful?
Yes
No
Friday, August 25th, 2017 AT 12:20 PM
Tiny
STEVE W.
  • MECHANIC
  • 12,963 POSTS
Go through that and keep us informed please. EGR can be a bear to deal with sometimes.
Was this
answer
helpful?
Yes
No
Friday, August 25th, 2017 AT 9:15 PM
Tiny
SUMTINGWONG
  • MEMBER
  • 7 POSTS
I am a little confused. You instructed me to remove the rubber hose off the back pressure fitting at the bottom of the EGR valve and connect my vacuum pump to that. Should the vehicle be running? I did this without the car running and couldn't get a reading at all. I also checked the EGR valve with the vacuum pump I was able to get a good reading with no drop in pressure.
Was this
answer
helpful?
Yes
No
Saturday, August 26th, 2017 AT 6:46 PM
Tiny
SUMTINGWONG
  • MEMBER
  • 7 POSTS
I was wondering if you meant a Vacuum pressure gage at the back pressure fitting?
Was this
answer
helpful?
Yes
No
Saturday, August 26th, 2017 AT 6:50 PM
Tiny
STEVE W.
  • MECHANIC
  • 12,963 POSTS
The pump is used to test the EGR valves diaphragm for leakage. If you put it on the valve, engine off, create 10in of vacuum and it holds steady the EGRs diaphragm is good.
The gauge is then used to verify engine vacuum is present with the engine running.
Was this
answer
helpful?
Yes
No
Sunday, August 27th, 2017 AT 10:12 AM

Please login or register to post a reply.

Sponsored links