Don't run the engine anymore until you confirm timing. This is an interference engine and internal damage can result if the timing is off. Let me know what color the smoke was. Here are the directions specific to your vehicle. The attached pics correlate with the directions.
_____________________________
1998 Infiniti Truck QX4 V6-3275cc 3.3L SOHC MFI (VG33E)
Procedures
Vehicle Engine, Cooling and Exhaust Engine Timing Components Timing Belt Service and Repair Procedures
PROCEDURES
Caution: Incorrect removal or installation of the timing belt can result in damage to internal engine components.
Pic 1
CAUTION:
- Do not bend or twist timing belt.
- After removing timing belt, do not turn crankshaft and camshaft separately because valves will strike piston heads.
- Make sure that timing belt, camshaft sprocket, crankshaft sprocket and belt tensioner are clean and free from oil and water.
- Installation should be carried out when engine is cold.
REMOVAL
1. Remove engine under cover.
2. Drain engine coolant from radiator.
Be careful not to spill coolant on drive belts.
3. Remove radiator.
4. Remove engine cooling fan and water pump pulley.
5. Remove the following belts.
- Power steering pump drive belt
- Compressor drive belt
- Alternator drive belt
6. Remove all spark plugs.
7. Remove distributor protector.
8. Remove compressor drive belt idler bracket.
9. Remove fresh-air intake tube for rocker cover.
10. Remove water hose for thermostat housing.
pic 2
pic 3
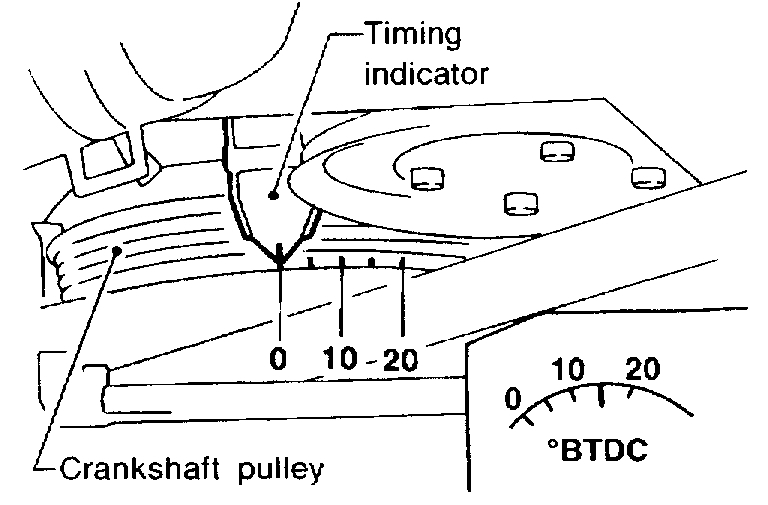
11. Set No. 1 piston at TDC on its compression stroke by rotating crankshaft.
12. Remove crankshaft pulley bolt.
13. Remove crankshaft pulley with a suitable puller.
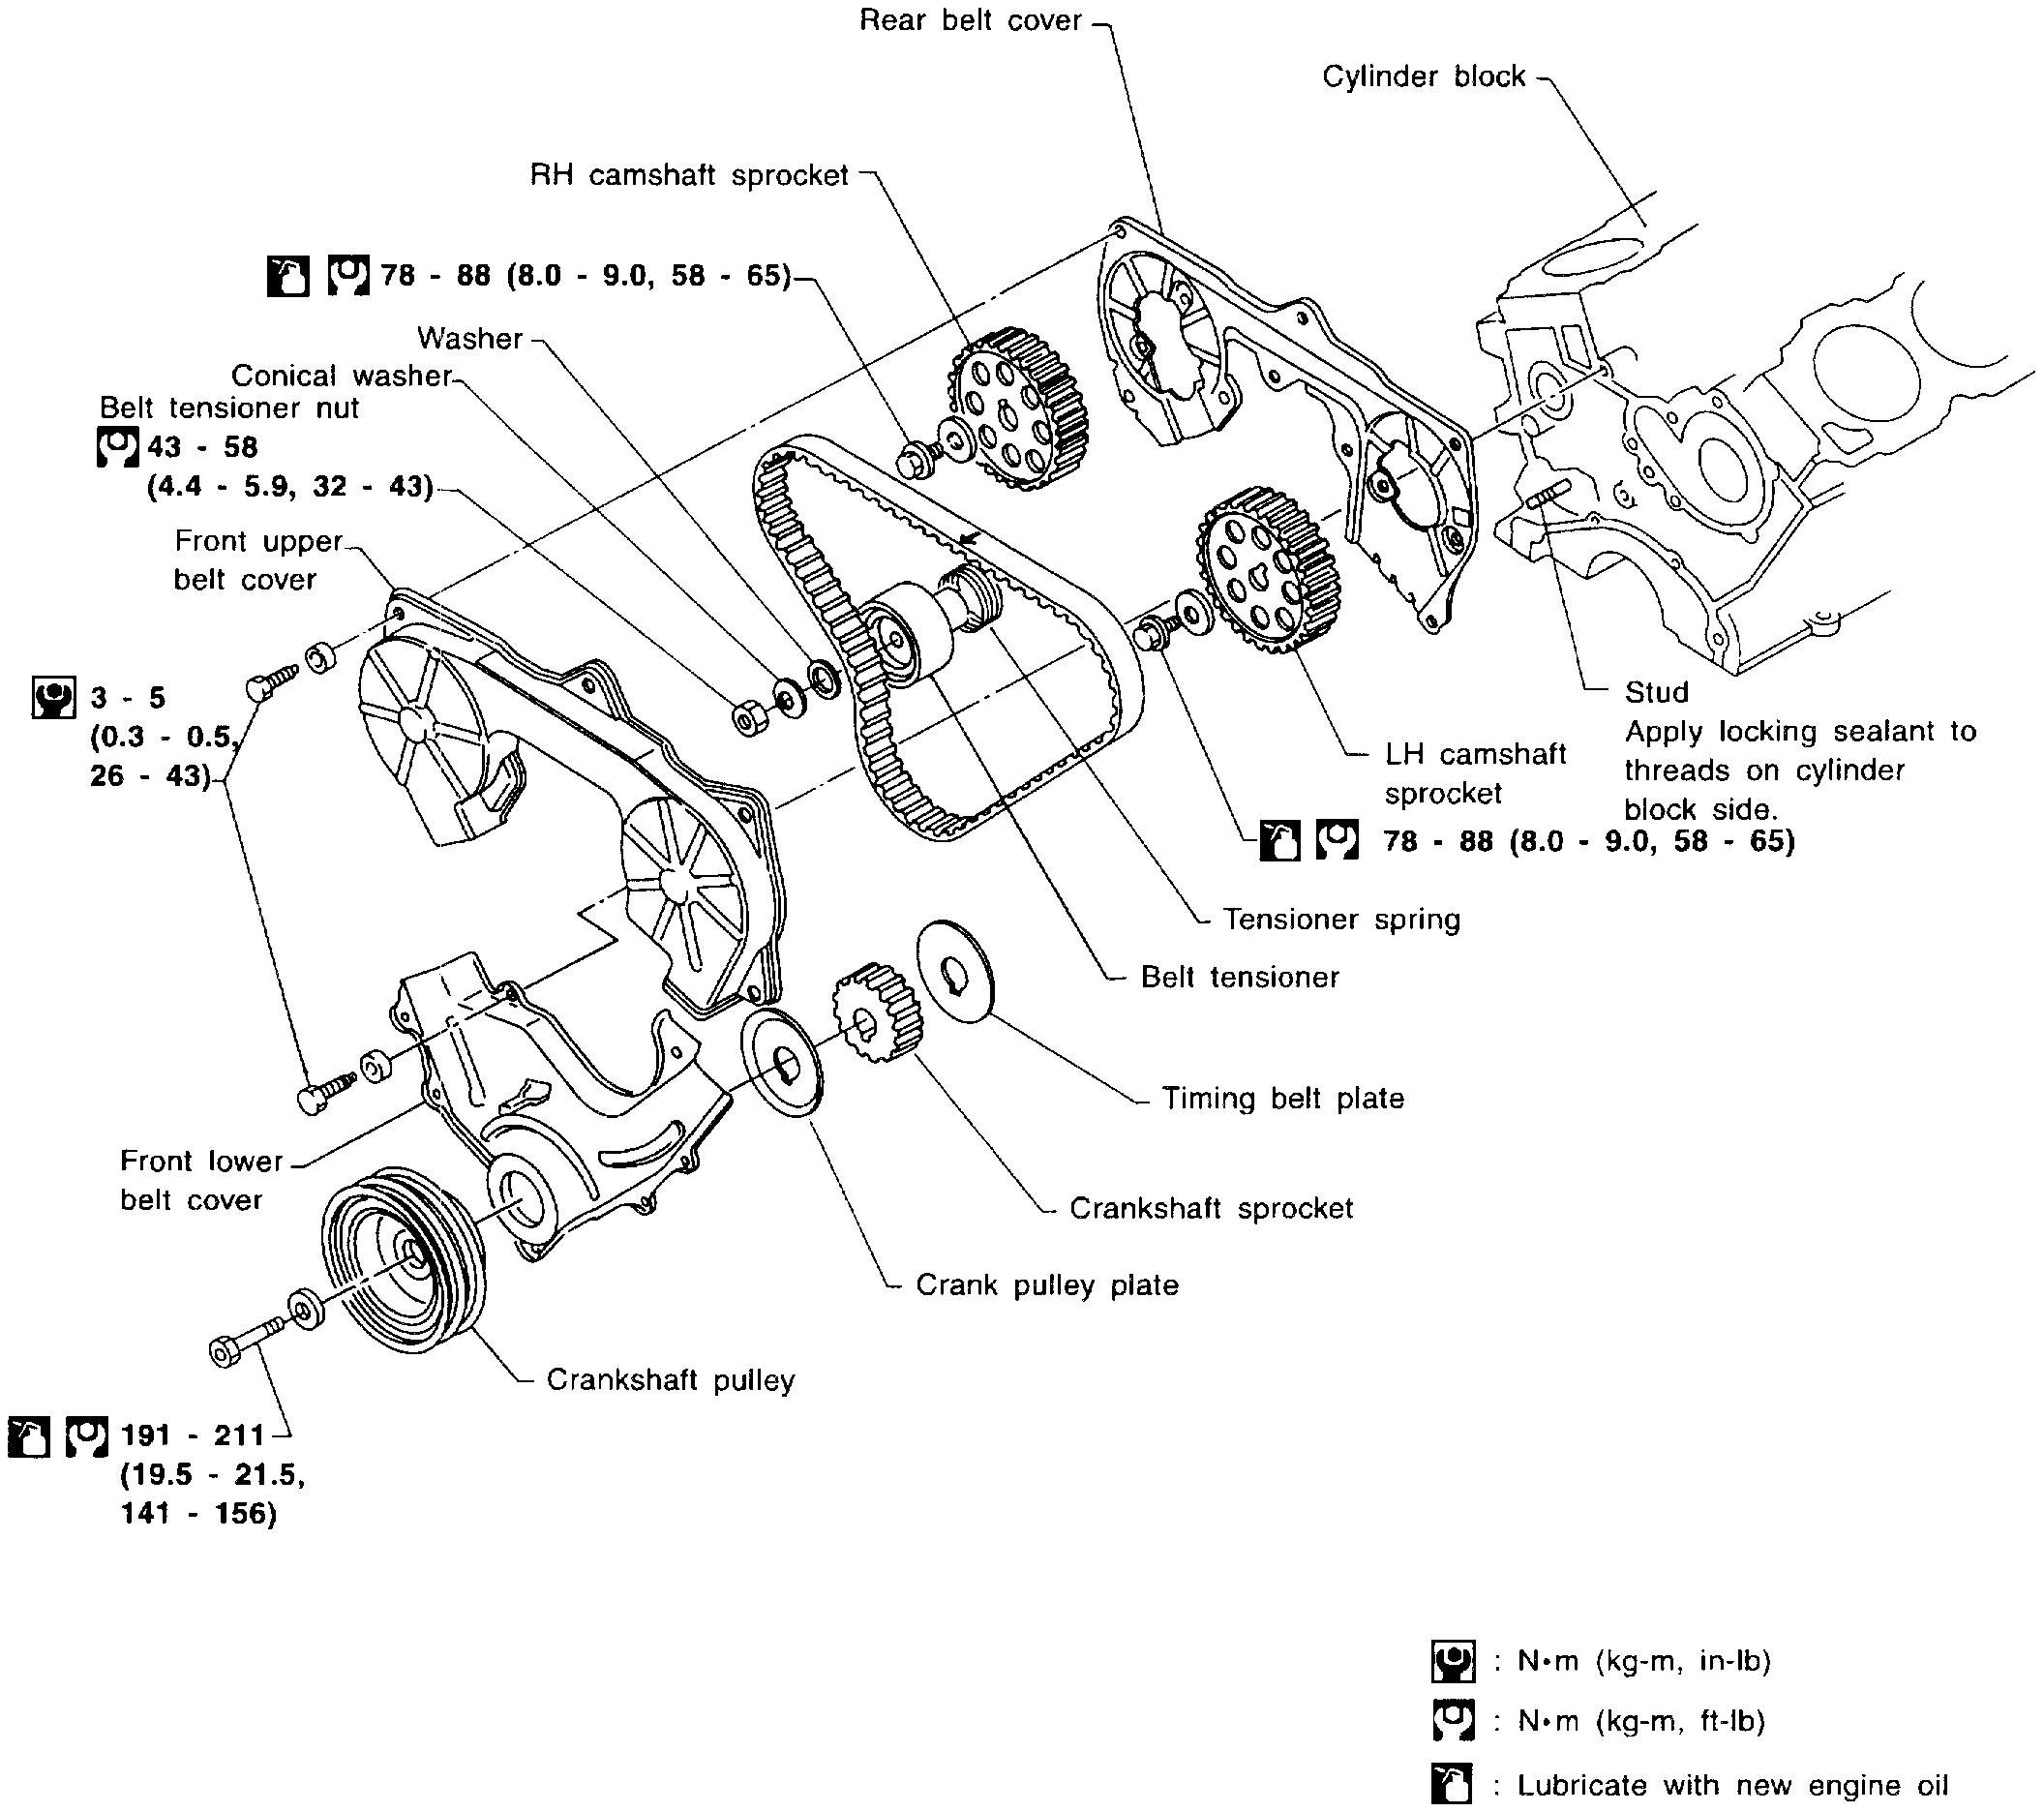
14. Remove front upper and lower belt covers.
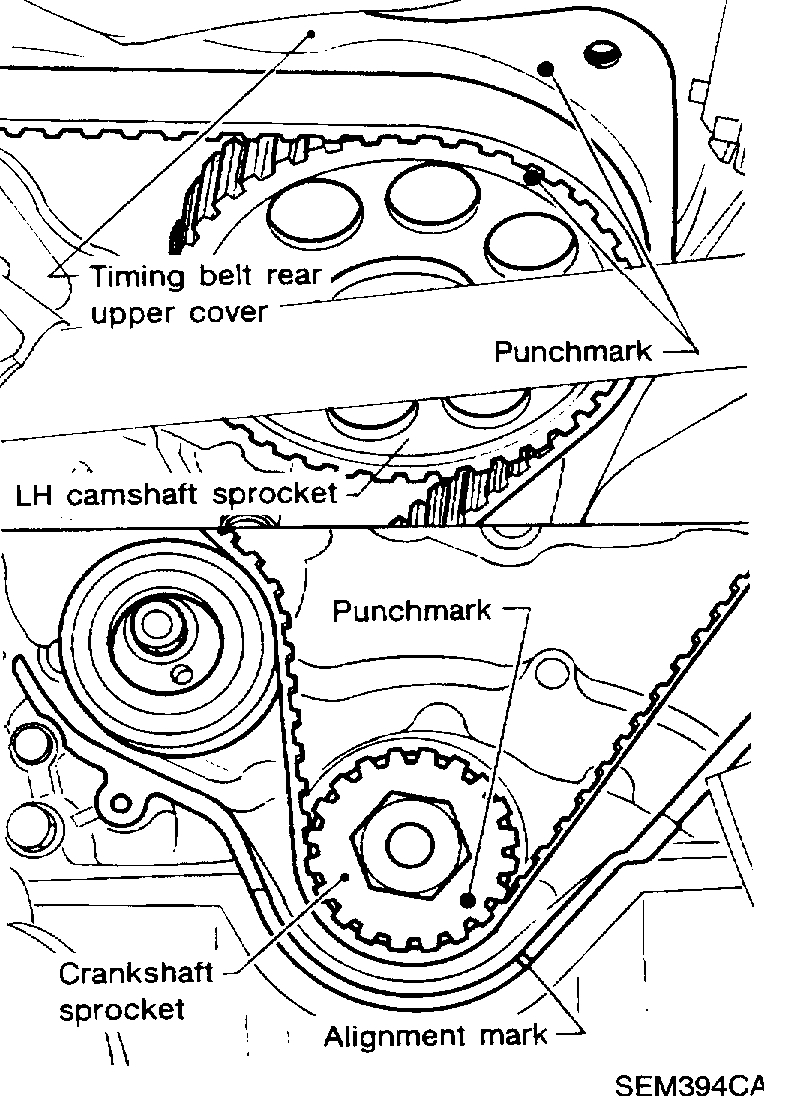
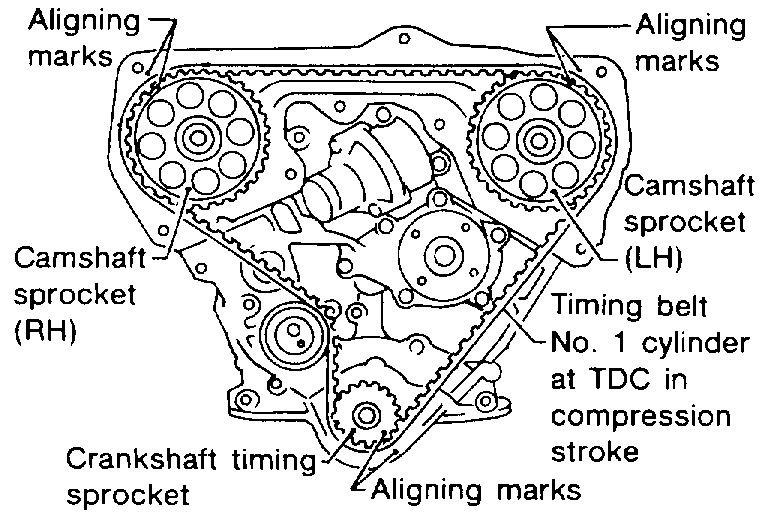
- Align punch-mark on LH camshaft sprocket with punch-mark on timing belt upper rear cover.
- Align punch-mark on crankshaft sprocket with notch on oil pump housing.
- Temporarily install crank pulley bolt on crankshaft so that crankshaft can be rotated.
pic 4
15. Loosen timing belt tensioner nut, turn tensioner, then remove timing belt.
INSPECTION
pic 5
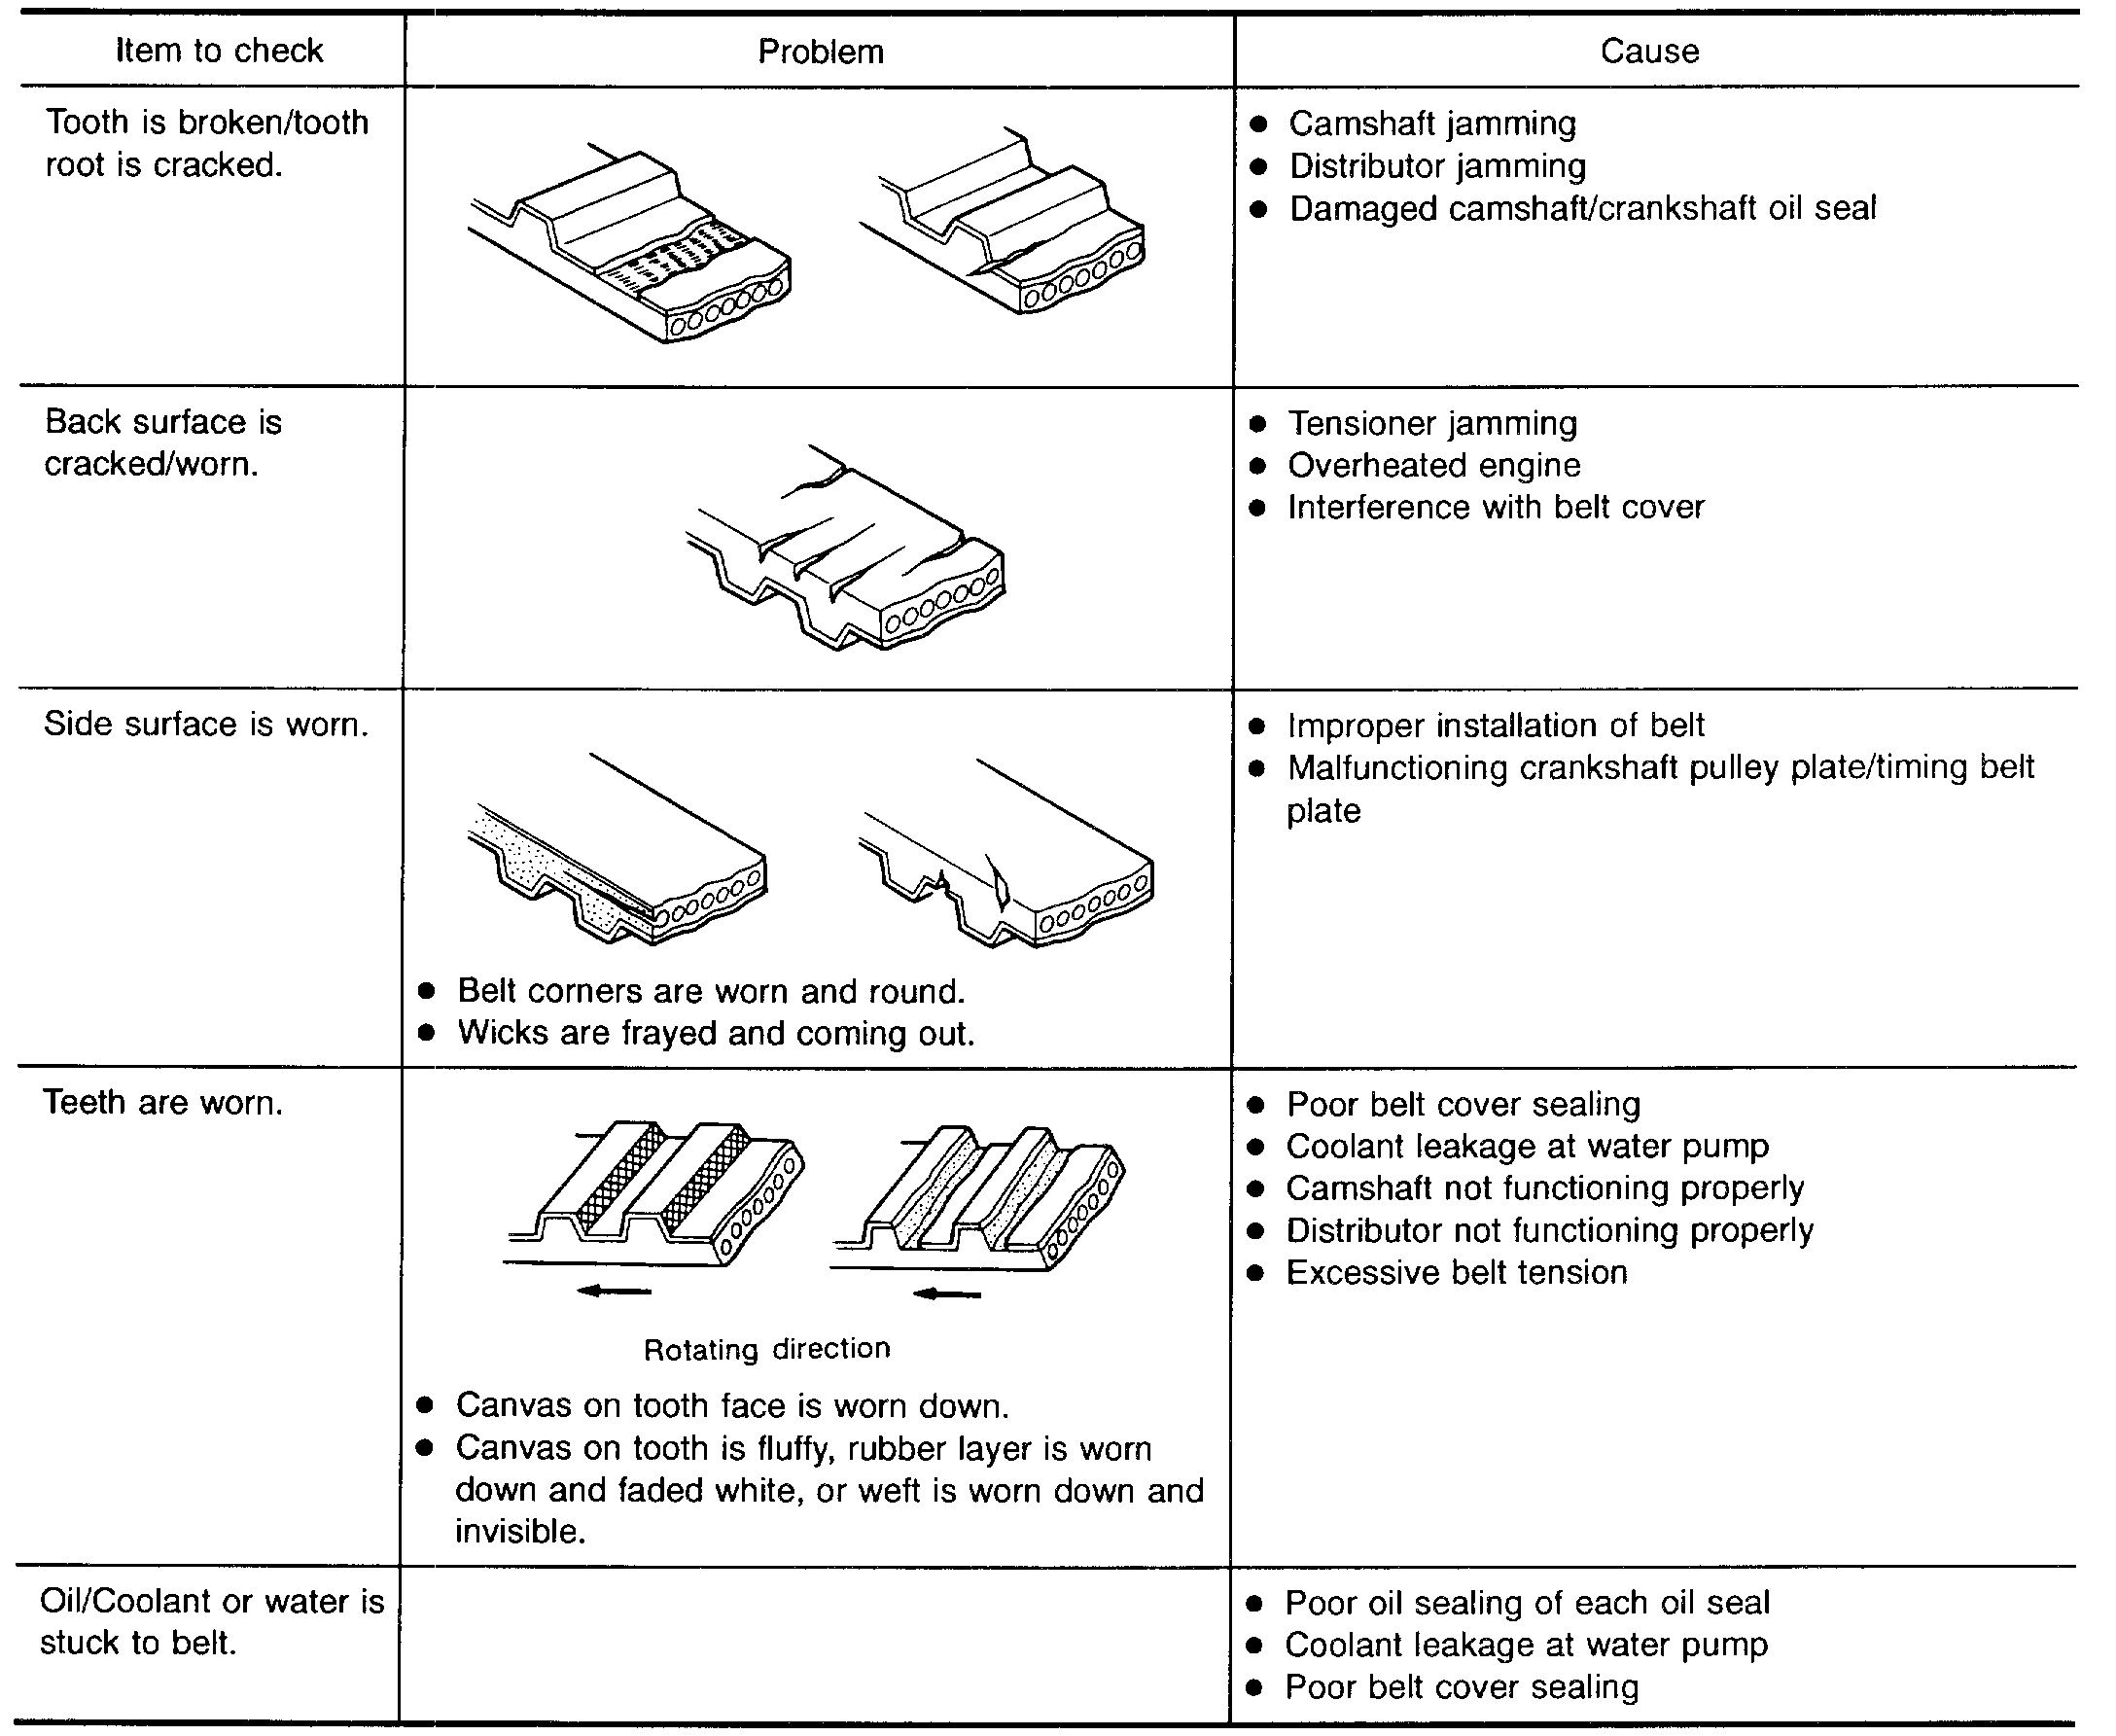
Visually check the condition of timing belt. Replace if any abnormality is found.
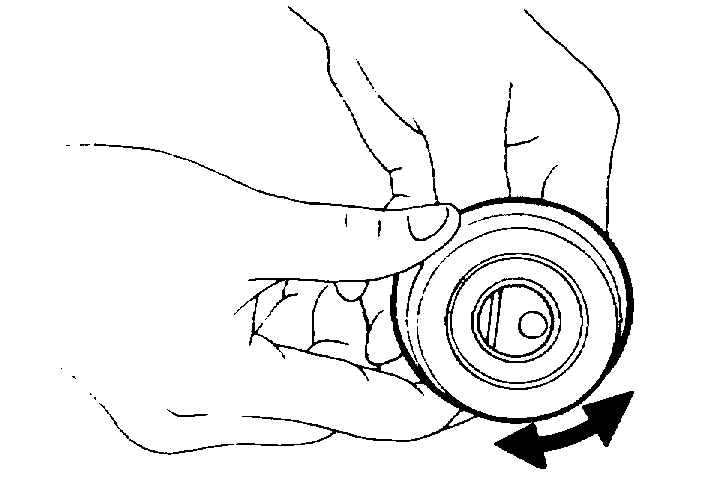
BELT TENSIONER AND TENSIONER SPRING
pic 6
1. Check belt tensioner for smooth turning.
2. Check condition of tensioner spring.
INSTALLATION
pic 7
1. Confirm that No. 1 piston is set at TDC on its compression stroke.
pic 8
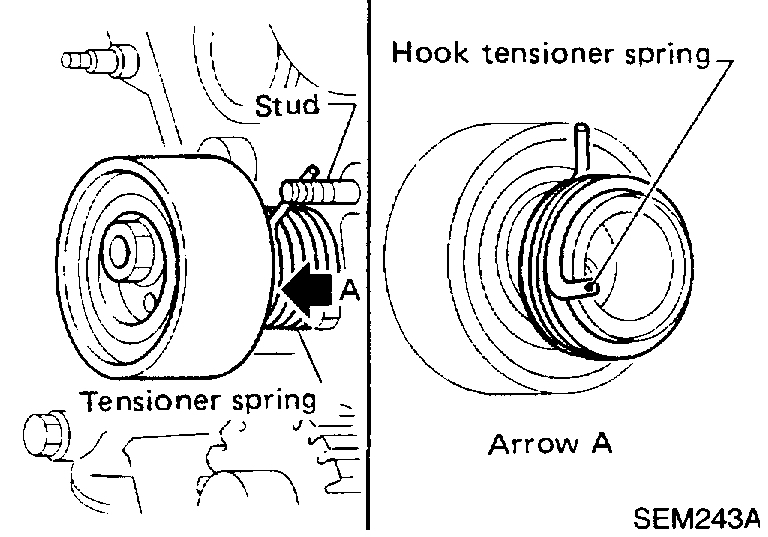
2. Install tensioner and tensioner spring.
If stud is once removed, apply locking sealant to threads of stud on cylinder block side before installing.
pic 9
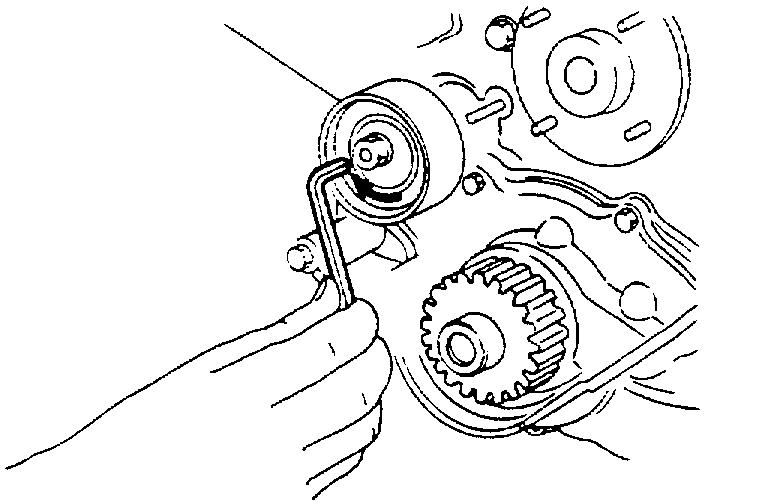
3. Turn tensioner fully outward with hexagon wrench, and temporarily tighten lock nut.
pic 10
pic 11
4. Set timing belt when engine is cold.
1. Align white lines on timing belt with punch-marks on camshaft sprockets and crankshaft sprocket.
2. Point arrow on timing belt toward front belt cover.
pic 12
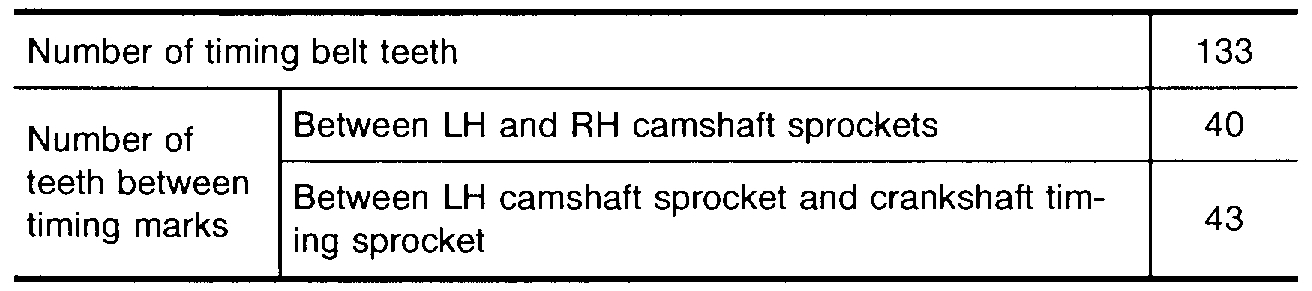
5. Loosen tensioner lock nut, keeping tensioner steady with hexagon wrench.
6. Turn tensioner 70 to 80 degrees clockwise with hexagon wrench, and temporarily tighten lock nut.
7. Turn crankshaft clockwise at least 2 times, then slowly set No. 1 piston at TDC on its compression stroke.
pic 13
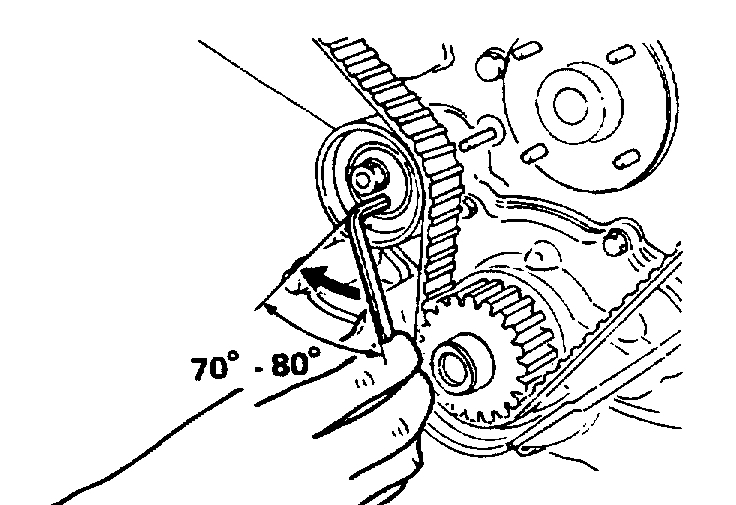
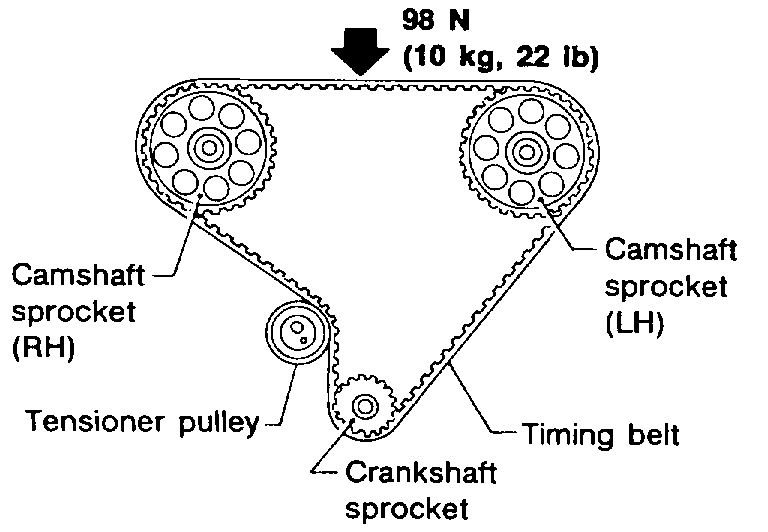
8. Push middle of timing belt between RH camshaft sprocket and tensioner pulley with force of 98 N (10 kg, 22 lb).
9. Loosen tensioner lock nut, keeping tensioner steady with hexagon wrench.
pic 14
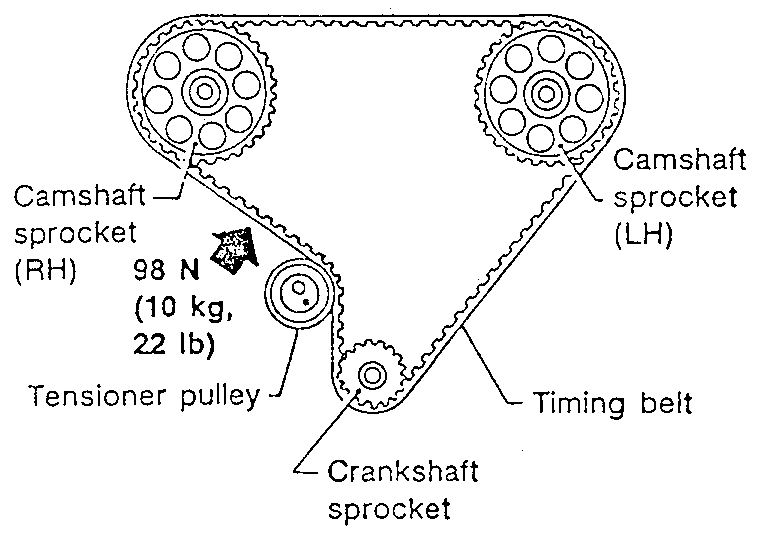
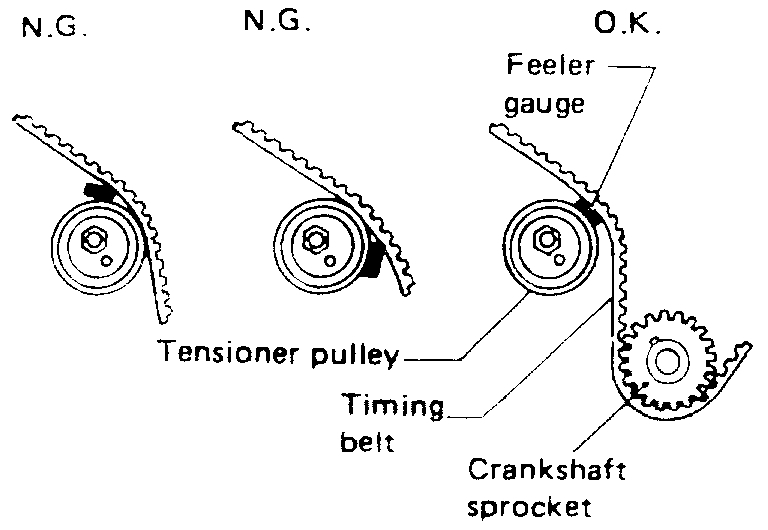
10. Set feeler gauge as shown in image which is 0.35 mm (0.0138 inch) thick and 12.7 mm (0.500 inch) wide.
pic 15
11. Turn crankshaft clockwise until feeler gauge is positioned as shown in image.
- Timing belt will move about 2.5 teeth.
12. Tighten tensioner lock nut, keeping tensioner steady with hexagon wrench.
13. Turn crankshaft clockwise or counterclockwise, and remove feeler gauge.
14. Turn crankshaft clockwise at least 2 times, then slowly set No.1 piston at TDC on its compression stroke.
15. Install lower and upper belt covers.
BELT TENSION CHECK
pic 16
1. Set No. 1 piston at TDC on its compression stroke.
pic 17
2. Measure deflection of timing belt midway between camshaft E pulleys while pushing with 98 N (10 kg, 22 lb) force.
Belt deflection when engine is cold (Reference value): 13 - 15 mm (0.51 - 0.59 inch)/98 N (10 kg, 22 lb)
___________________________________
Let me know what you find. I hope damage wasn't done to the valves. I am concerned because you said about the noise. Make sure the belt is in good condition and properly tightened. You don't want it to jump time.
Let me know.
Joe
Images (Click to enlarge)
Dec 5, 2019 at 8:52 PM