Hi,
Front brake pads and rotors really aren't too hard to do. If you do it yourself, make sure to purchase lifetime parts so you'll never have to pay for the parts again.
You can expect brake pads to last approximately 25,000 miles. However, that can change based on terrain and driving habits.
To start, here is a link that shows in general how it's done. You can use this as a guide:
https://youtu.be/SD9-MLW6Yts
and
https://www.2carpros.com/articles/how-to-replace-front-brake-pads-and-rotors-fwd
Here are the directions specific to your vehicle. The pics below correlate with the directions.
REMOVAL
NOTE: Before proceeding, (Refer to 05 - Brakes - Warning) (Refer to 05 - Brakes - Caution) .
1. Raise and support the vehicle. (Refer to 04 - Vehicle Quick Reference/Hoisting - Standard Procedure)
NOTE: Perform Step #2 through Step #5 on each side of the vehicle to complete pad set removal.
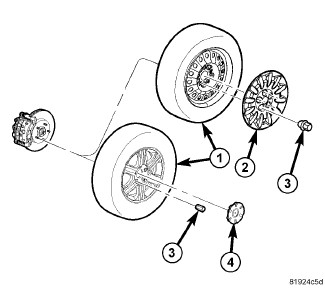
2. Remove the wheel mounting nuts (3), then the tire and wheel assembly (1).
CAUTION: When removing or installing a caliper guide pin bolt, it is necessary to hold the guide pin stationary while turning the bolt. Hold the guide pin stationary using a wrench placed upon the pin's hex-shaped head.
3. Remove the two brake caliper guide pin bolts (2, 3).
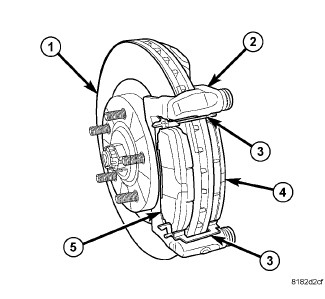
4. Remove the disc brake caliper (4) from the disc brake adapter bracket (1) and hang it out of the way using wire or a bungee cord. Use care not to overextend the brake hose when doing this.
5. Remove the brake pads (4, 5) from the caliper adapter bracket (2).
INSTALLATION
NOTE: Perform Step #1 through Step #5 on each side of the vehicle to complete pad set installation, then proceed to Step #6.
NOTE: Make sure the pads with the audible wear indicator (if equipped) are installed in the inboard location on each side of the vehicle.
NOTE: If the brake pads have a protective paper on the rear face of the brake pad plate, it must be removed before pad installation.
1. Place the brake pads (4, 5) in the abutment shims (3) clipped into the disc brake caliper adapter bracket (2) as shown. Place the pad with the wear indicator (if equipped) attached on the inboard side (2).
2. Completely retract the caliper piston back into the bore of the caliper.
CAUTION: Use care when installing the caliper (4) onto the adapter bracket (1) to avoid damaging the boots.
3. Install the disc brake caliper over the brake pads on the brake caliper adapter bracket.
CAUTION: When removing or installing a caliper guide pin bolt, it is necessary to hold the guide pin stationary while turning the bolt. Hold the guide pin stationary using a wrench placed upon the pin's hex-shaped head.
4. Align the caliper guide pin bolt holes with the adapter bracket. Install the upper (2) and lower (3) caliper guide pin bolts. Tighten the guide pin bolts to 35 N·m (26 ft. lbs.).
5. Install tire and wheel assembly (1) (Refer to 22 - Tires and Wheels - Installation) . Install and tighten wheel mounting nuts (3) to 135 N·m (100 ft. lbs.).
6. Lower the vehicle.
7. Pump the brake pedal several times before moving the vehicle to set the pads to the brake rotor.
8. Check and adjust the brake fluid level in the reservoir as necessary.
9. Road test the vehicle and make several stops to wear off any foreign material on the brakes and to seat the brake pads.
Brake Rotor Replacement
NOTE: Before proceeding, (Refer to 05 - Brakes - Warning) (Refer to 05 - Brakes - Caution) .
1. Raise and support the vehicle. (Refer to 04 - Vehicle Quick Reference/Hoisting - Standard Procedure)
2. Remove the wheel mounting nuts (3), then the tire and wheel assembly (1).
NOTE: In some cases, it may be necessary to retract the caliper piston in its bore a small amount in order to provide sufficient clearance between the pads and the rotor to easily remove the caliper from the knuckle. This can usually be accomplished before the guide pin bolts are removed, by grasping the inboard side of the caliper and pulling outward working with the guide pins, thus retracting the piston. Never push on the piston directly as it may get damaged.
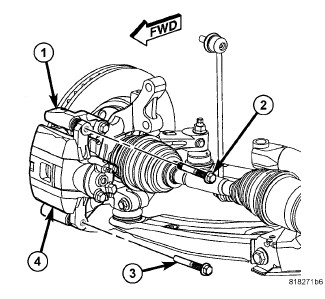
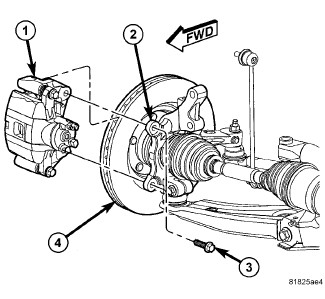
3. Remove the two bolts (3) securing disc brake caliper and adapter bracket (1) to the steering knuckle (2).
4. Remove the disc brake caliper and adapter bracket (1) from the knuckle (2) and rotor (4) as an assembly. Hang the assembly out of the way using wire or a bungee cord. Use care not to overextend the brake hose when doing this.
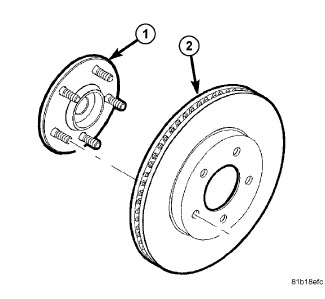
5. Remove any clips retaining the brake rotor to the wheel mounting studs.
6. Slide the brake rotor (2) off the hub and bearing (1).
Check out the diagrams (Below). Please let us know what happens.
Images (Click to enlarge)
Mar 31, 2021 at 10:05 AM