Good morning,
Yes, it is normal for movement without the wheel mounted.
Yes, you need a torque wrench to tighten the bolts to be sure they are secured properly.
You also need it for your wheels or you could end up warping a new rotor.
Roy
^ Use the same procedures for the LH side and RH side.
^ The procedures listed are for the LH side.
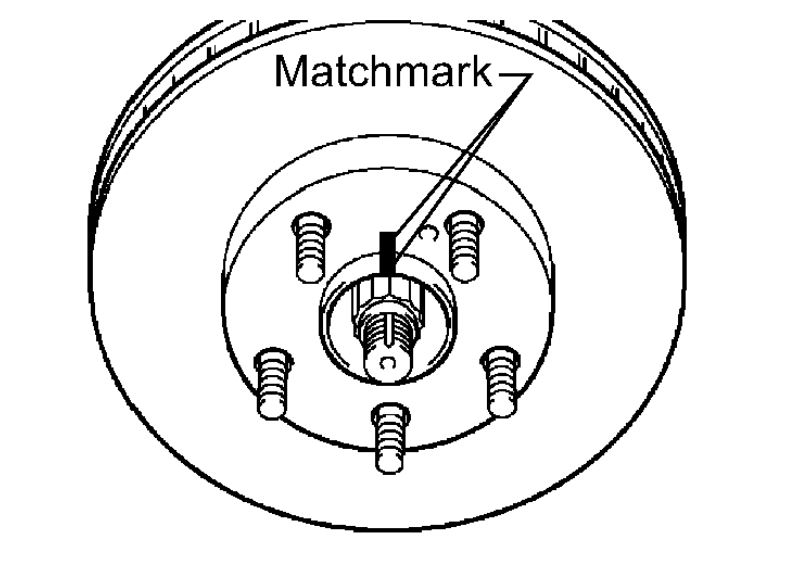
1. INSTALL FRONT DISC
a) Align the matchmarks and install the disc.
HINT: When replacing the disc with a new one, select the installation position where the disc has the minimum runout.
imageOpen In New TabZoom/Print
2. CHECK DISC RUNOUT
a) Check the bearing play in the axle direction and check the axle hub runout.
b) Temporarily install the disc to the hub with the 2 hub nuts.
c) Using a dial indicator, measure the disc runout 10 mm (0.3 inch) away from the outer edge of the disc.
Minimum disc runout: 0.05 mm (0.0020 inch)
If the runout is greater than the maximum, change the installation position of the disc and axle so that the runout will become minimal.
If the runout is greater than the maximum even when the installation positions are changed, grind the disc.
If the disc thickness is less than the minimum, replace the disc.
d) Remove the 2 hub nuts.
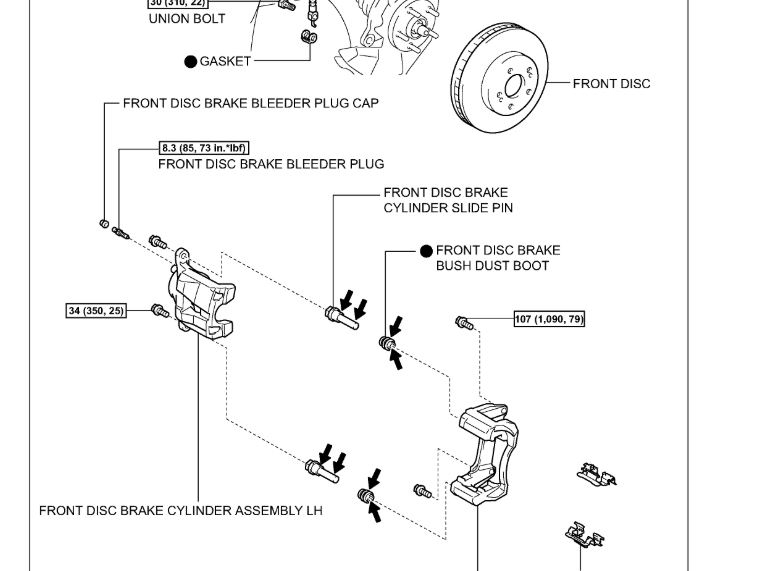
3. INSTALL FRONT DISC BRAKE CYLINDER MOUNTING LH
a) Install the cylinder mounting with the 2 bolts.
Torque: 107 Nm (1,090 kgf-cm, 79 ft. lbs.)
imageOpen In New TabZoom/Print
4. INSTALL FRONT DISC BRAKE BUSH DUST BOOT
a) Apply lithium soap base glycol grease to the seal surface of 2 new dust boots.
b) Install the dust boots to the cylinder mounting.
imageOpen In New TabZoom/Print
5. INSTALL FRONT DISC BRAKE CYLINDER SLIDE PIN
a) Apply lithium soap base glycol grease to the sliding part and the seal surface of the 2 cylinder slide pins.
b) Install the 2 cylinder slide pins to the cylinder mounting.
6. INSTALL FRONT DISC BRAKE PAD SUPPORT PLATE
a) Install the support plate (No. 1 and No. 2) to the cylinder mounting.
imageOpen In New TabZoom/Print
7. INSTALL FRONT ANTI SQUEAL SHIM
a) Apply disc brake grease to the both side of the shims (inner).
b) Install the shims (inner and outer) to each pad.
NOTICE:
^ When replacing worn pads, the shims must be replaced together with the pads.
^ Install the shims in the correct positions and direction.
c) Install the pad wear indicator plate to the pad (inner).
NOTICE: Install the pad wear indicator plate in the correct position and direction.
8. INSTALL FRONT DISC BRAKE PAD
a) Install the 2 pads to the cylinder mounting.
NOTICE: There should be no oil or grease on the friction surface of the pads and disc.
9. INSTALL FRONT DISC BRAKE CYLINDER ASSEMBLY LH
a) Install the brake cylinder with the 2 bolts.
Torque: 34 Nm (350 kgf-cm, 25 ft. lbs.)
b) Connect the flexible hose with the union bolt and a new gasket.
Torque: 30 Nm (310 kgf-cm, 22 ft. lbs.)
NOTICE: Connect the flexible hose lock securely in the lock hole in the brake cylinder.
10. FILL RESERVOIR WITH BRAKE FLUID
11. BLEED AIR FROM BRAKE MASTER CYLINDER
12. BLEED AIR FROM BRAKE LINE
13. CHECK BRAKE FLUID LEVEL IN RESERVOIR
14. CHECK FOR BRAKE FLUID LEAKAGE
15. INSTALL FRONT WHEEL LH
Torque: 103 Nm (1,050 kgf-cm, 76 ft. lbs.)
Images (Click to enlarge)
Apr 28, 2019 at 6:20 AM