Good afternoon,
This could either be the pedal assembly itself or the power brake booster not allowing the brake pedal to return to the rest position.
I would disconnect the pedal from the booster rod and make sure the pedal is free and moves easily.
If it does, then I would replace the brake booster.
If it does not, then the pedal assembly is the issue.
Roy
Pedal
Brake and Accelerator Pedal Assembly Replacement
Removal Procedure
1. Remove the instrument panel tie bar. Refer to Instrument Panel Tie Bar Replacement See: Dashboard / Instrument Panel > Removal and Replacement > Instrument Panel Tie Bar Replacement
2. Disconnect the accelerator pedal position sensor electrical connector.
3. Remove the brake pedal position sensor. Refer to Brake Pedal Position Sensor Replacement See: Pedal Positioning Sensor > Removal and Replacement > Brake Pedal Position Sensor Replacement
imageOpen In New TabZoom/Print
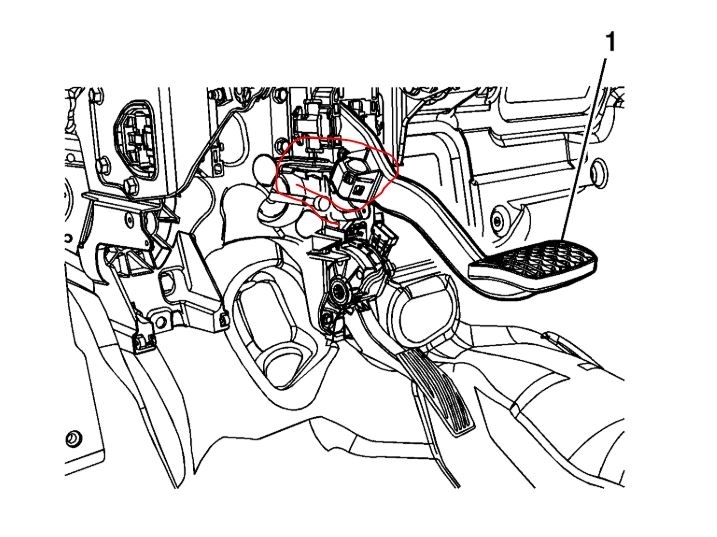
4. Pull the brake pedal (1) rearward to release the power vacuum brake booster pushrod retainer.
Note:
Do not reuse the power vacuum brake booster pushrod retainer.
5. Remove and discard the power vacuum brake booster pushrod retainer.
6. Remove the power vacuum brake booster. Refer to Power Vacuum Brake Booster Replacement See: Vacuum Brake Booster > Removal and Replacement > Power Vacuum Brake Booster Replacement
imageOpen In New TabZoom/Print
7. Remove the brake pedal assembly nuts (1).
8. Remove the brake pedal assembly.
Installation Procedure
1. Install the brake pedal assembly.
imageOpen In New TabZoom/Print
Caution:
Refer to Fastener Caution See: Vehicle > Technician Safety Information > Fastener Caution
2. Install the brake pedal assembly nuts (1) and tighten to 22 Nm (16 lb ft).
3. Install the power vacuum brake booster. Refer to Power Vacuum Brake Booster Replacement See: Vacuum Brake Booster > Removal and Replacement > Power Vacuum Brake Booster Replacement
imageOpen In New TabZoom/Print
Note:
Install a new power vacuum brake booster pushrod retainer.
4. Install a new power vacuum brake booster pushrod retainer to the power vacuum brake booster pushrod.
Note:
Ensure the power vacuum brake booster pushrod retainer is fully seated in the brake pedal arm.
5. Install the power vacuum brake booster pushrod retainer to the brake pedal (1).
6. Install the brake pedal position sensor. Refer to Brake Pedal Position Sensor Replacement See: Pedal Positioning Sensor > Removal and Replacement > Brake Pedal Position Sensor Replacement
7. Connect the accelerator pedal position sensor electrical connector.
8. Install the instrument panel tie bar. Refer to Instrument Panel Tie Bar Replacement See: Dashboard / Instrument Panel > Removal and Replacement > Instrument Panel Tie Bar Replacement
Booster
Power Vacuum Brake Booster Replacement
Removal Procedure
1. With the engine OFF, apply and release the brake pedal several times until the pedal becomes firm to deplete the power vacuum brake booster vacuum reserve.
2. Without draining the coolant and without disconnecting the hoses, remove and position aside the radiator surge tank. Refer to Radiator Surge Tank Replacement See: Coolant Reservoir > Removal and Replacement > Radiator Surge Tank Replacement.
3. Disconnect the brake pedal position sensor electrical connector. Refer to Brake Pedal Position Sensor Replacement See: Pedal Positioning Sensor > Removal and Replacement > Brake Pedal Position Sensor Replacement.
imageOpen In New TabZoom/Print
4. Release the brake pedal (1) from the power vacuum brake booster pushrod by lifting the pedal upward.
Note: Do not reuse the brake pedal retainer.
5. Remove and discard the brake pedal retainer.
6. Disconnect the power vacuum brake booster vacuum sensor electrical connector.
imageOpen In New TabZoom/Print
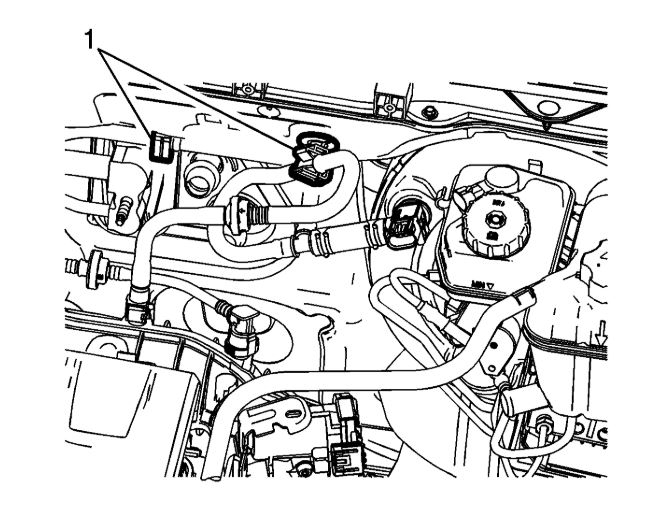
7. Release the power brake booster vacuum inlet pipe from the retainers (1) on the dash panel.
imageOpen In New TabZoom/Print
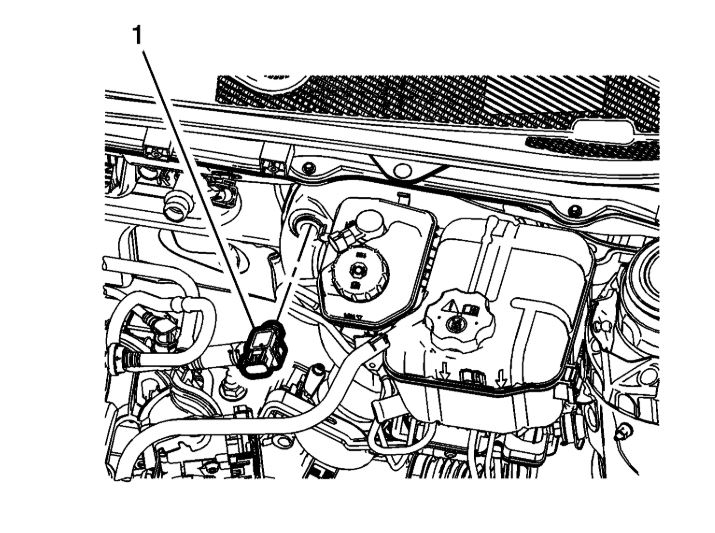
8. Remove the power brake booster vacuum sensor (1) from the power vacuum brake booster and position aside.
9. Disconnect the brake fluid level indicator switch electrical connector.
10. Remove the electronic brake and traction control module (EBTCM). Refer to Electronic Brake and Traction Control Module with Brake Pressure Modulator Valve Replacement See: Electronic Brake Control Module > Removal and Replacement > Electronic Brake and Traction Control Module with Brake Pressure Modulator Valve Replacement.
imageOpen In New TabZoom/Print
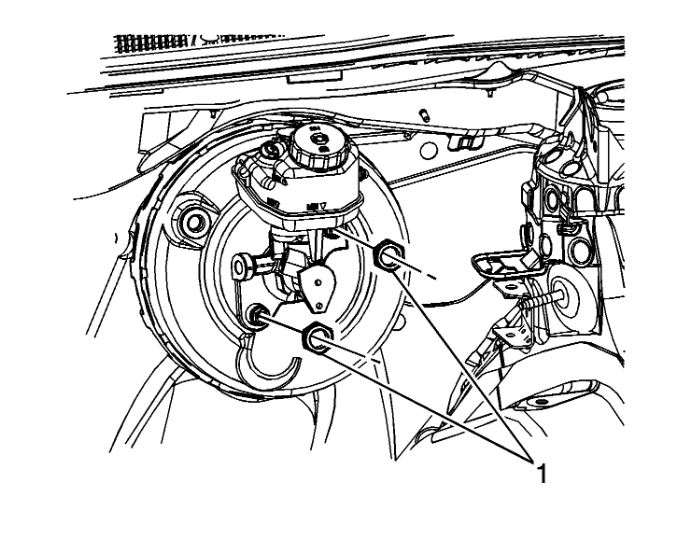
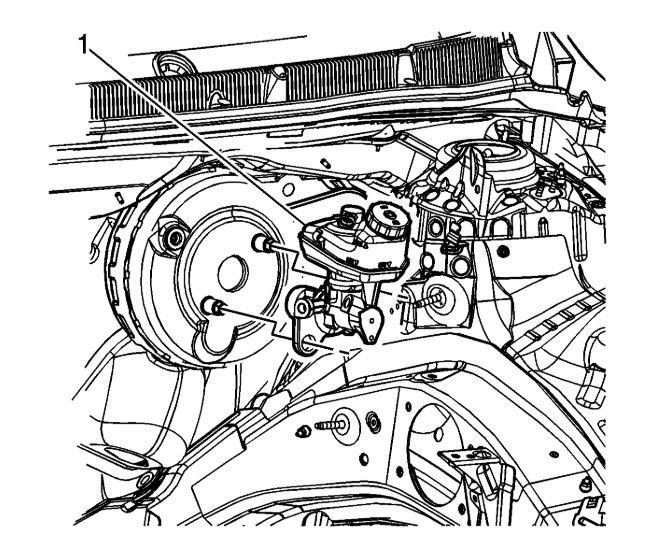
11. Remove the master cylinder nuts (1).
imageOpen In New TabZoom/Print
12. Remove the master cylinder (1).
13. Inspect the master cylinder O-ring seal for damage and replace, if necessary.
imageOpen In New TabZoom/Print
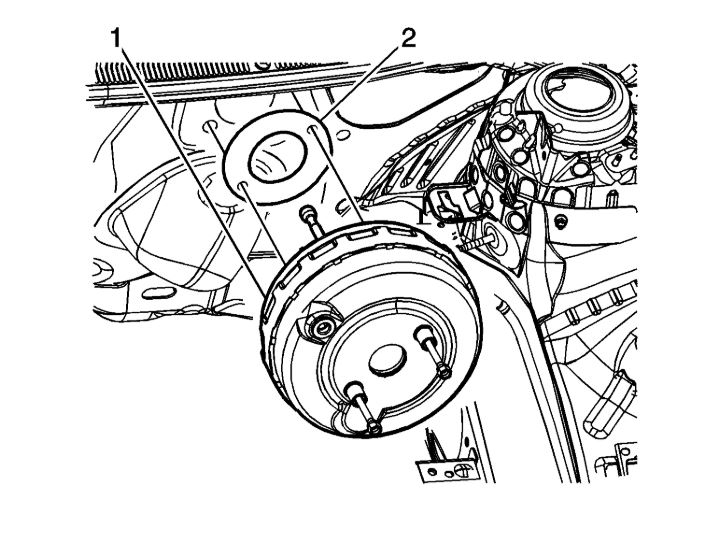
14. Completely loosen the power vacuum brake booster bolts (1).
imageOpen In New TabZoom/Print
15. Remove the power vacuum brake booster (1).
16. Inspect the power vacuum brake booster gasket (2) for damage and replace, if necessary.
Images (Click to enlarge)
Jun 1, 2020 at 12:41 PM