What are you doing? Are you replacing a broken part, or are you doing a normal front brake job due to worn pads?
It sounds like you're trying to replace the pads without removing the caliper. If that's correct, there's only a very models where you can get away with that. For all others, the caliper must be removed.
You should be able to stick a large flat-blade screwdriver through the center of the caliper, and catch it on one of the cooling slots in the rotor, then use it as a pry bar to spread the pads apart. Some people will tell you to remove the caliper first, then use a c-clamp to push the piston back into the caliper housing. That should never be necessary. If you have to resort to that, there's a ring of rust or debris built up around the piston. That will cause it to not release properly, and you'll have a miserable brake pull. We used to rebuild calipers with every brake job. If a piston can't be cleaned of that debris, or if the chrome plating has lifted, there's rust underneath and that piston must be replaced. Today professionally-rebuilt calipers are so inexpensive, it doesn't pay to try to rebuild them yourself. If your pistons slide in without too much effort, they should be okay to reuse without rebuilding or replacing them.
To complicate the issue, there's at least three different caliper designs that were used. You can have one, two, or four pistons in each caliper. Prying one piston in is fairly easy. With two or four, it's almost a requirement to pry them in before removing the caliper. Expect to need quite a bit of effort.
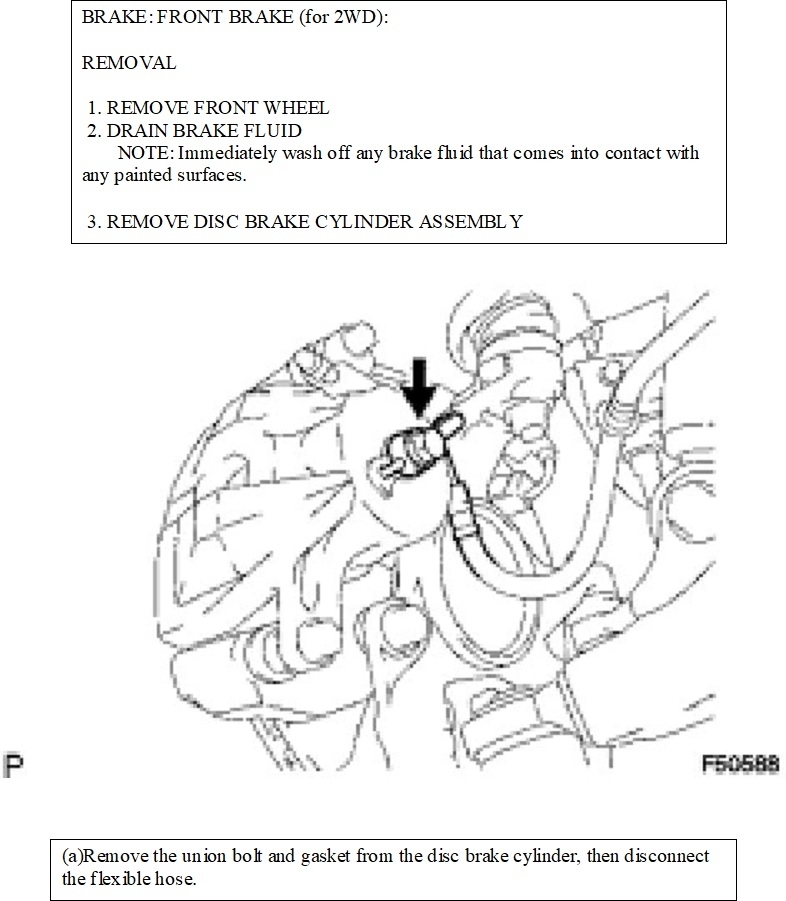
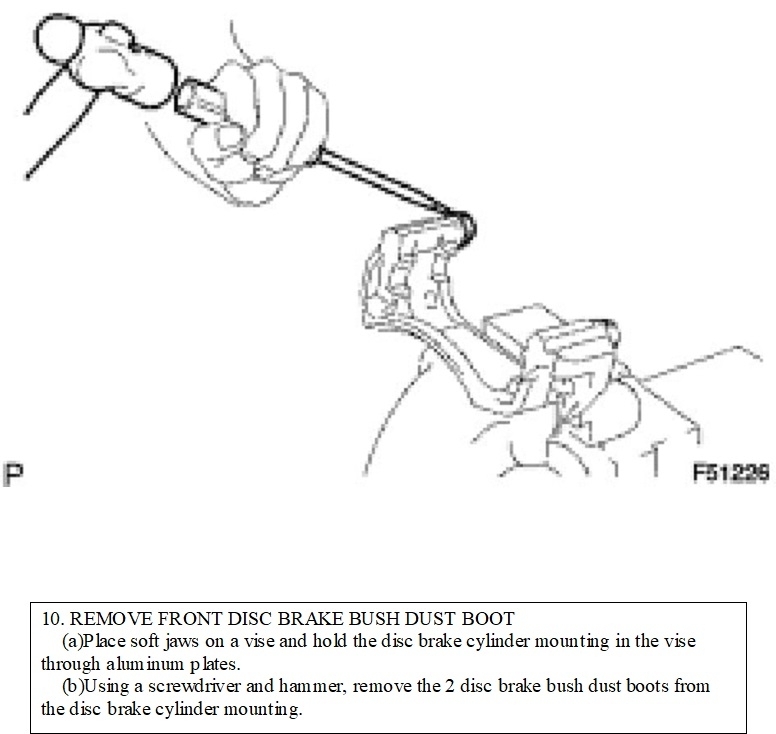
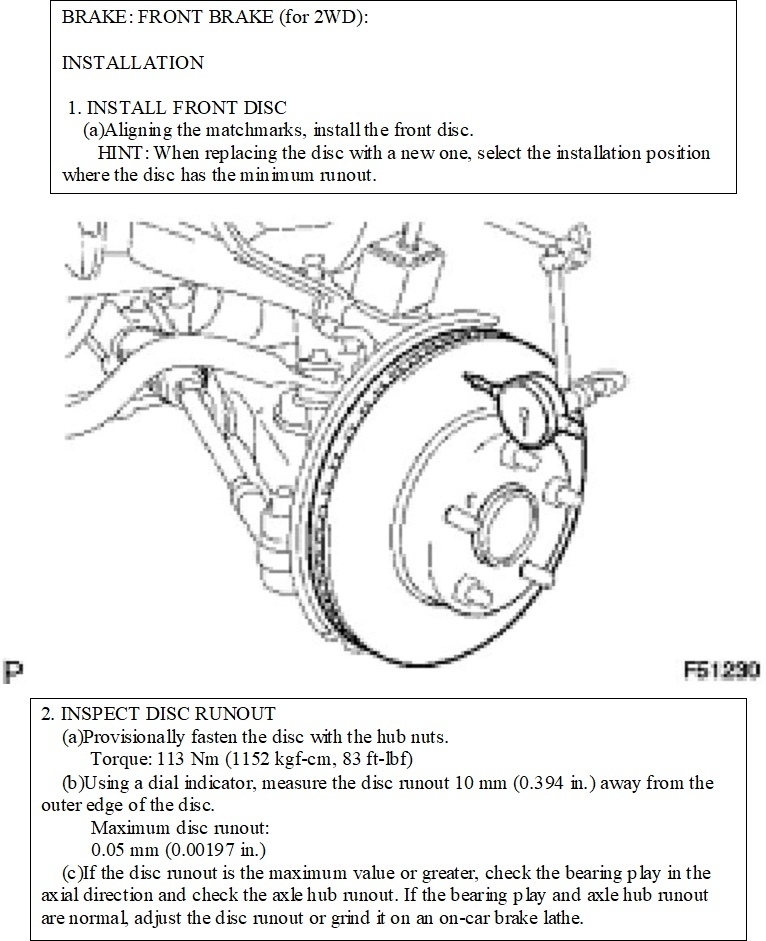
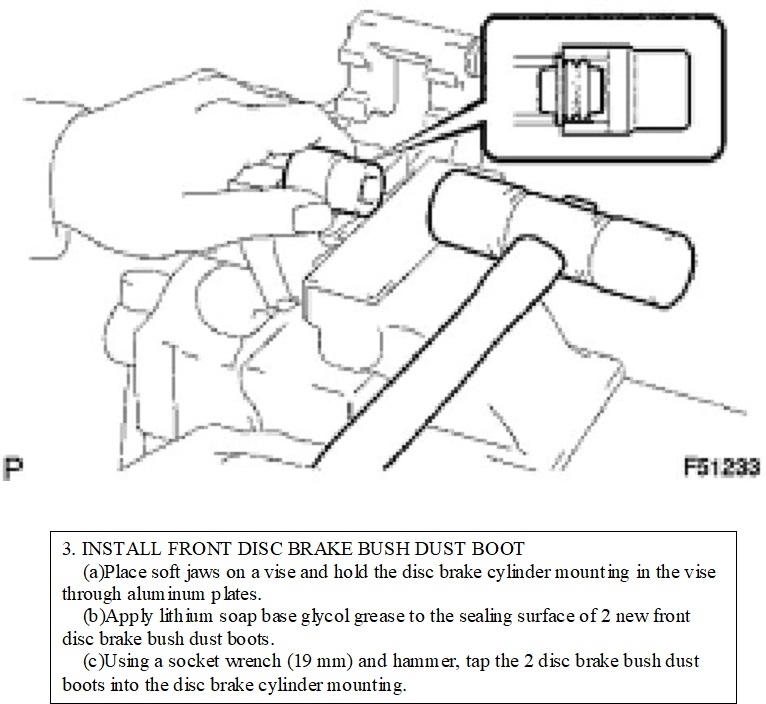
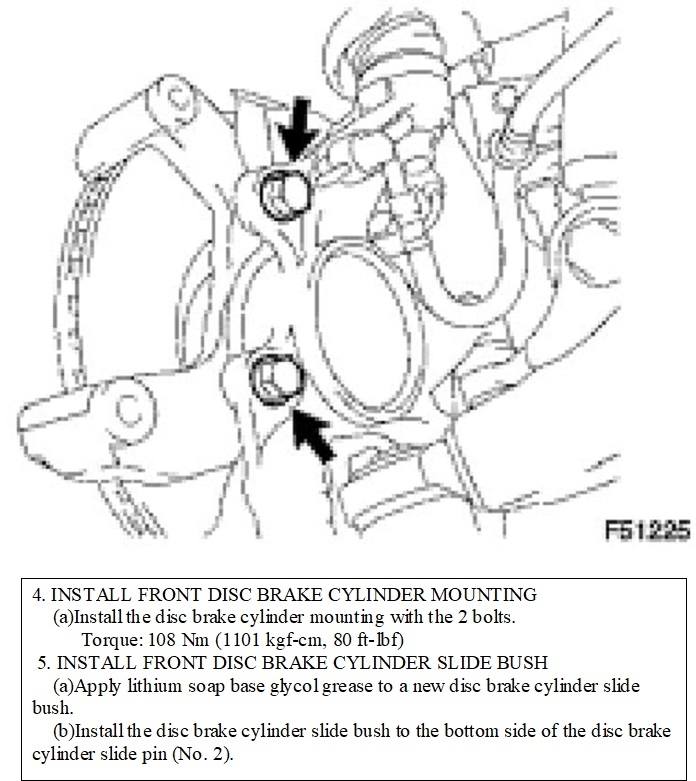
This is where slapping in a new set of pads differs a lot from a professional brake job. New pads can get you back on the road, and usually will not compromise safety, but it can impact customer satisfaction. First let me post the instructions from Toyota for the 2wd model. Read through that all the way first because there's a lot of information that is confusing. I'll elaborate on that next.
Right off the bat, skip steps 2 and 3a. They're preparing to replace the caliper. What you should look for next, once the pads have been spread, is to see if brake fluid has overflowed in the reservoir. Pushing the piston in pushes all the brake fluid behind it back up to the reservoir. If someone topped off that fluid previously, like during a routine oil change, the system will be over-full. Wash that brake fluid off any painted surface with water to prevent damaging that paint.
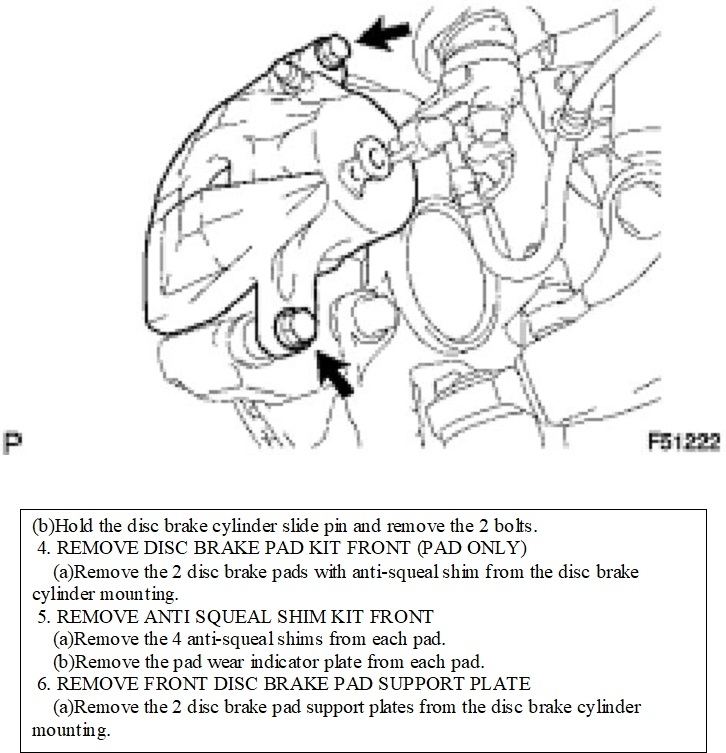
You'll need to watch the placement of anti-squeal shims and anti-rattle clips. When I run into an unusually-complicated setup such as this, I take just one side apart first so I have the other one to look at for reference.
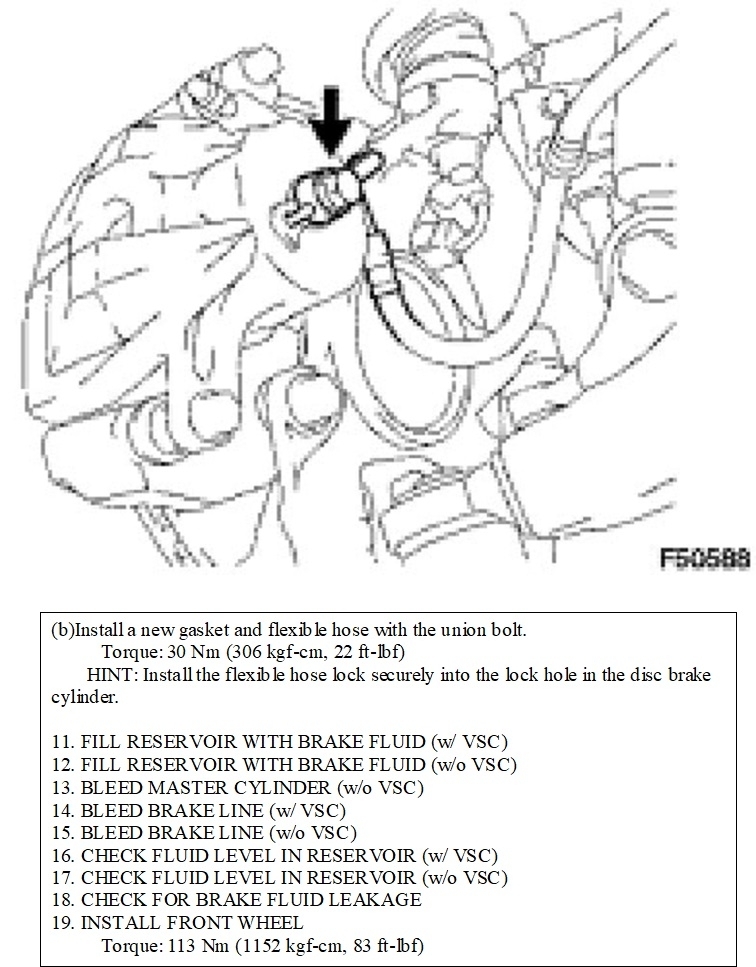
These next steps are part of every professional brake job, but usually aren't included in manufacturer's instructions. The first is to support the caliper with a piece of stiff wire hooked to the coil spring or something else that will hold it. There must never be any substantial weight on the flexible hose. That weight can tear the inner liner.
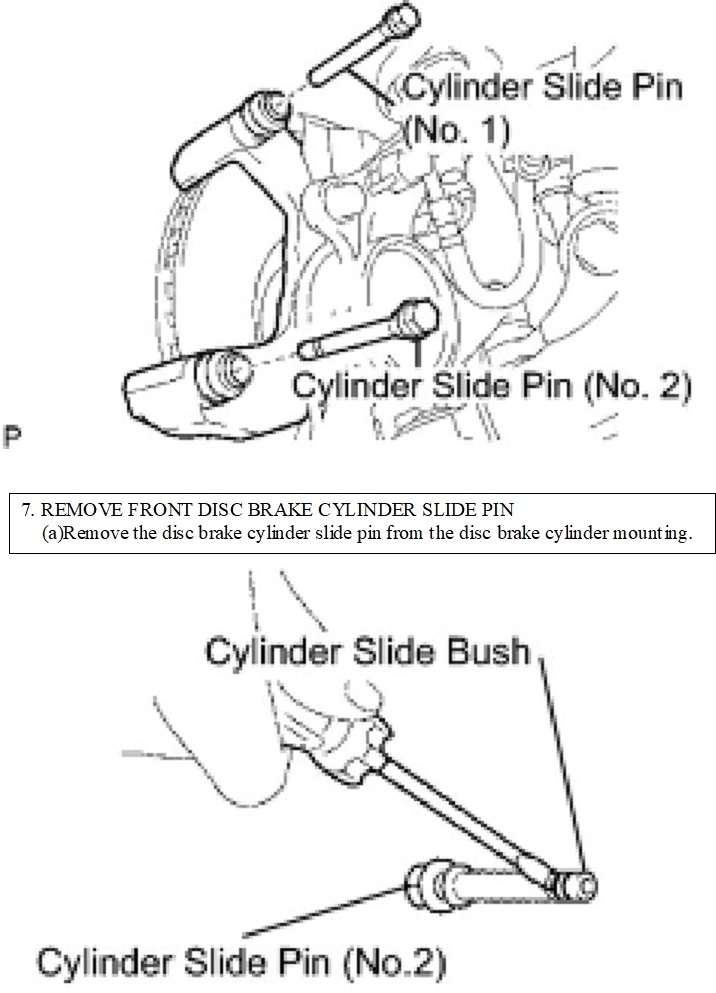
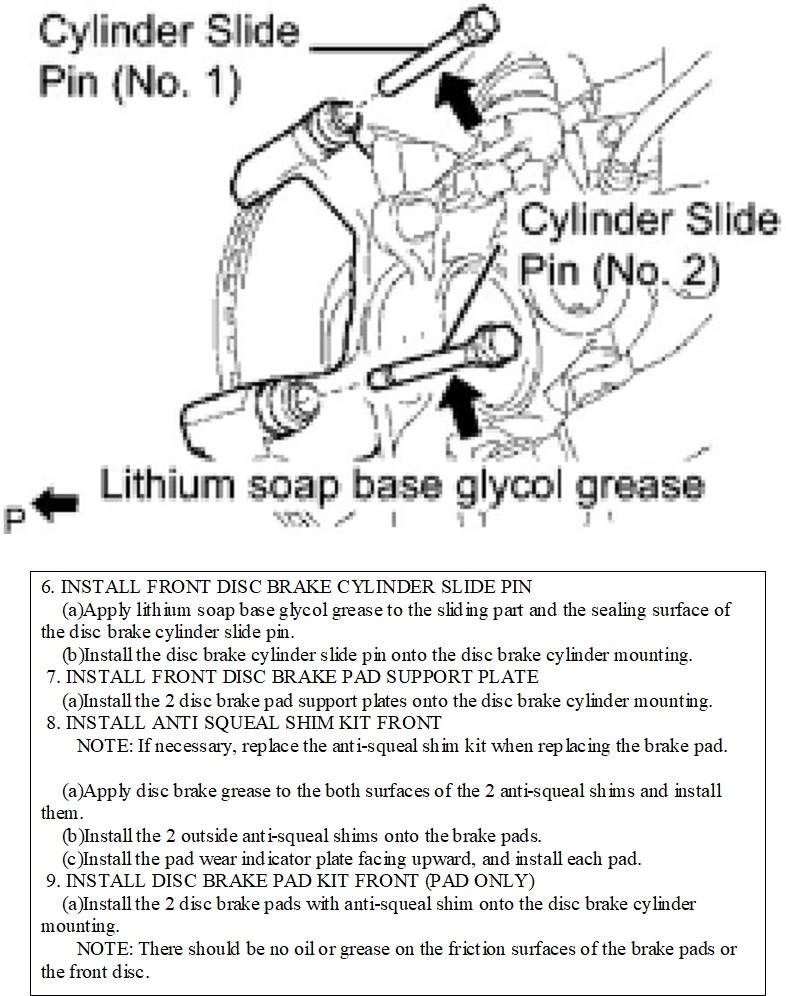
Inspect the caliper slide pins for signs of dirt or lifting of the chrome plating. Dirt or impacted grease can be washed off. Lifted chrome will have rust under it. That must not be cleaned or lubed. That pin must be replaced. The rust spot will prevent the caliper from sliding freely to self adjust and to release when the brakes are released.
During reassembly, those slide pins must be coated with special high-temperature brake grease. "Rusty Lube" is one product I'm familiar with, but there's a lot of others. You'll find that at any auto parts store, and often at hardware stores.
That same brake grease is used on the backing plates of the pads too, but it gets more involved with this design. Normally that grease is applied to the outer fingers of the caliper where they contact the outer pad, and to the end of the piston that contacts the inner pad. The pads are going to vibrate; nothing can stop that, but the grease reduces how much that vibration is transferred to the caliper where it would be amplified and become annoying. Toyota tried to stop that squeal with extra shims. Those might help, but you'll still want to lightly coat all the surfaces that contact each other.
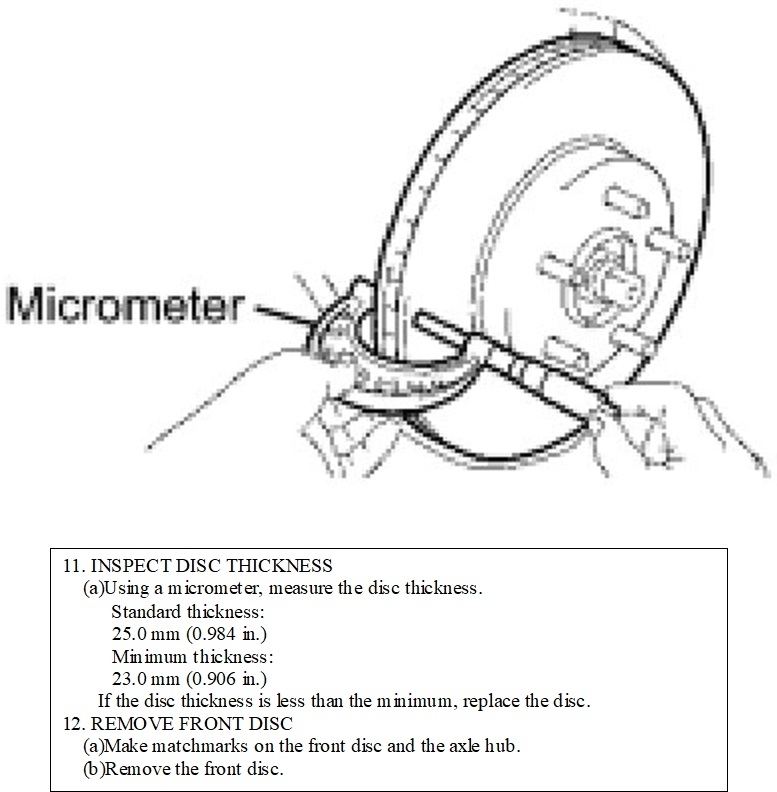
Checking the rotors is next. If you had any pulsation in the brake pedal, the rotors have excessive thickness variation. Machining them will take care of that, but you must also consider the overall thickness. Every model has a published legal thickness the rotors can be machined to, then often there's a slightly smaller dimension they can be allowed to wear to. Those specs are called the "machine to" spec and the "discard" spec.
Rotors start out really thin today to save weight, but that means they may be under the legal limit if machined just once. The good news is new rotors have come down so much in cost, it's often a better value to just install new ones. One word of warning though. Most new rotors come from China. There's nothing wrong with the quality, but when we make parts from cast iron, we set them aside for three months to "age" before they get their final machining. Those made in China are cast, machined, packed, and shipped, then they age on your car. It's real common for them to warp in that first 90 days. A light machining at the store where you bought them will take care of that. People who demand new rotors under warranty usually run into the same problem in another three months.
Check the hub and the rotor's mounting surface to be sure no rust, scale, or debris gets stuck in there. Same with the rotor's outer mounting surface where it contacts the wheel. Any debris that gets in there will cause either a wobble in the wheel or a wobble in the rotor and wheel. Use some of that brake grease around the rotor's center hole and the hub it sits on.
Be careful to not get any grease, including fingerprint grease, on the friction surfaces of the pads and rotors. If that does happen, it's fine to wash it off with brake parts cleaner, but that must be done before those parts go through the first warm-up cycle. That heat helps the grease soak into the rotor and pads, then it will never come out. That contamination is one cause of brake squeal that's easy to prevent.
Beginning around the mid '90s, trucks began developing very noticeable brake pulls due to the rotors being different thicknesses. I've had two of those, one with .020" difference and one with only .007" difference. That's the thickness of two sheets of paper on a rotor that's almost 1 1/4" thick. This type of pull only shows up after at least a half dozen fairly hard stops in quick succession. The different thicknesses causes the rotors to reach different temperatures. That heat migrates into the pads where it changes their "coefficient of friction". That means one pair of pads grabs harder than the other pair, and you have a pull to one side. If you replace a rotor, replace both of them. If they're machined, both should be machined to the same final thickness and the same speed of cut on the brake lathe. The person doing the machining will watch for that.
Don't use any grease on the wheel studs or lug nuts. Most import models have anodized studs. That coating is light yellow, silver, or light blue and is a lubricant. Grease will deteriorate that coating resulting in binding threads the next time those nuts are removed. The person removing the wheel next time gets unfairly blamed for the damage, but it was caused by the last person who put that grease on the studs.
For my final comment of value, a little-known trick to prevent brake squeal is to use sandpaper or a flat file to remove the sharp edges on the new pads. This doesn't have to be much. I've cut this down to simply dragging them across the floor a couple of times. That removes the fingernails-on-the-blackboard squeal. Seems if that type of squeal is prevented during the break-in period, roughly 100 miles, that source of squeal won't come back later.
Be sure to use a click-type torque wrench on the lug nuts. Tighten them to 83 foot-pounds.
Images (Click to enlarge)
Dec 7, 2022 at 2:25 PM