Welcome to 2CarPros.
The first thing I suggest is to remove the bulb and inspect for corrosion. There may be a bad connection. Also, I know that these have a gasket on them to prevent moisture from getting to the bulb.
Here are the directions. I would suggest replacing the bulb itself and inspect all connections to see if the problem goes away. All attached pictures correlate with the directions
_________________________________________
DISASSEMBLY
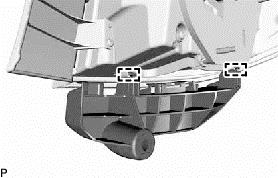
1. REMOVE REAR BUMPER UPPER RETAINER
(a)Disengage the 2 guides and remove the rear bumper upper retainer.
pic 1
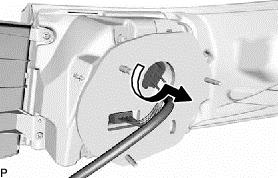
2. REMOVE REAR TURN SIGNAL LIGHT BULB
(a)Turn the rear combination light socket and wire sub-assembly with the rear turn signal light bulb in the direction indicated by the arrow shown in the illustration, and remove them as a unit.
pic 2
(b)Remove the rear turn signal light bulb from the rear combination light socket and wire sub-assembly.
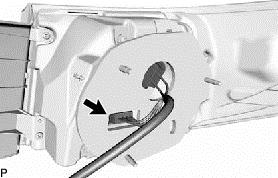
3. REMOVE REAR COMBINATION LIGHT SOCKET AND WIRE SUB-ASSEMBLY
(a)Disconnect the connector and remove the rear combination light socket and wire sub-assembly.
pic 3
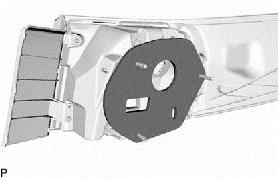
4. REMOVE REAR COMBINATION LIGHT GASKET
(a)Remove the rear combination light gasket.
pic 4
NOTICE:
* Be sure to remove all the traces of the old gasket from the body.
* Do not reuse the removed gasket. Be sure to install a new rear combination light gasket to prevent water ingress.
_______________________
tail light bulb
2014 Lexus ES 300h L4-2.5L (2AR-FXE) Hybrid
Installation
Vehicle Lighting and Horns Tail Lamp Service and Repair Removal and Replacement Rear Combination Light Assembly Installation
INSTALLATION
HINT
* Use the same procedure for the RH and LH sides.
* The procedure described below is for the LH side.
1. INSTALL REAR COMBINATION LIGHT ASSEMBLY
(a)Engage the guide to temporarily install the rear combination light assembly.
(b)Install the screw.
(c)Install the rear combination light assembly with the 3 nuts.
Torque : 2.2 Nm (22 kgf-cm, 19 in-lbf)
(d)Connect the connector.
2. INSTALL LUGGAGE COMPARTMENT INNER TRIM COVER LH See: Trunk / Liftgate Spring > Removal and Replacement > Installation
3. INSTALL ROPE HOOK (for LH Side) See: Trunk / Liftgate Spring > Removal and Replacement > Installation
4. INSTALL LUGGAGE HOLD BELT STRIKER ASSEMBLY (for LH Side) See: Trunk / Liftgate Spring > Removal and Replacement > Installation
5. INSTALL LUGGAGE COMPARTMENT INNER TRIM COVER RH (w/o Power Trunk Lid System) See: Trunk / Liftgate Spring > Removal and Replacement > Installation
6. INSTALL LUGGAGE COMPARTMENT INNER TRIM COVER RH (w/ Power Trunk Lid System) See: Trunk / Liftgate Spring > Removal and Replacement > Installation
7. INSTALL ROPE HOOK (for RH Side) See: Trunk / Liftgate Spring > Removal and Replacement > Installation
8. INSTALL LUGGAGE HOLD BELT STRIKER ASSEMBLY (for RH Side) See: Trunk / Liftgate Spring > Removal and Replacement > Installation
9. INSTALL LUGGAGE COMPARTMENT FRONT TRIM COVER See: Trunk / Liftgate Spring > Removal and Replacement > Installation
10. INSTALL REAR FLOOR FINISH PLATE See: Trunk / Liftgate Spring > Removal and Replacement > Installation
11. INSTALL LUGGAGE HOLD BELT STRIKER ASSEMBLY (for Rear Side) See: Trunk / Liftgate Spring > Removal and Replacement > Installation
12. INSTALL SPARE WHEEL COVER PAD RH (for Full Size Spare Tire) See: Trunk / Liftgate Spring > Removal and Replacement > Installation
13. INSTALL SPARE WHEEL COVER PAD LH (for Full Size Spare Tire) See: Trunk / Liftgate Spring > Removal and Replacement > Installation
14. INSTALL LUGGAGE COMPARTMENT FLOOR MAT See: Trunk / Liftgate Spring > Removal and Replacement > Installation
15. INSTALL REAR BUMPER ASSEMBLY
See: Rear Bumper > Removal and Replacement > Installation
________________________________
Note: If you are able to access and remove the bulb without removal of the assembly, do that. These are the only directions I have and they are related to the replacement of the assembly.
Let me know if this helps or if you have other questions.
Take care,
Joe
Images (Click to enlarge)
Jul 11, 2019 at 8:15 PM