If the headlight brightness flickers along with the "Battery" gauge going up, it suggests the gauge IS working properly. It's indicating a severe over-charge condition. That can lead to battery damage, burned out bulbs, and even computer failures if it gets bad enough. The gauge will usually come back down a little when the engine is at idle speed and a number of "loads" are turned on, like the head lights or heater fan.
This charging system is real easy to diagnose with a digital voltmeter. If you aren't comfortable using one, start with this article:
https://www.2carpros.com/articles/how-to-use-a-voltmeter
They're using one with the "auto-ranging" feature. That's an expensive feature you don't need. Harbor Freight Tools has a perfectly fine meter for $7.00. You can also find them at Walmart or any hardware store. I can help you set it up if necessary.
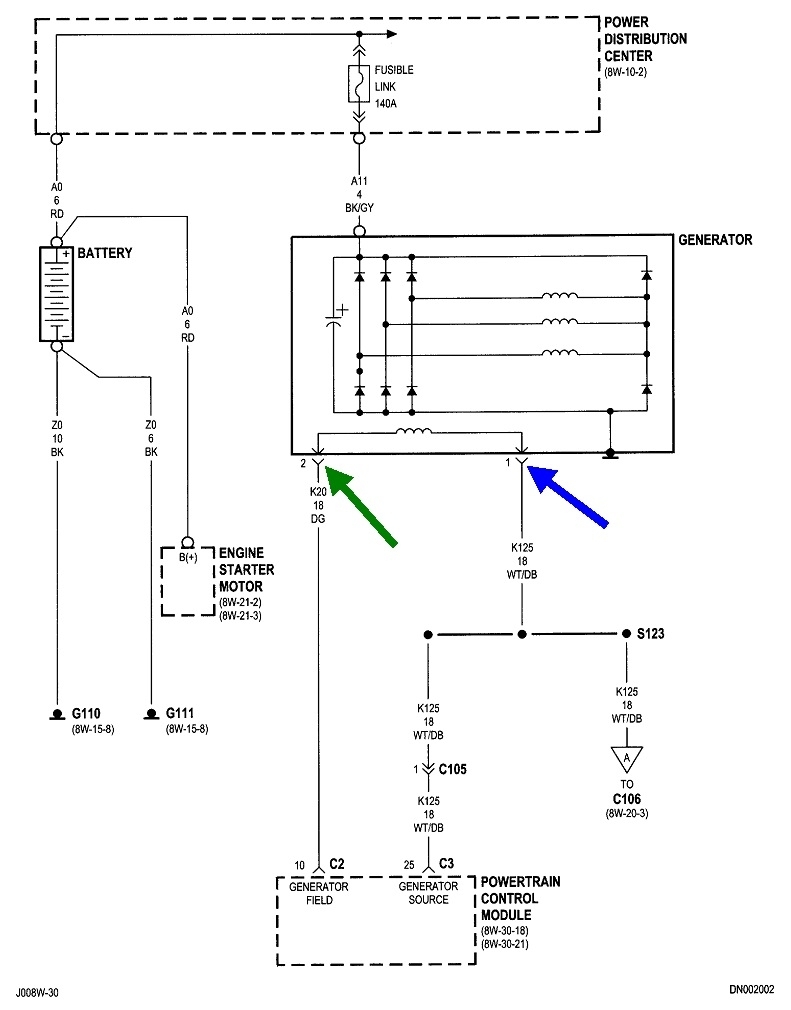
There's two small nuts on the back of the alternator. It's pointless to discuss the wire colors because they both go through a small black plastic block and pop out as the two terminals, so there's no way to know which wire goes to which terminal. We'll solve that shortly.
Those two small terminals are going to have voltage on them only when the engine is running. Measure on both at that time and tell me what you find. One is going to have full system voltage. That will be the same that you can measure right across the battery. Normal is between 13.75 to 14.75 volts. Once you find that, the other terminal must have less voltage, but not 0 volts. The lower that second voltage is, the harder the voltage regulator is driving the alternator. Typical is to find between roughly 4 to 11 volts. You'll need to measure that one two times. First when the system is working properly. Remember which terminal that is.
The next step can be difficult, but you have to measure that terminal again while the problem is occurring. What you find then will give us an idea of the cause of the over-charging. There's only three things that can cause this. The first is that second terminal is being grounded, (shorted to the alternator's housing) intermittently. That is very difficult to do inside, but if someone previously bent or damaged that terminal by the plastic block, that could do this. It's the least likely cause.
The second cause is a shorted voltage regulator. It lives inside the Engine Computer, so that computer would have to be replaced.
The third, and most likely cause, is the dark green wire has rubbed through the insulation somewhere and is touching ground, meaning a metal bracket or part of the engine.
There's a nice clue to help with this. If the dark green wire is grounded when the problem is occurring, you're going to find 0.0 volts on that terminal. Follow the wire harness from the alternator to the Engine Computer. Look for a place it's draped over the sharp edge of a metal bracket, fell down onto hot exhaust parts, and things like that.
The clue that this is caused by a shorted voltage regulator is due to all the other circuitry inside the computer, a shorted regulator doesn't take the voltage all the way down to 0.0 volts. Instead, you'll typically find around 2.0 volts, give or take. Any voltage at all, even just a couple of tenths of a volt, proves there is not a dead short as there would be if that wire was touching ground.
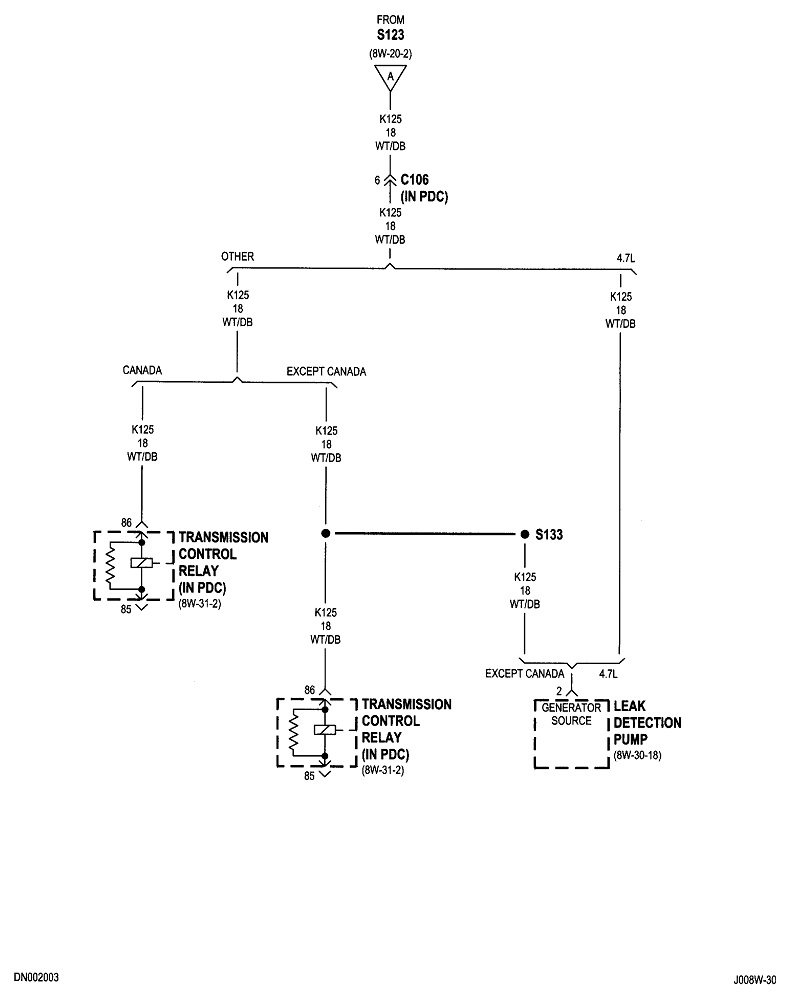
I guessed at a 4.7L when selecting the diagrams. It's very similar for both engine options. We only need the first of these three. I added the two arrows pointing to the two terminals you'll be measuring on.
To add some unnecessary confusion to the story, rather than standing there for a long time waiting for the problem to occur, another approach is to connect the voltmeter to the "control" terminal, (that dark green wire), and prop it somewhere that you can see it while driving. You can run a wire inside the vehicle and use clip leads so the meter can sit on the passenger's seat. I prefer to use a wiper arm to hold the meter where I can see it. When the "Volts" gauge jumps up and the head lights get brighter, see what the voltage is on the meter.
Let me know how far this gets you, and what you find, then we'll figure out where to go next.
Images (Click to enlarge)
Sep 16, 2023 at 10:18 PM