Ball joint installation

Tiny
RWALLACE33
  • MEMBER
  • 1996 CHEVROLET 1500
  • 5.7L
  • V8
  • 4WD
  • AUTOMATIC
  • 300,000 MILES
Hey, I’m doing the front end on my truck. Tie rods, ball joints, upper control arm, stabilizer links, and idler arms.

I have a jack under my lower control arm from when I popped the lower ball joint out of the knuckle. Does it matter if I tighten all the tie rods and ball joints at this height? Or should I tighten when suspension is sagged down? Or when it’s all on four wheels?
Wednesday, December 26th, 2018 AT 12:17 PM

12 Replies

Tiny
JACOBANDNICKOLAS
  • MECHANIC
  • 108,128 POSTS
Hi and thanks for using 2CarPros.

I always tighten them while it's on a rack, so you shouldn't have any problems.

Here are the torque specs for different components. I will say that if you replaced tie rods, it may need an alignment. Actually, I recommend it. Especially if you didn't measure overall length prior to removing the originals.

Lower Ball Joint to Steering Knuckle Nut. 128 Nm (94 ft. Lb.)
Upper Ball Joint to Steering Knuckle Nut. 100 Nm (74 ft. Lb.)
Hub and Bearing Assembly, Shield and Knuckle. 180 Nm (133 ft. Lb.)
Tie Rod Nut to Steering Knuckle. 48 Nm (35 ft. Lb.)
Splash Shield to Steering Knuckle Bolts. 26 Nm (19 ft. Lb.)

Let me know if this helps or if you have other questions.

Take care,
Joe
Was this
answer
helpful?
Yes
No
Wednesday, December 26th, 2018 AT 6:40 PM
Tiny
RWALLACE33
  • MEMBER
  • 24 POSTS
Hey, my lower control arm has a spot for the nipple. But it says mount in board on the boot. I cannot comply to both. So should I just make the nipple alignment priority and not worry about the grease relief on the boot?
Was this
answer
helpful?
Yes
No
Thursday, December 27th, 2018 AT 1:15 PM
Tiny
JACOBANDNICKOLAS
  • MECHANIC
  • 108,128 POSTS
Hi:
Are you referring to the zerk fitting? Can you upload a picture so I can see what you are dealing with? Also, are you referring to the lower ball joint?
Was this
answer
helpful?
Yes
No
Thursday, December 27th, 2018 AT 2:55 PM
Tiny
RWALLACE33
  • MEMBER
  • 24 POSTS
I mean the the grease nipple and zerk fitting, same thing to me. It’s supposed to line up with a indent in the lower control arm. And the boot on the lower ball joint it says “mount inboard” or away from brakes. I cannot comply to both needs. Because when the zerk/nipple are where they need to be the boots grease relief is facing the wrong way. I just pressed it back in and the zerk is where it belongs now. With no regards to the grease exit hole.
Was this
answer
helpful?
Yes
No
Thursday, December 27th, 2018 AT 5:42 PM
Tiny
JACOBANDNICKOLAS
  • MECHANIC
  • 108,128 POSTS
Hi again:
You should be able to turn the boot. Did you try?

Let me know.
Joe
Was this
answer
helpful?
Yes
No
Thursday, December 27th, 2018 AT 9:27 PM
Tiny
RWALLACE33
  • MEMBER
  • 24 POSTS
I wasn’t able to. They have a new style of boot than a traditional lower ball joint.

Aside from that. I have replaced my upper control arms. I have the shims/washers marked for when I put it back together. But now I’m not sure if I should tighten the upper control arm bolts to the frame before I drop it back down? Or after because they have a bushing that kinda acts as a spring.
Was this
answer
helpful?
Yes
No
Sunday, December 30th, 2018 AT 12:09 PM
Tiny
JACOBANDNICKOLAS
  • MECHANIC
  • 108,128 POSTS
Hi and welcome back:

Here are the directions from alldata for install of the upper control arm:

UPPER

REMOVAL

NOTE: Raise the vehicle and support it with suitable safety stands.

Remove or disconnect the following:
1. Are and wheel assembly.
2. Air cleaner extension, if needed.
3. Brake hose.
- Nut and the screw.
- Bracket and the hose.
- Tie the hose out of the way.
4. Cotter pin.
5. Nut.
6. Upper control arm (101) from the knuckle (117).
7. Nuts.
8. Bolts.
9. Upper control arm (101).
10. Bushings.

INSTALLATION

CAUTION: Always use the correct fastener in the proper location. When you replace a fastener, use ONLY the exact part number for that application. The manufacturer will call out those fasteners that require a replacement after removal. The manufacturer will also call out the fasteners that require thread lockers or thread sealant. UNLESS OTHERWISE SPECIFIED, do not use supplemental coatings (paints, greases, or other corrosion Inhibitors) on threaded fasteners or fastener joint interfaces. Generally, such coatings adversely affect the fastener torque and joint clamping force, and may damage the fastener. When you install fasteners, use the correct tightening sequence and specifications. Following these instructions can help you avoid damage to parts and systems.

Install or connect the following:
1. Bushings.
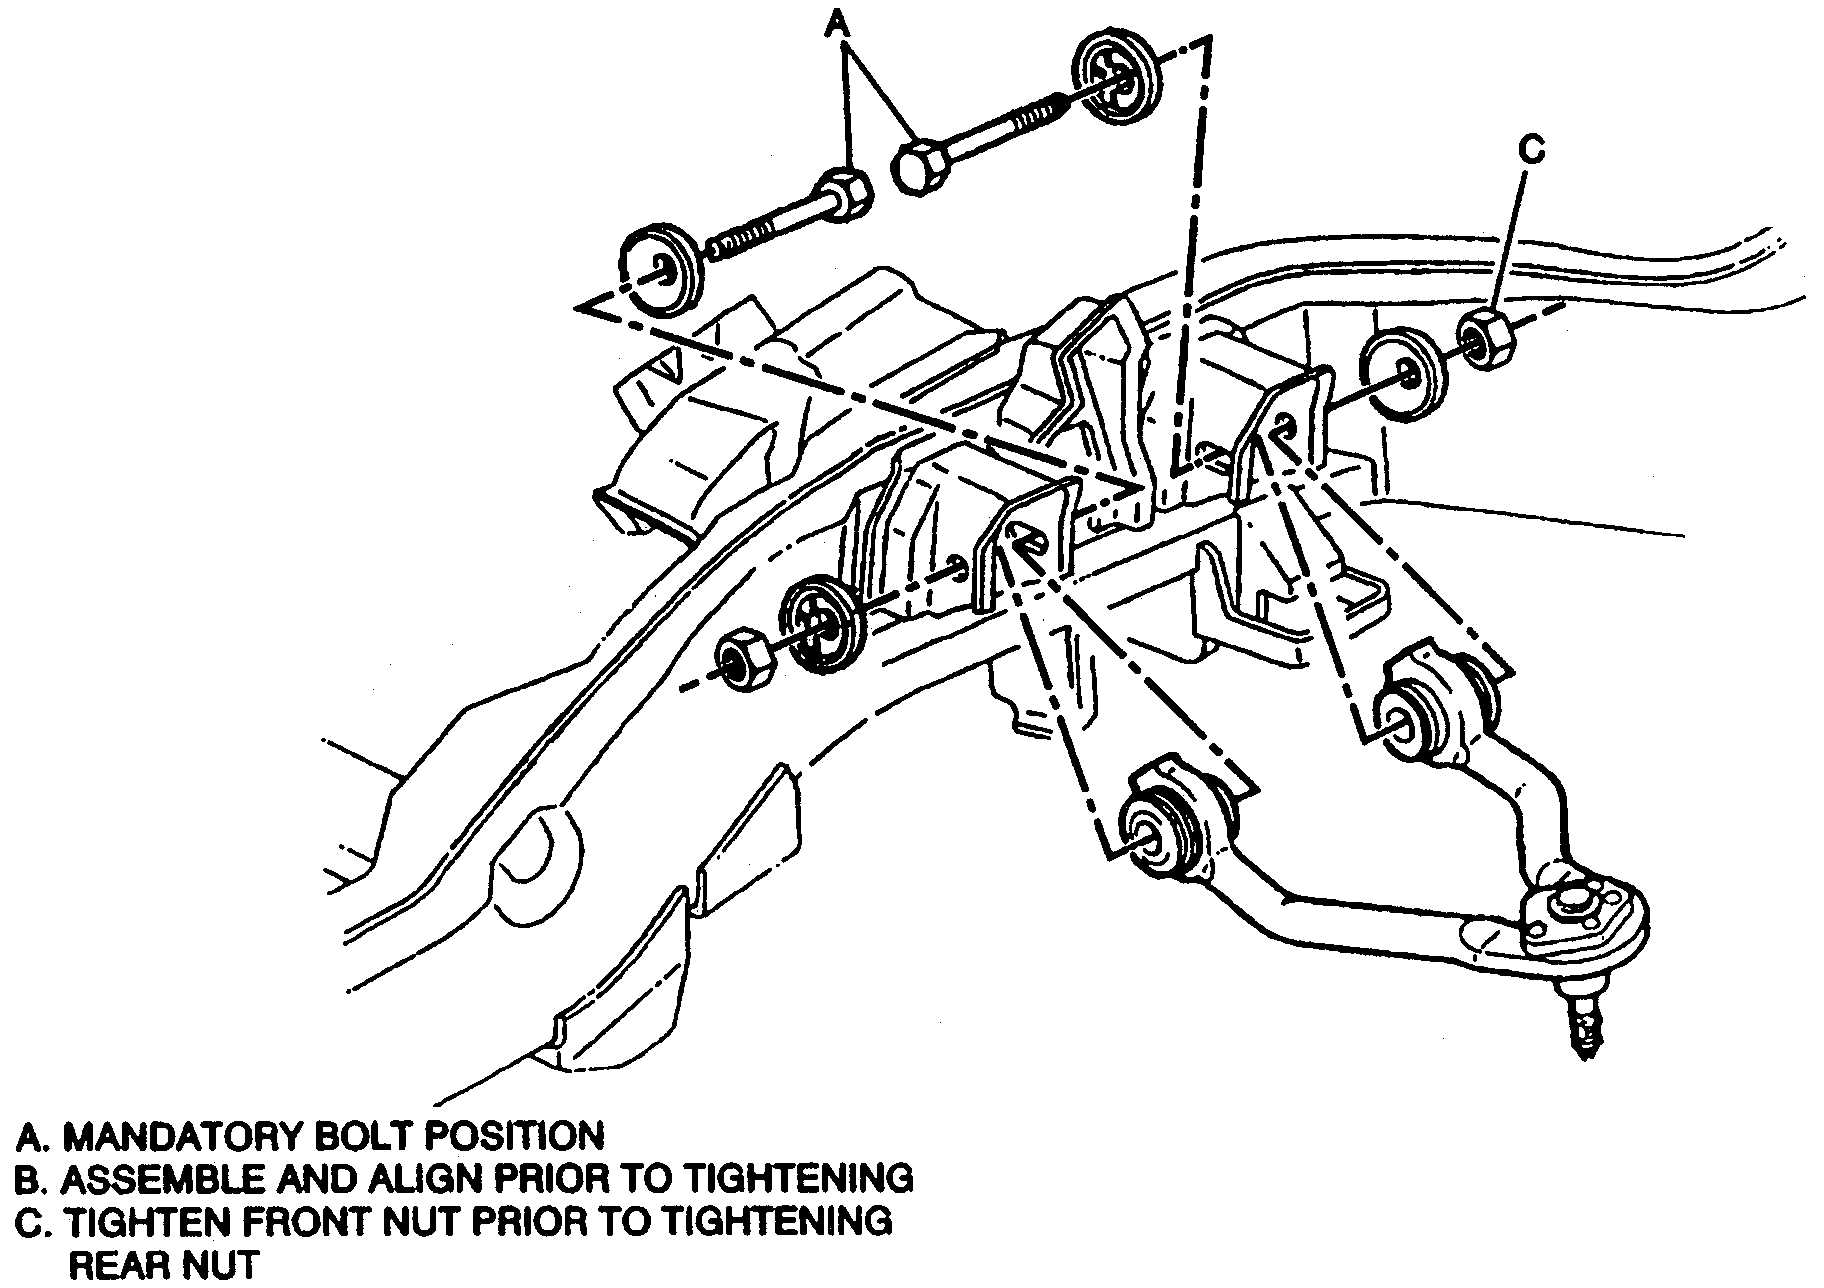
2. Upper control arm (101) to the frame (95).
3. Bolts and the washers.
- Be sure the bolt heads are opposed inside the bracket.
4. New nuts.
- Tighten the front nut prior to tightening the rear nut.
- Tighten nuts to 190 Nm (140 ft. Lbs.).
- The nuts must be tightened with the control arm at "Z" Height.
5. Upper ball joint (115) stud to the knuckle (117).
6. Nut to the upper ball joint (115) stud.
- Tighten nut (129) to 100 Nm (94 ft. Lbs.).
- Tighten the nut to align the cotter pin. Do not tighten more than 1/6 turn.
7. New cotter pin.
- Bend the cotter pin ends against the nut flats.
- Remove the support from the knuckle.
8. Brake hose.
- Bracket and the hose.
- Screw and the nut.
9. Air cleaner extension, if needed.
10. Tire and wheel assembly.
- Lower the vehicle.

____________________

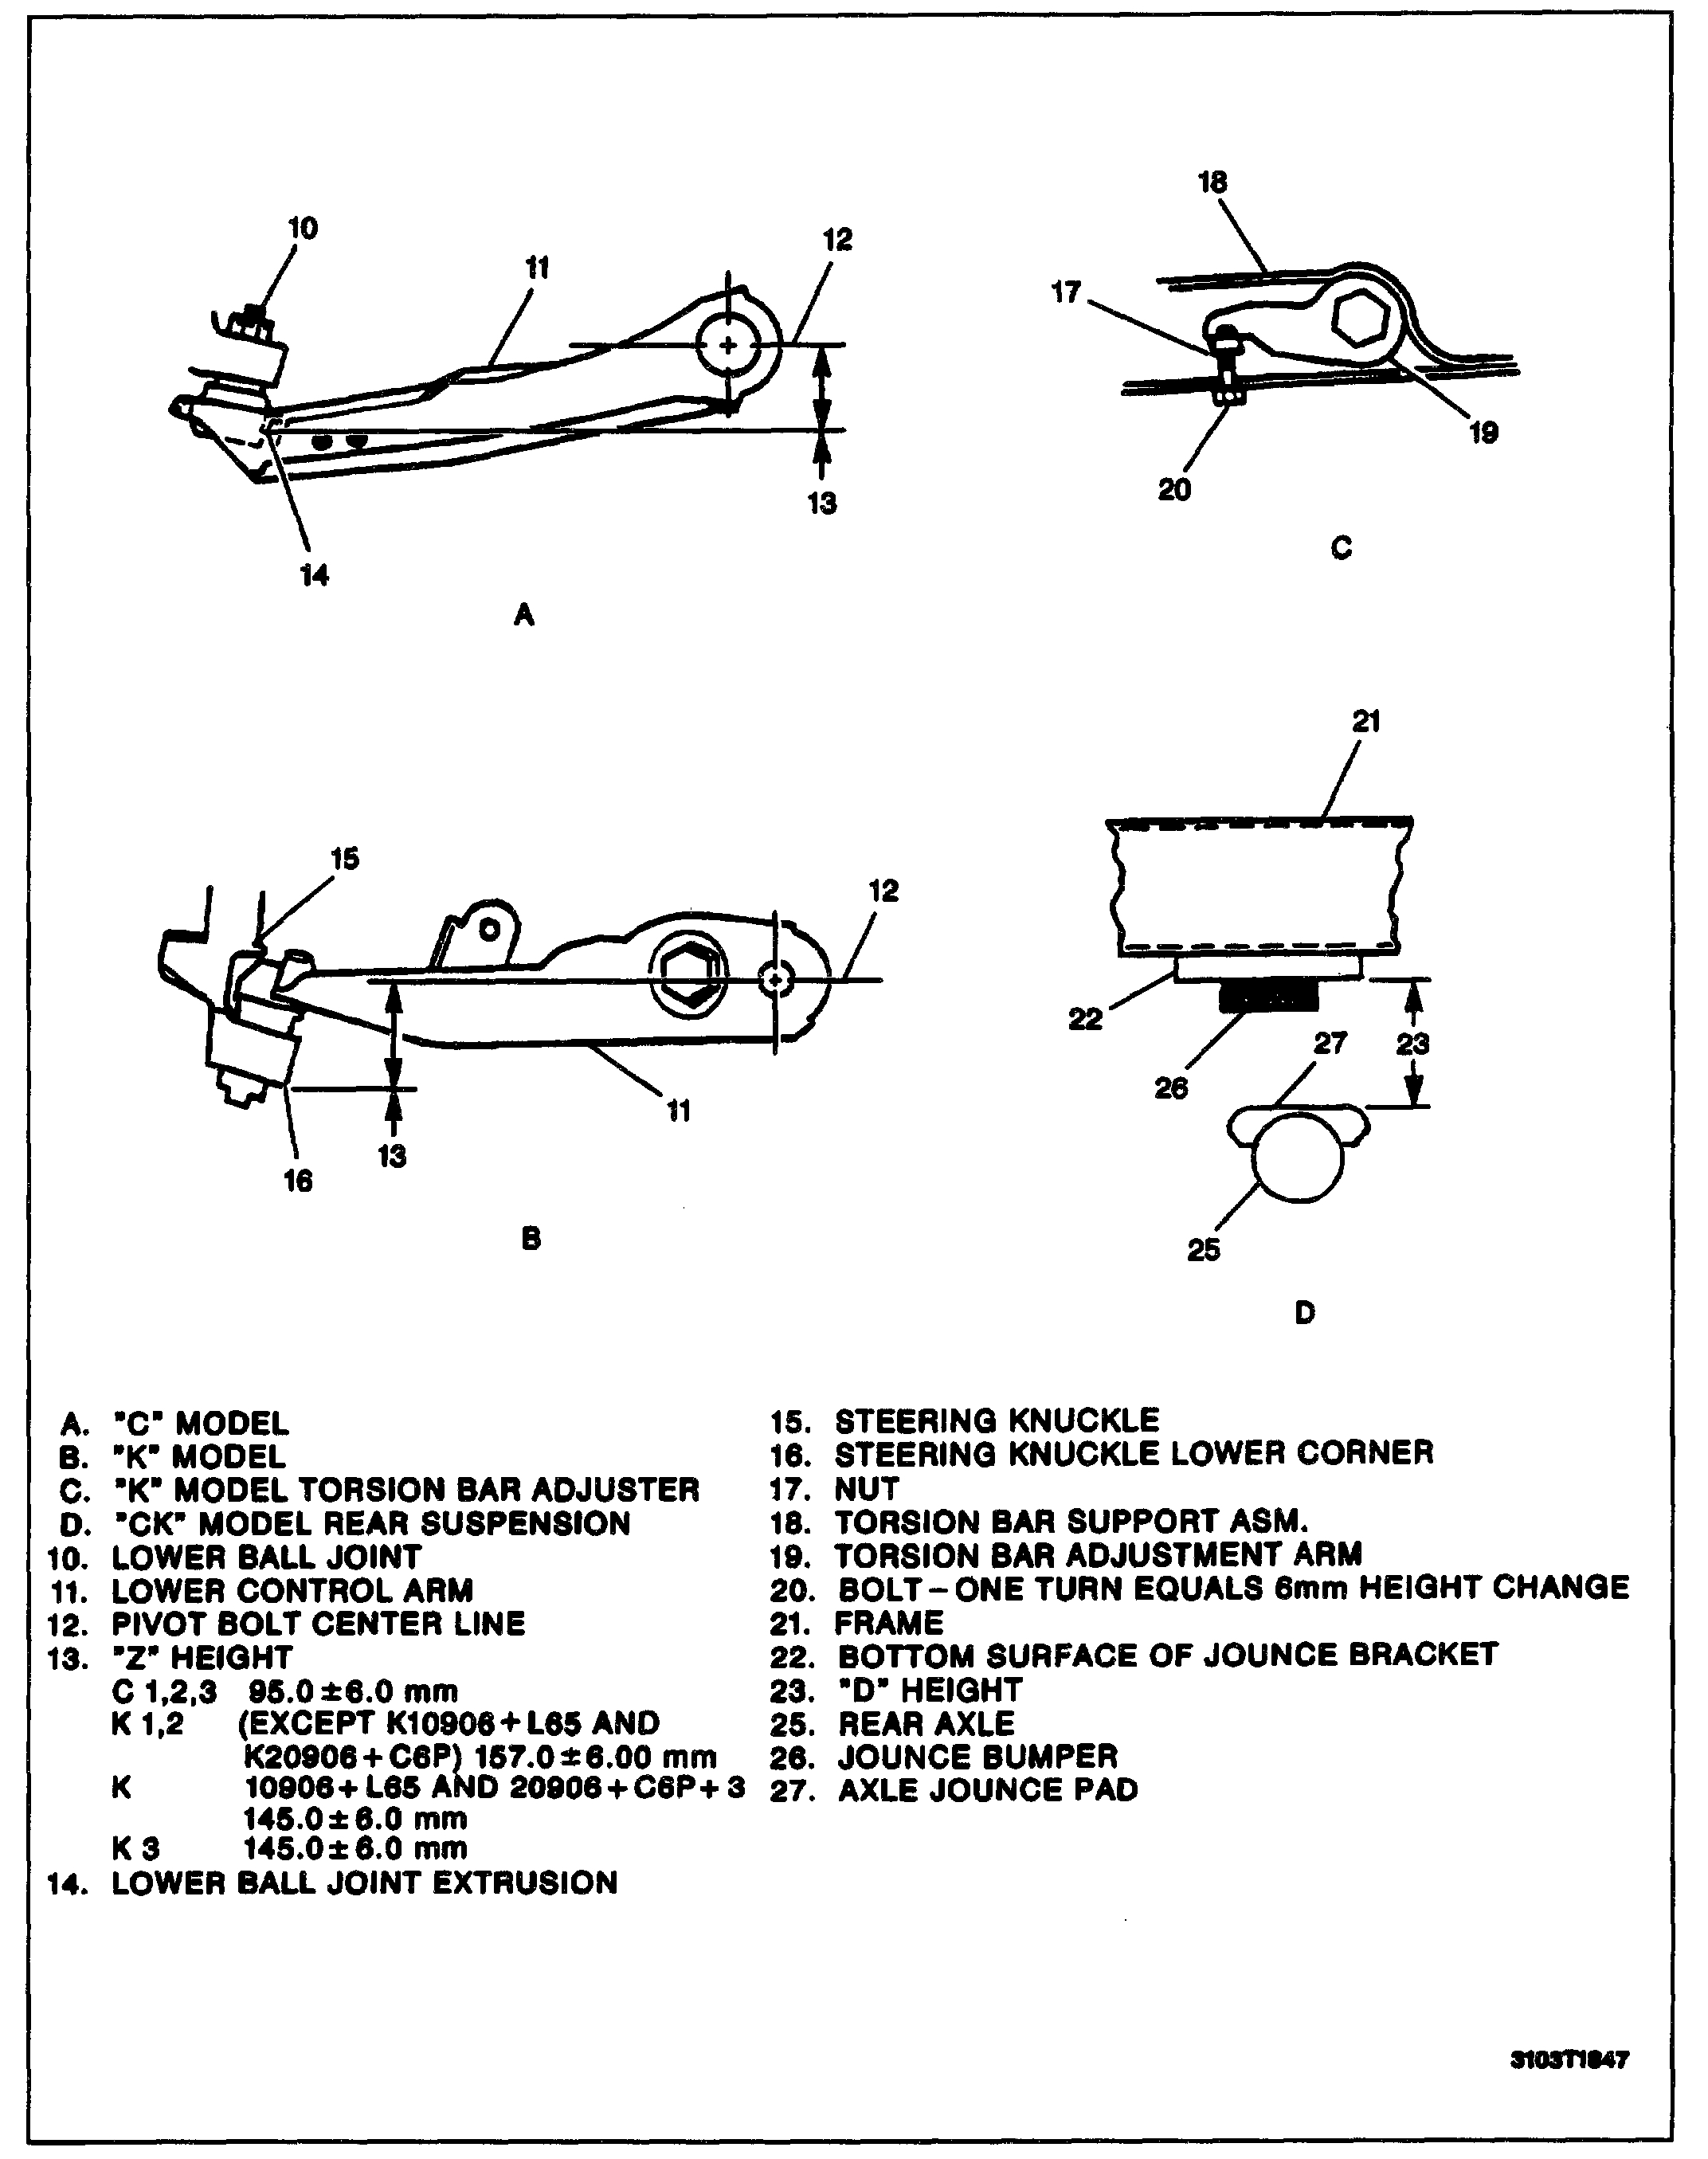
You will notice that it indicates the vehicle must be at Z height when tightening. That is when the vehicle is on a level surface (on the ground) and the correct trim height is confirmed. On your vehicle, height adjustment is done with the torsion bar, but you shouldn't have taken anything apart with that. So, it should be correct.

To determine Z height, you have to measure from the pivot bolt center line to the lower corner of the steering knuckle to obtain a measurement. The measurement should be right around 4.5".

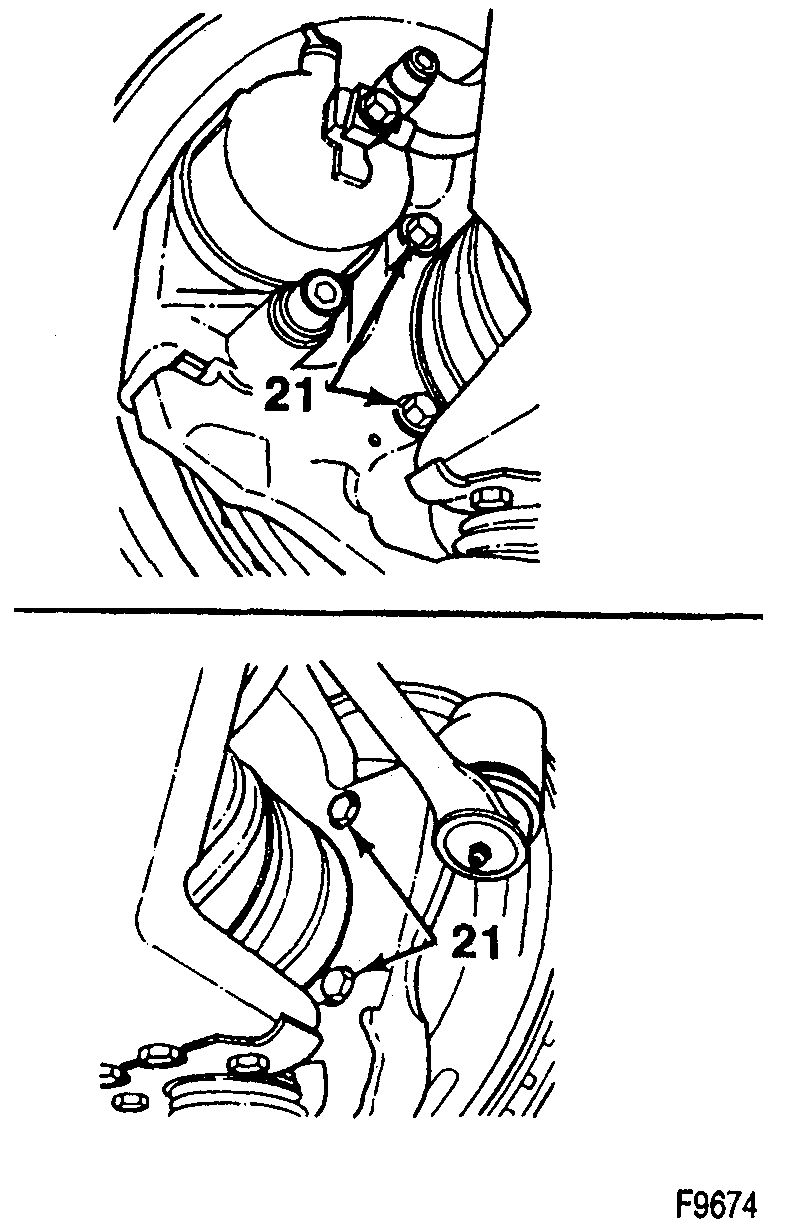
Here are the directions for torsion bar adjustment if needed. See pic 3

1. Lift the front bumper of the vehicle up about 38 mm (1.5 inches).
2. Gently remove your hands and let the vehicle settle on its own.
3. Repeat the operation twice more for a total of three times.
4. Measure the "Z" dimension.
5. Push the front bumper of the vehicle down about 38 mm (1.5 inches).
6. Gently remove your hands and let the vehicle rise on its own.
7. Repeat the operation twice more for a total of three times.
8. Measure the "Z" dimension.
9. Find the average of the high and low measurements. This is the true "Z" dimension.

Again, you didn't adjust ride height, so this shouldn't be an issue.

Let me know if this helps or if you have other questions.

Joe
Was this
answer
helpful?
Yes
No
Sunday, December 30th, 2018 AT 2:59 PM
Tiny
RWALLACE33
  • MEMBER
  • 24 POSTS
That’s a lot more confusing than I thought.
Was this
answer
helpful?
Yes
No
Sunday, December 30th, 2018 AT 3:05 PM
Tiny
RWALLACE33
  • MEMBER
  • 24 POSTS
Can I just tighten when on level ground and take for an alignment and let them know?
Was this
answer
helpful?
Yes
No
Sunday, December 30th, 2018 AT 3:06 PM
Tiny
JACOBANDNICKOLAS
  • MECHANIC
  • 108,128 POSTS
I have always tightened them while they were still in the air. Interestingly, after I sent that to you I realized it contradicted itself. At one point, it says to have vehicle at Z height which is determined with the vehicle down, and the end says lower the vehicle. Ugh!

What I can tell you is this. Anytime I have replaced upper control arms on GM trucks, they have been in the air and I haven't had any trouble. There wasn't a reason to remove or change torsion bar height, so Z height shouldn't have changed. I swear they do things like this to make things more complicated.

Just make sure that you follow the bolt tightening sequence and tighten to the proper torque spec.

Please feel free to ask other questions. We'll get through this. I promise.
Was this
answer
helpful?
Yes
No
Sunday, December 30th, 2018 AT 3:12 PM
Tiny
RWALLACE33
  • MEMBER
  • 24 POSTS
Darn! I don’t have a torque wrench. I was going to buy one but everyone said I don’t need it.

So I just lower it to the ground, and tighten the front nuts first and then back. To about really fricken tight foot pounds hahahah
Was this
answer
helpful?
Yes
No
Sunday, December 30th, 2018 AT 4:27 PM
Tiny
JACOBANDNICKOLAS
  • MECHANIC
  • 108,128 POSTS
Hi:
I recommend following the torque specs, but many don't. That's your call, however, there aren't parts you want loose. Lol

I would snug everything and then do the final torque on the ground. You can do it while it is lifted, too. I honestly can't see what either way would hurt. Also, before you do put it down, make sure things are snug so they can't move.

Take care and let me know how things work out for you.
Joe
Was this
answer
helpful?
Yes
No
Sunday, December 30th, 2018 AT 11:11 PM

Please login or register to post a reply.

Sponsored links