Hello .. thanks for the donation .. much appreciated
Timing Belt Installation
CAUTION:To prevent pistons from hitting valves, make sure crankshaft is NOT at TDC for any piston before turning camshaft.
Place timing belt on crankshaft sprocket (if reusing belt, observe direction of rotation). Install lower part of timing belt cover. Install vibration dampener. The hole in the vibration damper must be located over the raised part on the crankshaft timing belt sprocket. Tighten vibration damper/pulley to specification. See TORQUE SPECIFICATIONS .
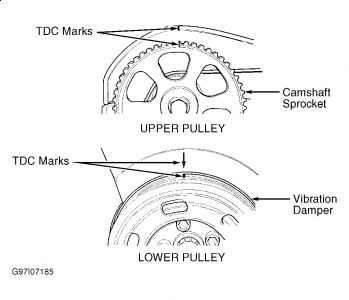
If necessary, align camshaft sprocket-to-cylinder head cover positioning marks and vibration damper-to-timing belt cover positioning marks. See Fig. 14

Install timing belt in this order: water pump, tensioning pulley, camshaft sprocket.
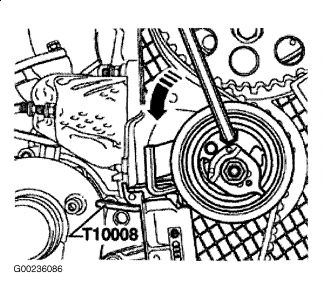
NOTE:If the timing belt tensioner has not been restrained and is at its travel limit, it must be pushed back in the installed position together with the pulley. This procedure can take up to 5 minutes. When compressing the tensioner, excessive force can damage the tensioning pulley. Push pulley on counterclockwise in direction of arrow with a socket head wrench using even (but not excessive) application of force until tensioner piston can be locked with Locking Plate (T10008). See Fig. 15 .
Turn eccentric bolt counterclockwise in direction of arrow using special tool (3387). See Fig. 21 .
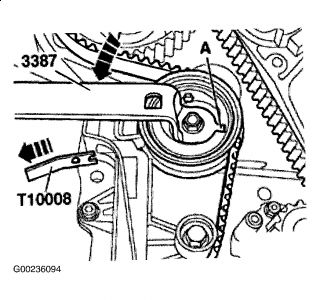
Hold eccentric bolt in this position and remove locking plate. Turn eccentric bolt clockwise to right in direction of arrow until a gauge with dimension of 8 mm (e.g., drill bit) can be passed between tensioning lever and tensioner housing. See Fig. 22
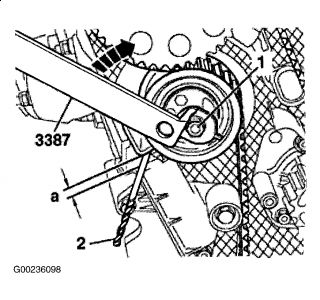
Hold eccentric bolt in this position and tighten pulley nut to specification. See TORQUE SPECIFICATIONS .
Turn crankshaft two complete turns by hand in direction of engine rotation until crankshaft is at TDC again. Mark on camshaft sprocket and mark on crankshaft must be at TDC cylinder 1. See Fig. 14 . Check dimension between tensioning lever and tensioner housing with a gauge. Dimension should be 6-10 mm. If dimension is not obtained, tension timing belt again. Go to step 3 .
Install center and upper timing belt cover and ribbed belt tensioner. Tighten fasteners to specification. See TORQUE SPECIFICATIONS . When installing ribbed belt, make sure that direction of rotation is correct and that belt is installed correctly to pulleys. On vehicles with A/C, install ribbed belt to A/C compressor last.
To install lock carrier, reverse removal procedures outlined in REMOVAL (AVANT & SEDAN) . Torque all fasteners to specification. See TORQUE SPECIFICATIONS . Let support stop rest on rubber buffer for torque support with its own weight and tighten bolts to 21 ft. lbs. (28 N.m). See Fig. 23 .
NOTE:Before installing bumper, check for the presence of threaded pins at bumper rear edge as well as expanding clips and sleeves in the fenders. Always replace bumper retaining bolts.
Slide bumper onto impact absorber and re-connect hose (1) of headlight cleaning system and electrical harness connectors (2). See Fig. 7 . Move bumper into installation position. Make sure threaded pins in bumper side edges engage into holes at the fenders. Install bumper retaining bolts until bumper can stay in place without any assistance.
Do not tighten completely allowing for any necessary adjustments. Pull back wheelhousing liner (A). See Fig. 3 . Engage bumper rear edge into catch (B). Torque nuts. Repeat procedure on opposite side of the vehicle. Torque left and right retaining bolts to specification. See TORQUE SPECIFICATIONS . Install left and right air inlet grille on bumper. Remainder of installation is the reverse of removal.
hope this helps

Nov 28, 2009 at 4:56 PM