Hi,
First, it does sound like the blend air door actuator is not working on the left. Here is a link that shows how to replace one in general:
https://www.2carpros.com/articles/replace-blend-door-motor
Here are the directions specific to your vehicle. The attached pics correlate with the directions.
2005 Chevy Truck Trailblazer 4WD L6-4.2L VIN S
Air Temperature Actuator - Left
Vehicle Heating and Air Conditioning Air Door Actuator / Motor Service and Repair Procedures HVAC System - Manual Air Temperature Actuator - Left
AIR TEMPERATURE ACTUATOR - LEFT
AIR TEMPERATURE ACTUATOR REPLACEMENT - LEFT
REMOVAL PROCEDURE
1. Remove the I/P carrier.
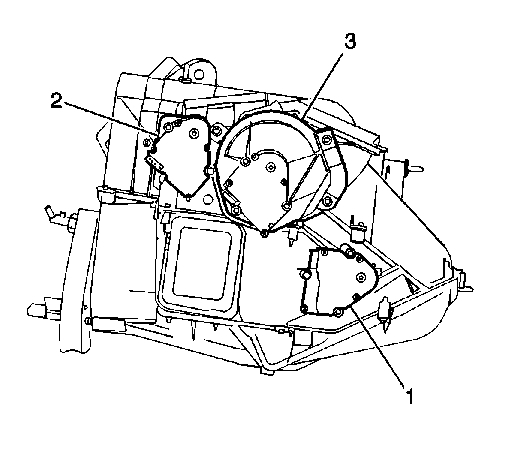
pic 1
2. Remove the left side air temperature actuator (1) retaining screws.
3. Disconnect the left side air temperature actuator electrical connector.
4. Remove the left side air temperature actuator.
INSTALLATION PROCEDURE
pic 2
1. Install the left side air temperature actuator (1).
2. Install the left side air temperature actuator retaining screws.
Tighten the screws to 1.9 N.m (17 lb in).
NOTE: Refer to Fastener Notice in Service Precautions.
3. Connect the electrical connector to the left side air temperature actuator.
4. Install the I/P carrier.
5. Calibrate the air temperature actuator on vehicles equipped with automatic climate control (C68). Refer to Re-Calibrating Actuators (Primary).
________________________
If you have automatic climate control, you need to re-calibrate the actuator. Here are the directions. Note that you can do it with or without a scan tool. Without is toward the bottom of the directions.
_______________________
2005 Chevy Truck Trailblazer 4WD L6-4.2L VIN S
Re-Calibrating Actuators (Primary)
Vehicle Heating and Air Conditioning Service and Repair Procedures HVAC System - Automatic Re-Calibrating Actuators (Primary)
When replacing the HVAC control module it will be necessary to allow the HVAC control module to perform a calibration process. When installing the HVAC control module be sure to perform the following:
IMPORTANT: Do not adjust any controls on the HVAC control module while the HVAC control module is self-calibrating. If interrupted, improper HVAC performance will result.
1. Place the ignition switch to the OFF position.
2. Disconnect the scan tool.
3. Install the HVAC control module.
4. Connect all previously disconnected components.
5. Start the vehicle.
6. Wait 40 seconds for the HVAC control module to self-calibrate.
7. Verify that no DTCs have set as current DTCs.
When replacing the HVAC actuator it will be necessary to allow the HVAC control module to perform a calibration process. When installing the HVAC actuator be sure to perform one of the following:
IMPORTANT: Do not adjust any controls on the HVAC control module while the HVAC control module is self-calibrating. If interrupted improper HVAC performance will result.
Preferred Method (w/ Scan Tool)
1. Clear all DTCs.
2. Place the ignition switch in the OFF position.
3. Install the HVAC actuator.
4. Connect all previously disconnected components.
5. Start the vehicle.
6. With the scan tool, initiate the Motor Re-calibration feature of the Heating and Air Conditioning Special Functions menu.
7. Verify that no DTCs have set as current DTCs.
IMPORTANT: Do not adjust any controls on the HVAC control module while the HVAC control module is self-calibrating. If interrupted, improper HVAC performance will result.
Alternate Method (w/o Scan Tool)
1. Clear all DTCs.
2. Place the ignition switch to the OFF position.
3. Install the HVAC actuator.
4. Connect all previously disconnected components.
5. Remove the HVAC B fuse for a minimum of 10 seconds.
6. Install the HVAC B fuse.
7. Start the vehicle.
8. Wait 40 seconds for the HVAC control module to self-calibrate.
9. Verify that no DTCs have set as current DTCs.
_______________________________________________
As far as the rear AC issues, the auxiliary air temperature actuator mimics the set passenger temperature. You will need to check if it is operational by removal and inspection. Here are the directions for replacement. Pics 3 and 4 correlate with these directions.
_______________________________________________
2005 Chevy Truck Trailblazer 4WD L6-4.2L VIN S
Air Temperature Actuator - Auxiliary
Vehicle Heating and Air Conditioning Air Door Actuator / Motor Service and Repair Procedures HVAC System - Manual Air Temperature Actuator - Auxiliary
AIR TEMPERATURE ACTUATOR - AUXILIARY
AIR TEMPERATURE ACTUATOR REPLACEMENT - AUXILIARY
REMOVAL PROCEDURE
1. Remove the right rear quarter trim panel.
2. Disconnect the electrical connector from the air temperature actuator.
3. Remove the retaining screws from the air temperature actuator.
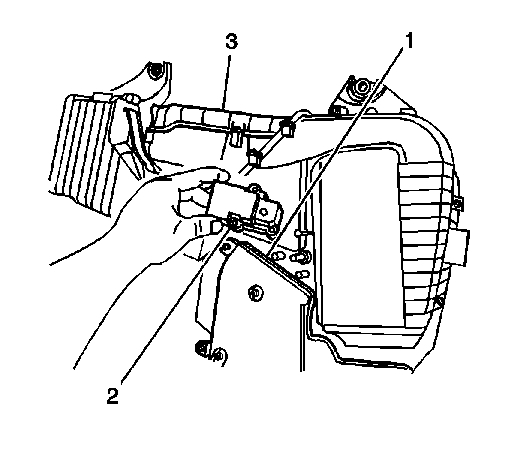
pic 3
4. Remove the air temperature actuator (1) from the rear HVAC module.
INSTALLATION PROCEDURE
pic 4
1. Install the air temperature actuator (2) to the rear HVAC module.
2. Install the screws to the actuator.
Tighten the screws to 1.9 N.m (17 lb in).
NOTE: Refer to Fastener Notice in Service Precautions.
3. Connect the electrical connector to the air temperature actuator.
4. Re-calibrate the air temperature actuator. Refer to Re-Calibrating Actuators (Primary).
5. Install the right rear quarter trim panel.
______________________________
Let me know if that helps.
Take care,
Joe
Images (Click to enlarge)
Aug 26, 2020 at 8:05 PM