Hi,
Front brake pads and rotors really aren't too hard to do. If you do it yourself, make sure to purchase lifetime parts so you'll never have to pay for the parts again.
You can expect brake pads to last approximately 25,000 miles. However, that can change based on terrain and driving habits.
To start, here is a link that shows in general how it's done. You can use this as a guide:
https://www.2carpros.com/articles/how-to-replace-front-brake-pads-and-rotors-fwd
Here are the directions specific to your vehicle. The pics below correlate with the directions.
_________________________________________________
2019 Honda Insight L4-1.5L (LEB6) Hybrid
Front Brake Pad Removal, Installation, and Inspection
Vehicle Brakes and Traction Control Disc Brake System Brake Pad Service and Repair Removal and Replacement Front Brake Pad Removal, Installation, and Inspection
FRONT BRAKE PAD REMOVAL, INSTALLATION, AND INSPECTION
Front Brake Pad Removal, Installation, and Inspection
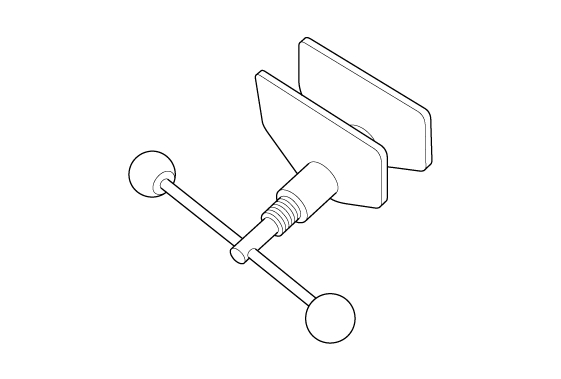
Special Tool Required
pic 1
Removal
NOTE: Review the Service Precautions before doing repairs or service (CLICK HERE).
1. Brake Fluid - Remove
1.
Remove some brake fluid from the master cylinder reservoir.
2. Vehicle - Lift (CLICK HERE)
3. Front Wheels - Remove (CLICK HERE)
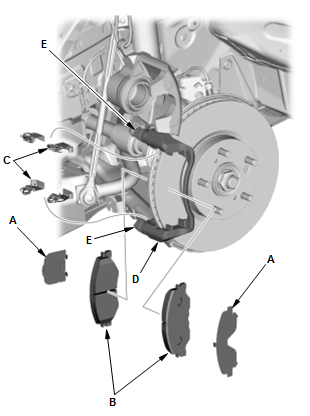
4. Brake Pad - Remove
pic 2
1.
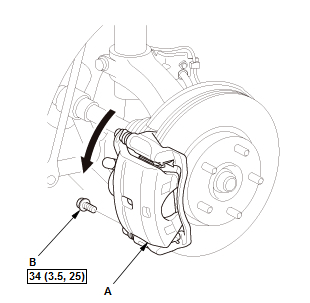
Remove the flange bolt (A).
2.
Pivot the caliper body (B) up out of the way.
NOTE:
Be careful when pivoting the caliper body up or the spring could pop out of position.
Check the hose and the pin boots for damage and deterioration.
pic 3
3.
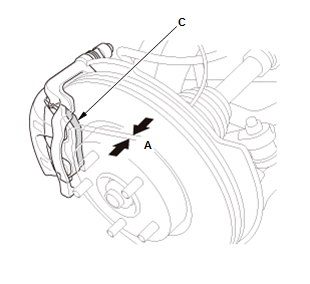
Remove the pad shims (A) and the brake pads (B).
4.
Remove the upper and lower pad clips (C).
NOTE: The upper and lower pad clips are different. During installation, make sure the pad clips are in the proper positions.
5.
Clean the caliper bracket (D) thoroughly; remove any rust, and check for grooves and cracks.
6.
Verify that the caliper pins (E) move in and out smoothly. Clean and lube if needed.
5. Brake Disc - Inspect (CLICK HERE)
Installation
NOTE:
How to read the torque specifications (CLICK HERE).
Review the Service Precautions before doing repairs or service (CLICK HERE).
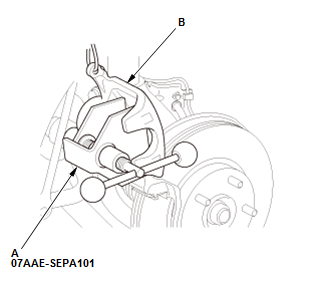
1. Brake Pad - Install
pic 4
1.
Install the brake caliper piston compressor tool (A) on the caliper body (B).
2.
Press in the piston with the brake caliper piston compressor tool.
3.
Remove the brake caliper piston compressor tool.
pic 5
pic 6
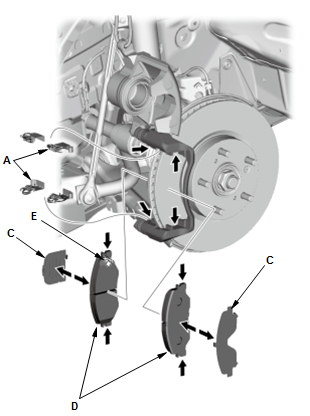
4.
Apply a thin coat of M-77 assembly paste (P/N 08798- 9010) to the retainer mating surface of the caliper bracket (indicated by the arrows).
5.
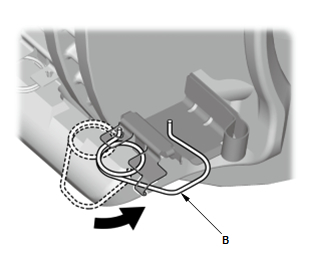
Install the upper and lower pad clips (A).
NOTE: If the pad springs (B) has been removed, and install it as shown.
6.
Wipe off the excess assembly paste from the clips. Keep the assembly paste away from the brake disc and the brake pads.
7.
Apply a thin coat of M-77 assembly paste (P/N 08798- 9010) to the pad side of the shims (C), the back of the brake pads (D), and the other areas indicated by the arrows.
8.
Wipe off the excess assembly paste from the pad shims and brake pads friction material. Keep grease and assembly paste away from the brake disc and brake pads. Contaminated brake disc or brake pads reduce stopping ability.
9.
Install the brake pads and pad shims correctly, with the wear indicator (E) on the upper inside position.
NOTE: If you are reusing the brake pads, always reinstall the brake pads in their original positions to prevent a temporary loss of braking efficiency.
pic 7
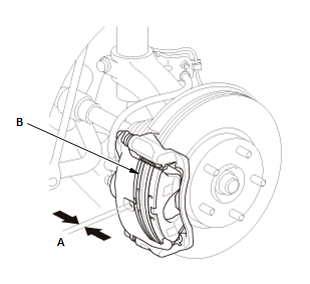
10.
Pivot the caliper body (A) down into position.
11.
Install the flange bolt (B).
12.
Press the brake pedal several times to make sure the brakes work.
NOTE: Engagement may require a greater pedal stroke immediately after the brake pads have been replaced as a set. Several applications of the brake pedal will restore the normal pedal stroke.
2. Front Wheels - Install (CLICK HERE)
3. Brake Fluid - Refill
1.
Add brake fluid as needed.
Inspection
NOTE: Review the Service Precautions before doing repairs or service (CLICK HERE).
1. Vehicle - Lift (CLICK HERE)
2. Front Wheels - Remove (CLICK HERE)
3. Brake Pad - Inspect
pic 8
Outer pad
pic 9
1.
Check the thickness (A) of the inner pad (B) and the outer pad (C). Do not include the thickness of the backing plate.
2.
If any part of the brake pad thickness is less than the service limit, replace the brake pads as a set.
4. Front Wheels - Install (CLICK HERE)
____________________________
Rotor replacement
2019 Honda Insight L4-1.5L (LEB6) Hybrid
Front Brake Disc Removal, Installation, and Inspection
Vehicle Brakes and Traction Control Disc Brake System Brake Rotor/Disc Service and Repair Removal and Replacement Front Brake Disc Removal, Installation, and Inspection
FRONT BRAKE DISC REMOVAL, INSTALLATION, AND INSPECTION
Front Brake Disc Removal, Installation, and Inspection
NOTE:
•
How to read the torque specifications (CLICK HERE).
•
Review the Service Precautions before doing repairs or service (CLICK HERE).
1. Vehicle - Lift (CLICK HERE)
2. Front Wheel - Remove (CLICK HERE)
3. Front Brake Caliper - Remove
1.
Remove the caliper assembly without disconnecting the brake hose from the caliper body (CLICK HERE).
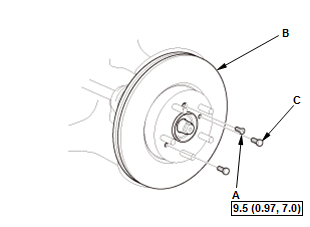
4. Front Brake Disc - Remove
pic 10
1.
Remove the brake disc flathead screw (A).
2.
Remove the brake disc (B).
NOTE: If the brake disc is stuck to the front hub, thread two 8 x 1.25 mm bolts (C) into the brake disc to push it away from the front hub. Turn each bolt 90 degrees at a time to prevent the brake disc from binding.
5. All Removed Parts - Install
1.
Install all removed parts in the reverse order of removal.
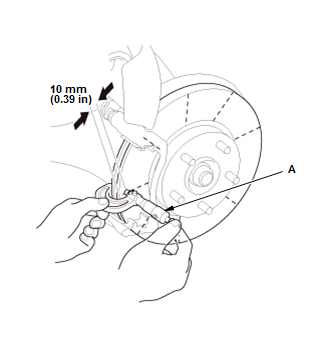
6. Front Brake Disc Runout - Inspect
Inspection
NOTE: How to read the torque specifications (CLICK HERE).
1. Vehicle - Lift (CLICK HERE)
2. Front Wheels - Remove (CLICK HERE)
3. Brake Pad - Remove (CLICK HERE)
4. Front Brake Disc Thickness and Parallelism - Inspect
pic 11
1.
Using a micrometer (A), measure the brake disc thickness at eight points, about 45 ° apart and 10 mm (0.39 in) from the outer edge of the brake disc. Replace the brake disc if the smallest measurement is less than the maximum refinishing limit.
* This is the maximum allowable difference between the thickness measurements.
2.
If the brake disc is beyond the service limit for parallelism, refinish the brake disc with a Honda-approved commercially available on-car brake lathe.
NOTE:
•
If the brake disc is beyond the service limit for refinishing, replace it.
•
For more information on Honda-approved brake lathes, refer to any authorized service information related brake disc refinishing (if available).
3.
Inspect the brake disc runout.
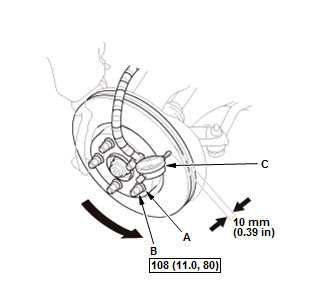
5. Front Brake Disc Runout - Inspect
pic 12
1.
Inspect the brake disc to wheel surface for damage and cracks.
2.
Clean the brake disc thoroughly, and remove all rust.
3.
Install suitable flat washers (A) and the wheel nuts (B).
4.
Tighten the wheel nuts to the specified torque to hold the brake disc securely against the hub.
5.
Set up the dial gauge (C) against the brake disc as shown.
6.
Measure the runout at 10 mm (0.39 in) from the outer edge of the brake disc.
7.
If the brake disc is beyond the service limit for runout, refinish the brake disc with a Honda-approved commercially available on-car brake lathe.
NOTE:
•
If the brake disc is beyond the service limit for refinishing, replace it.
•
If the brake disc is replaced with a new one, check the new disc for runout. If the new disc is out of specification, refinish the disc.
•
For more information on Honda-approved brake lathes, refer to any authorized service information related brake disc refinishing (if available).
6. Brake Pad - Install (CLICK HERE)
7. Front Wheels - Install (CLICK HERE)
_______________
I hope this helps. Let me know if you have other questions.
Take care and God Bless,
Joe
Images (Click to enlarge)
Mar 4, 2021 at 8:36 PM