AC blower

Tiny
SOFIEM11
  • MEMBER
  • 2011 JEEP GRAND CHEROKEE
  • 3.0L
  • 6 CYL
  • 4WD
  • AUTOMATIC
  • 121,879 MILES
The air will blow for sixty seconds, then turn down for five to six seconds, and then repeat. I have replace the floor actuator, and gear. It is working fine now but still not consistent air flow.

What should do?

Thank you,
Jeff
Owner of:
1997’ Jeep Wrangler Sport
2004’ Jeep Grand Cherokee
2011’ Jeep Grand Cherokee ( having the issue)
2011’ Dodge Caravan
Saturday, October 27th, 2018 AT 6:26 PM

4 Replies

Tiny
JACOBANDNICKOLAS
  • MECHANIC
  • 108,133 POSTS
Hi and thanks for using 2carpros. Com

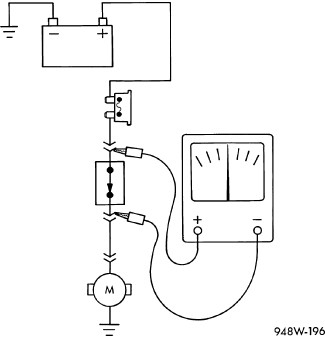
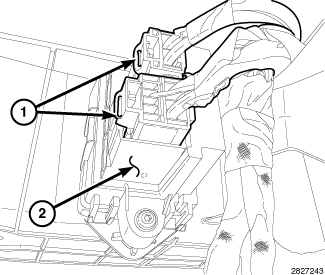
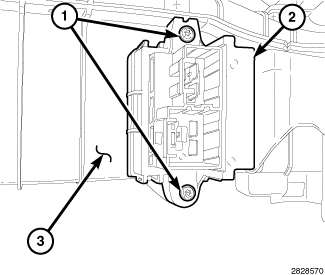
I'm not sure I completely understand. Is the blower motor slowing and then speeding back up? If that is the case, follow this voltage drop test. The attached picture correlates with these directions.

____________________

VOLTAGE DROP TEST

Theory of Operation

Voltage drop is the reduction in voltage in an electrical circuit between the source and load components. The wires and connectors of a circuit should contain next to no resistance. All the voltage should be used through the load. The "load" is the component using the power, such as a light, starter, or blower motor. If a circuit has excessive resistance, it prevents the wire from carrying sufficient current under high load conditions. A voltage drop test is an effective way to find excessive resistance in connections and circuits. To perform a voltage drop test, a Digital Volt Ohm Meter (DVOM) is used to measure the voltage drop across a live circuit or connection while it is under the load. If the circuit or connection being tested has excessive resistance, the DVOM will measure the voltage that the resistance is using. Little or no voltage drop should be read, ideally less that 0.4 of a volt, anything greater indicates excessive resistance and the circuit or connection should be inspected for cleaning or repair.

1. Turn the ignition off.
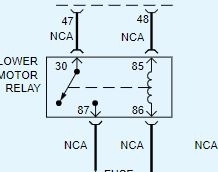
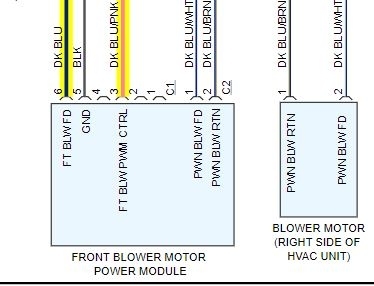
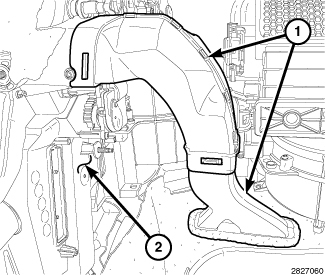
2. Use the wiring application as a guide, trace the circuit being tested and locate the components related to the circuit.
3. Set your multimeter up to check for DC voltage.
4. Carefully back probe the two component harness connectors of the circuit being tested.

WARNING: When the engine is operating, do not stand in direct line with the fan. Do not put your hands near the pulleys, belts or fan. Do not wear loose clothing. Failure to follow these instructions may result in possible serious or fatal injury.

NOTE: If you are testing the starting circuit, disable the engine so the engine does not start.

5. Crank the engine for five seconds if you are testing the starting circuit and monitor the multimeter voltage reading.
6. For circuits that don't require the engine running, turn the ignition on.
7. For circuits that require the engine running, start the engine.

NOTE: If the circuit you are checking needs to be turned on, such as Blower Motor or a lamp, do so now.

8. Monitor the voltage reading.
9. The voltmeter will show the difference in voltage between the two points.

Is the voltage less than 0.4 of a Volt?

Yes

- At this time the circuit is functioning properly. Continue to measure the voltage between the components and wiggle the wire harness and connectors while checking for an intermittent condition.
- Use the wiring application as a guide to trace the circuits and look for any in-line connectors where the excessive resistance could occur intermittently.
- Look for any chafed, pierced, pinched, or partially broken wires.
- Look for broken, bent, pushed out or corroded terminals. Verify that there is good pin to terminal contact in the related wire harness connectors.
- Perform any Technical Service Bulletins (TSBs) that may apply.

No

- Repair the excessive resistance in the circuit.
- Use the wiring application as a guide to trace the circuit and look for any in-line connectors where the excessive resistance may occur.
- Look for any chafed, pierced, pinched, or partially broken wires.
- Look for broken, bent, pushed out or corroded terminals. Verify that there is good pin to terminal contact in the related wire harness connectors.
- Perform any Technical Service Bulletins (TSBs) that may apply.

___________________________________________________

If my understanding of the problem is incorrect, let me know exactly what is happening.

Take care,
Joe
Was this
answer
helpful?
Yes
No
Sunday, October 28th, 2018 AT 7:20 PM
Tiny
SOFIEM11
  • MEMBER
  • 2 POSTS
Maybe I can describe it better. AC/heater is on, it works for sixty seconds and the. Shuts down for five to six seconds. Then starts up again for sixty seconds and off five to six. Repeat repeat repeat.
Was this
answer
helpful?
Yes
No
Sunday, October 28th, 2018 AT 8:34 PM
Tiny
JACOBANDNICKOLAS
  • MECHANIC
  • 108,133 POSTS
HI and thanks for using 2carpros,com.

Based on your description, the first thing I would check is the blower motor relay. I have attached a picture of its location (under hood/Integrated power module) Switch the relay with another one with the same part number to see if that changes things.

Next, there is a blower motor power module under the dash that could be causing problems as well. Testing of this component requires special tooling.

Start with the relay and see if that changes anything. It may be heating up and loosing connection and then cooling enough to make connection.

If you don't have a relay with the same part number, here is a DIY link that shows how to check one.

https://www.2carpros.com/articles/how-to-check-an-electrical-relay-and-wiring-control-circuit

If you decide to inspect the blower motor power module, here are the directions for removal: Starting with picture 3, the remaining pics correlate with these directions.

REMOVAL

WARNING: Disable the airbag system before attempting any steering wheel, steering column or instrument panel component diagnosis or service. Disconnect and isolate the negative battery (ground) cable, then wait two minutes for the airbag system capacitor to discharge before performing further diagnosis or service. This is the only sure way to disable the airbag system. Failure to follow these instructions may result in accidental airbag deployment and possible serious or fatal injury.

WARNING: The heat sink for the blower motor power module may get very hot during normal operation. If the blower motor was turned on prior to servicing the blower motor power module, wait five minutes to allow the heat sink to cool before performing diagnosis or service. Failure to take this precaution can result in possible personal injury.

NOTE: Automatic Temperature Control (ATC) shown. Manual Temperature Control (MTC) similar.

NOTE: Illustration shown with instrument panel removed from view for clarity.

1. Disconnect and isolate the negative battery cable.
2. Remove the passenger side instrument panel silencer.
3. Disconnect the passenger side floor ducts (1) from the HVAC housing (2).
4. Disconnect the two wiring harness connectors (1) from the blower motor power module (2).

5. Remove the two screws (13) that secure the blower motor power module (2) to the HVAC housing (3).
6. Remove the blower motor power module from the HVAC housing.

Let me know if this helps or if you have other questions.

Take care,
Joe
Was this
answer
helpful?
Yes
No
Monday, October 29th, 2018 AT 5:09 PM
Tiny
SOFIEM11
  • MEMBER
  • 2 POSTS
I have checked all the fuses, all good. I do not know how to determine the 30, 40, 60 fuses. But I would assume it is obvious. So the relays, should I replace them all?

Thanks,
Jeff
Was this
answer
helpful?
Yes
No
Thursday, November 1st, 2018 AT 7:26 PM

Please login or register to post a reply.

Sponsored links