Good afternoon,
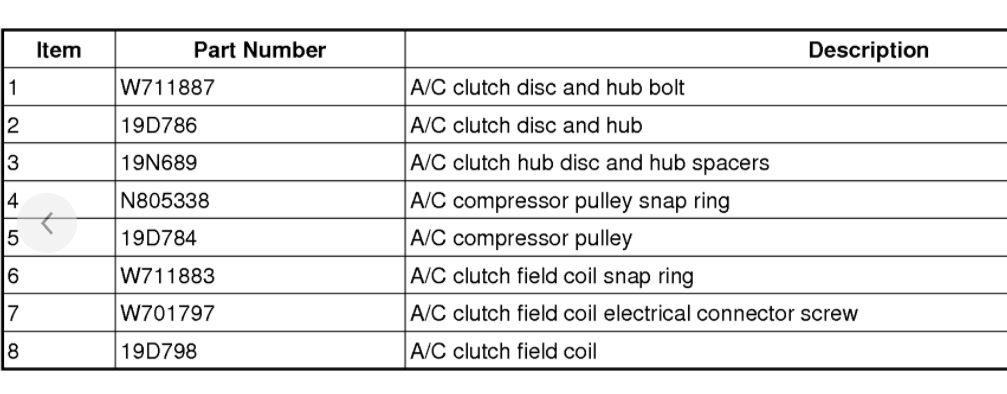
You can just replace the pulley with the bearing provided there is no damage to the nose the bearing rides on.
https://www.2carpros.com/articles/replace-air-conditioner-compressor
https://www.2carpros.com/articles/re-charge-an-air-conditioner-system
Roy
Removal
1. Remove the A/C compressor. For additional information, refer to Air Conditioning (A/C) Compressor - 6.2L and 6.8L See: Compressor HVAC > Removal and Replacement > Air Conditioning (A/C) Compressor or Air Conditioning (A/C) Compressor - 6.7L Diesel See: Compressor HVAC > Removal and Replacement > Air Conditioning (A/C) Compressor.
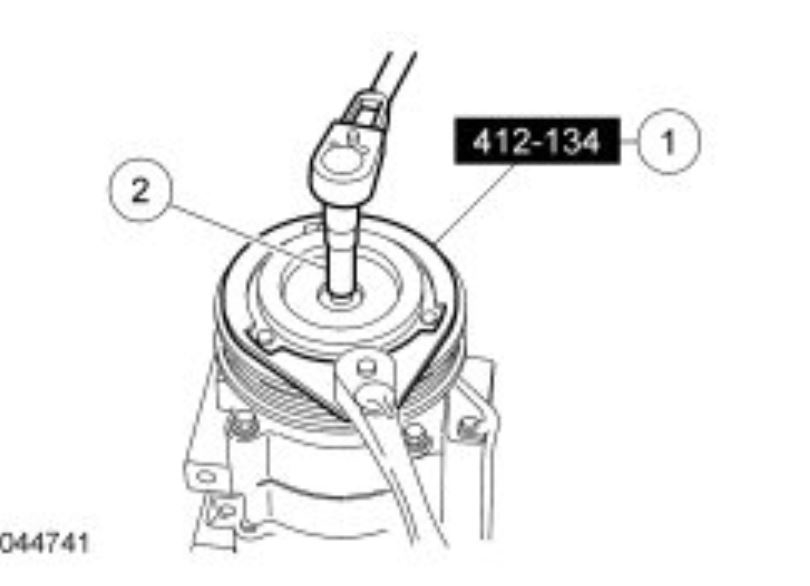
2. Remove the A/C clutch disc and hub bolt.
1. Using the Compressor Clutch Holding Tool, hold the A/C clutch disc and hub.
2. Remove the A/C clutch disc and hub bolt.
imageOpen In New TabZoom/Print
3. Remove the A/C clutch disc and hub.
4. Remove the A/C compressor pulley snap ring.
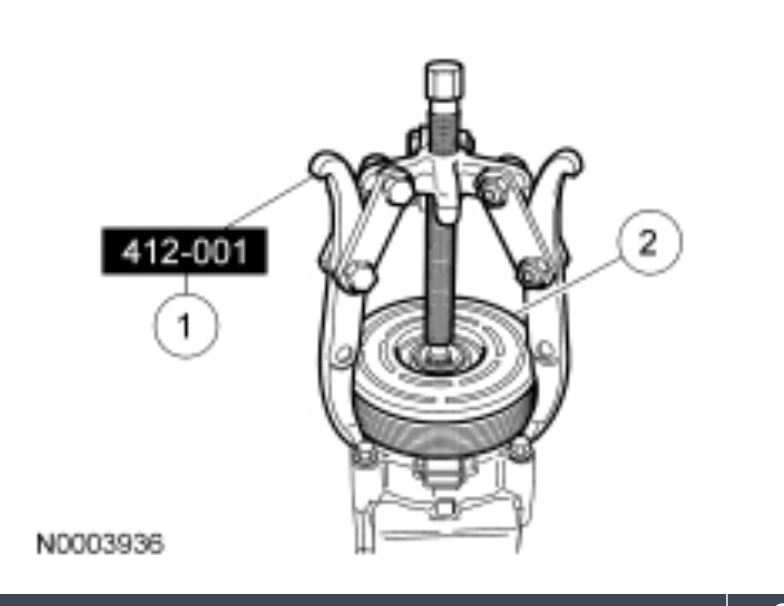
5. NOTICE: Do not use air tools. Damage to the Air Conditioning (A/C) clutch pulley or A/C compressor may result.
Remove the A/C compressor pulley.
1. Install the Compressor Pulley Remover.
2. Using the Compressor Pulley Remover, remove the A/C compressor pulley.
imageOpen In New TabZoom/Print
6. Remove the A/C clutch field coil snap ring.
7. Remove the A/C clutch field coil electrical connector bracket screw.
8. Remove the A/C clutch field coil.
Installation
NOTE: A new A/C compressor may come equipped with a clutch and pulley. If not, the A/C clutch components should be reused unless obvious signs of damage are found. If excessive grooving is found, a new A/C clutch disc and hub and a new A/C compressor pulley must be installed together. Otherwise, each component can be installed individually where needed.
1. Visually inspect the A/C clutch disc and hub, A/C compressor pulley and A/C clutch field coil for damage.
Inspect for physical damage, including cracked or melted components or discoloration due to excessive heat.
Inspect for excessive wear, including grooving in the A/C clutch disc and hub or A/C compressor pulley that is more than fingernail depth.
Inspect for roughness in the A/C compressor pulley bearing.
2. Clean the A/C clutch field coil and pulley mounting surfaces.
3. Install the A/C clutch field coil.
4. Install the A/C clutch field coil snap ring.
5. Install the A/C clutch field coil electrical connector bracket screw.
6. NOTE: The A/C compressor pulley is a tight fit on the A/C compressor. It must be correctly aligned during installation.
Install the A/C compressor pulley.
7. Install the A/C compressor pulley snap ring with the bevel side out.
8. Place one nominal thickness A/C clutch disc and hub spacer inside the clutch hub spline opening.
9. Install the A/C clutch disc and hub.
10. Using the Compressor Clutch Holding Tool, install the A/C compressor clutch disc and hub bolt.
1. Hold the A/C clutch disc and hub with the Compressor Clutch Holding Tool.
2. Tighten the bolt to 14 Nm (124 lb-in).
Images (Click to make bigger)
Thursday, December 10th, 2020 AT 10:17 AM