Four wheel drive not engaging and service four wheel drive light is on

Tiny
DORKFISH72
  • MEMBER
  • 2008 CHEVROLET SILVERADO
  • 5.3L
  • V8
  • 4WD
  • AUTOMATIC
  • 170,000 MILES
Hi, went to engage my 4wd for the first time this year and it failed to engage.
I have the dial type, when going through the selections nothing occurs no lights nothing. I do however get the service 4wd light.
In the garage with just the key turn I could hear the actuator motor engage and the selector indicated 4wd. Once I started moving I definitely had no 4wd and then threw the service light again.

Any ideas?
Wednesday, October 21st, 2020 AT 10:53 AM

14 Replies

Tiny
JACOBANDNICKOLAS
  • MECHANIC
  • 108,348 POSTS
Hi,

If the service light came on, you really should have the CAN bus system scanned to identify trouble codes. By doing this, it will identify any errors in the system. Here is a video that shows how it is done:

https://youtu.be/InIlnsjOVFA

Now, if you hear the actuator engage on the transfer case, the likely issue is at the front axle. There is an electric motor actuator on it as well. I need you to check if it is operating. If nothing is happening, then check for power. If there is power, replace the actuator. Here are the directions for replacement. The attached pics correlate with the directions.

_________________________

2008 Chevy Truck Silverado 1500 4WD V8-5.3L
Front Drive Axle Actuator Replacement
Vehicle Powertrain Management Transmission Control Systems Actuators and Solenoids - Transmission and Drivetrain Actuators and Solenoids - Differential Actuator Service and Repair Removal and Replacement Front Drive Axle Front Drive Axle Actuator Replacement
FRONT DRIVE AXLE ACTUATOR REPLACEMENT
Front Drive Axle Actuator Replacement

Removal Procedure

1. Raise and support the vehicle. Refer to Lifting and Jacking the Vehicle .
2. Remove the engine shield, if equipped. Refer to Engine Shield Replacement .
3. Disconnect the electrical connector from the actuator.

pic 1

4. Remove the actuator (1) for the 8.25 inch axle (2) or (3) for the 9.5 inch axle (4) by turning the actuator counterclockwise.

Installation Procedure

pic 2

1. Apply sealant to the threads of the actuator (1) for the 8.25 inch axle (2) or (3) for the 9.25 inch axle (4). Use the correct sealant. Refer to Sealers, Adhesives, and Lubricants .

Notice: Refer to Fastener Notice .

2. Install the actuator (1 or 3).

Tighten the actuator to 20 N.m (15 lb ft).

3. Connect the electrical connector to the actuator.
4. Install the engine shield, if equipped. Refer to Engine Shield Replacement .
5. Lower the vehicle.

_________________________________

Let me know if this helps or if you have other questions.

Take care,
Joe
Was this
answer
helpful?
Yes
No
Wednesday, October 21st, 2020 AT 6:25 PM
Tiny
DORKFISH72
  • MEMBER
  • 8 POSTS
I know where the actuator is. I haven't removed it yet. When I select the different 4wd options I can hear both actuate. When I actuated into 4hi I tried to rotate the front driveshaft, if was locked in. In 2hi it was free.

I was able to get it in 4lo but not understanding why it won't engage in 4hi.
Was this
answer
helpful?
Yes
No
Wednesday, October 21st, 2020 AT 6:37 PM
Tiny
DORKFISH72
  • MEMBER
  • 8 POSTS
At least it geared down not sure if it actually engaged.
Was this
answer
helpful?
Yes
No
Wednesday, October 21st, 2020 AT 6:54 PM
Tiny
JACOBANDNICKOLAS
  • MECHANIC
  • 108,348 POSTS
Based on what you are saying (if I am understanding correctly) the 4wd at the transfer case is engaged (can't turn the driveshaft) but not working. That leads me to believe it is related to the front module.

Please bear with me. Not being there makes it a bit more difficult.

_________________________

Take a look through these tests and see if any will help.

________________________

2008 Chevy Truck Silverado 1500 4WD V8-5.3L
Four-Wheel Drive Does Not Engage
Vehicle Transmission and Drivetrain Transfer Case Testing and Inspection Symptom Related Diagnostic Procedures MP 1222/1225/1226-NQG - Transfer Case Four-Wheel Drive Does Not Engage
FOUR-WHEEL DRIVE DOES NOT ENGAGE
Four-Wheel Drive Does Not Engage

Diagnostic Instructions

* Perform the Diagnostic System Check - Vehicle prior to using this diagnostic procedure.
* Review Strategy Based Diagnosis for an overview of the diagnostic approach.
* Diagnostic Procedure Instructions provides an overview of each diagnostic category.

Circuit/System Description

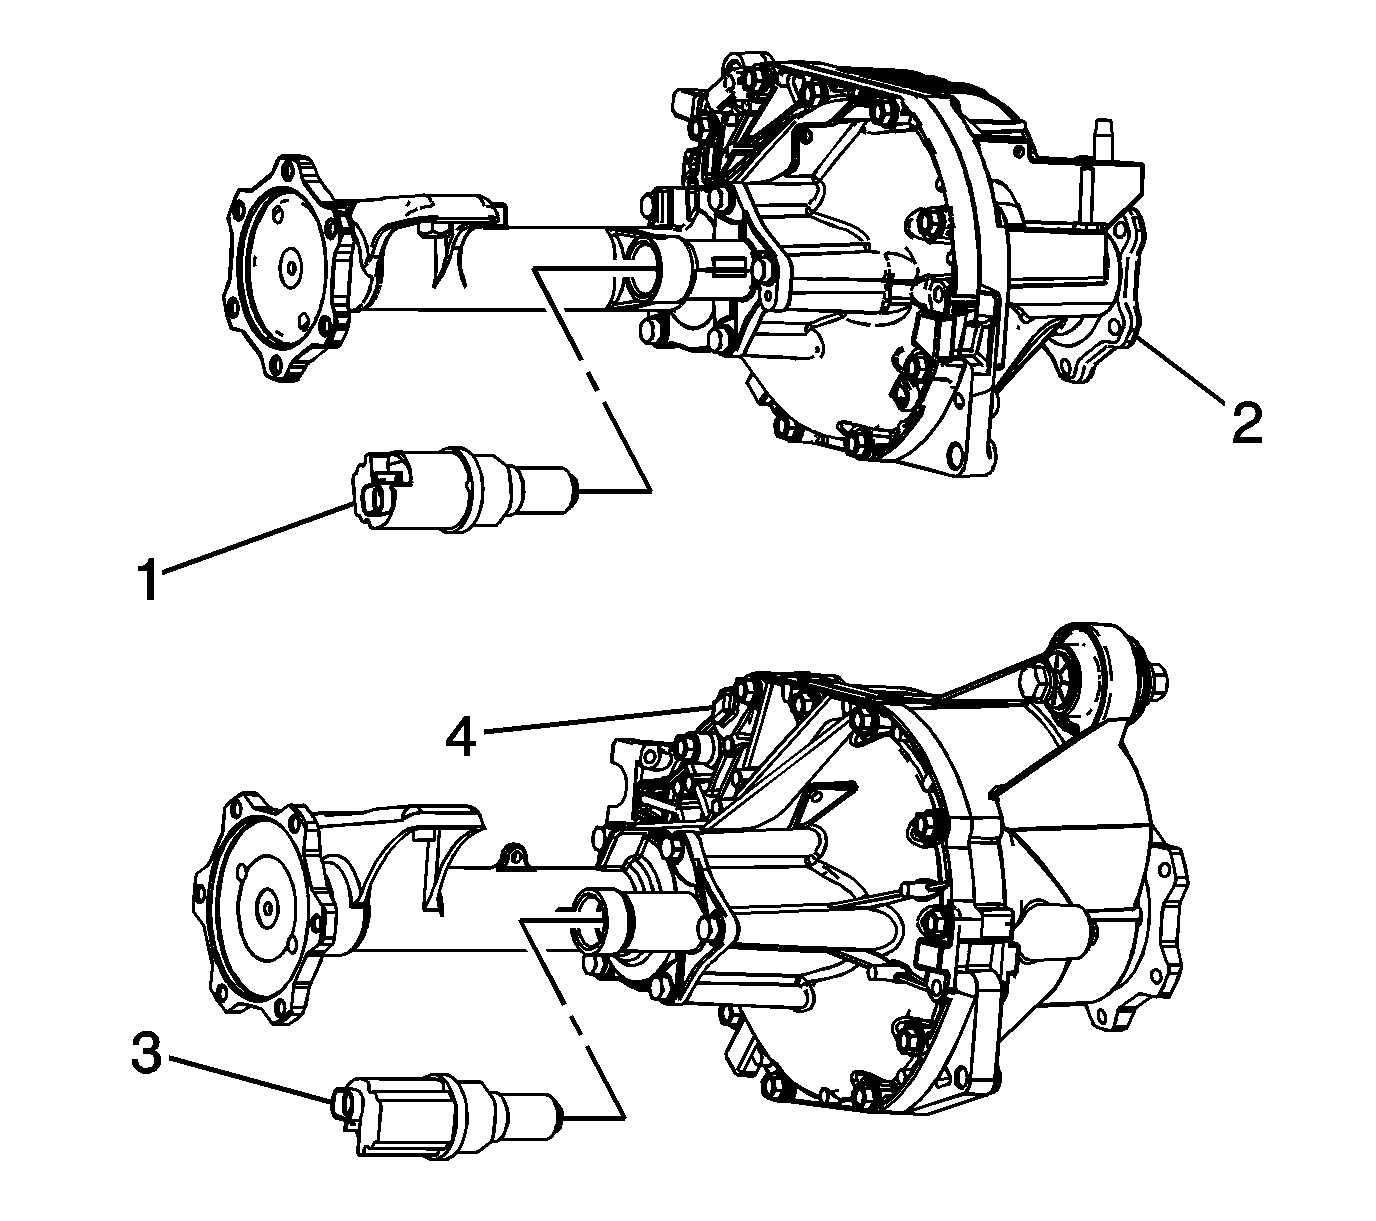
The front axle control circuit consists of an electric motor actuator which engages and disengages the front axle. The front axle actuator consists of the following components within the actuator assembly:

* A permanent magnetic motor
* A worm gear controlled plunger
* A front axle switch
* An electronic control circuit

The front axle actuator consists of the following circuits:

* An ignition 3 voltage circuit
* A ground circuit
* An axle actuator control circuit
* An axle switch signal circuit

Whenever a shift to 4WD is selected, the transfer case switch engages the front axle by grounding the axle actuator control circuit.

Reference Information
Schematic Reference

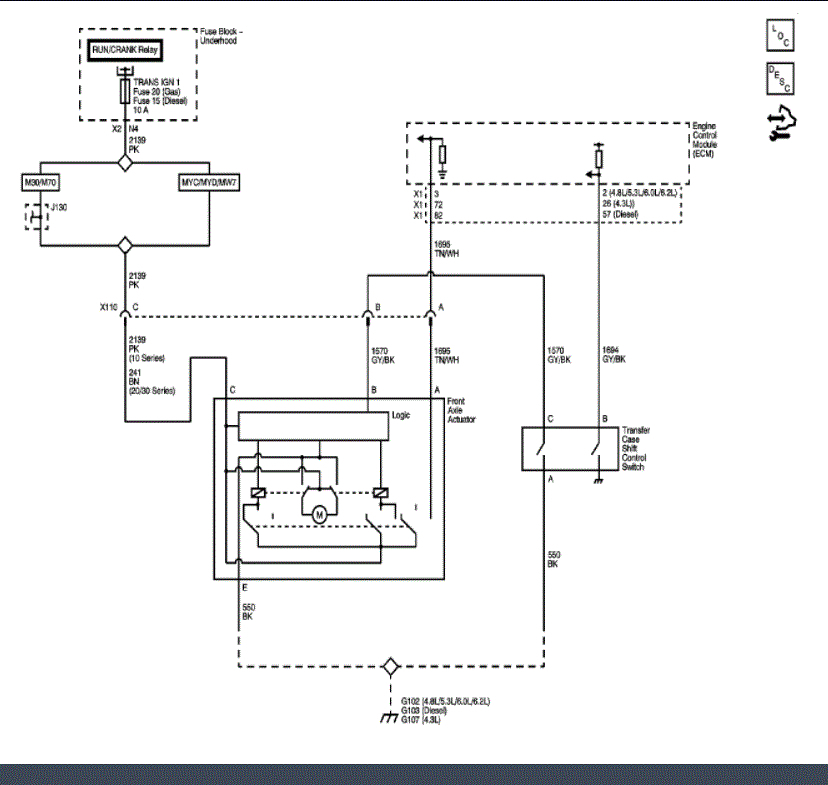
Transfer Case Control Schematics (See: Transfer Case > Electrical > Transfer Case Control Schematics)
Connector End View Reference

Component Connector End Views
Electrical Information Reference

* Circuit Testing
* Connector Repairs
* Testing for Intermittent Conditions and Poor Connections
* Wiring Repairs

Circuit/System Verification

1. Place the vehicle in 4WD install a scan tool and using engine data 2 look at the display for 4WD signal.
2. Verify that the scan tool indicates that the vehicle is in 4WD.

If the scan tool indicates that the vehicle is in 2WD go to circuit system testing.

Circuit/System Testing

1. Check the axle switch signal circuit for an open or high resistance.

If everything checks normal then go to the next step.

2. Check the front axle actuator control circuit for an open or high resistance with the front axle actuator disconnected and the mode selection switch disconnected.

If everything checks normal reconnect the mode selection switch and retest. If the circuit still shows an open or high resistance then replace the switch. If the circuit indicates no open or high resistance then refer to front axle actuator and axle testing.

Front Axle Actuator and Axle Testing

Remove the actuator and attempt shift from 2WD to 4WD, if the actuator moves check the front axle actuator plunger and fork assembly.

If the actuator does not function properly then replace the front axle actuator.

Repair Instructions

Perform the Diagnostic Repair Verification after completing the diagnostic procedure.

* Front Drive Axle Actuator Replacement (See: Actuator, Differential Lock > Removal and Replacement > Front Drive Axle Actuator Replacement)
* Transfer Case Gear Indicator Switch Replacement
* Front Drive Axle Clutch Fork Inspection (See: Differential Lock > Removal and Replacement > Front Drive Axle Clutch Fork Inspection)

_______________________

I attached a pic below from the wiring schematic for the transfer case control system.

Let me know if any of this helps.

Joe
Was this
answer
helpful?
Yes
No
Wednesday, October 21st, 2020 AT 7:51 PM
Tiny
DORKFISH72
  • MEMBER
  • 8 POSTS
Can you explain the difference in functions between the transfer case encoder motor and the front actuator motor?
Was this
answer
helpful?
Yes
No
Thursday, October 22nd, 2020 AT 4:50 AM
Tiny
JACOBANDNICKOLAS
  • MECHANIC
  • 108,348 POSTS
Hi,

I would be happy to.

Encoder Motor (see pic 1)
The transfer case is shifted by an encoder motor (9) on the control actuator shaft. The control actuator shaft rotates the 2/4 wheel drive actuator cam (10) and moves the high/low range shift fork (12) or the 2/4 wheel drive mode shift fork (8). Depending on the selected mode or range, the shift forks move either the high/low clutch (4) for the high/low range planetary assembly (3) or the synchronizer sleeve (6) for the 2/4 wheel drive mode.

The front axle actuator engages and disengages the front axle. The front axle actuator consists of a permanent magnetic (PM) motor, a worm gear controlled plunger, a front axle switch and an electronic control circuit. When a range shift to 4HI, or 4LO is requested, the transfer case shift control module requests engagement of the front axle by grounding the axle actuator control circuit through a current limiting driver.

Joe
Was this
answer
helpful?
Yes
No
Thursday, October 22nd, 2020 AT 5:03 PM
Tiny
DORKFISH72
  • MEMBER
  • 8 POSTS
I will remove the front actuator motor this weekend to inspect it and inspect the front differential.
If the actuator is working correctly and the encoder motor is working correctly which it appears to be. Then my issue lies with in the front differential. Am I correct to assume this?
Was this
answer
helpful?
Yes
No
Thursday, October 22nd, 2020 AT 7:21 PM
Tiny
JACOBANDNICKOLAS
  • MECHANIC
  • 108,348 POSTS
Either the differential or transfer case. However, I have a feeling it is the front actuator motor.

Let me know what you find.

Joe
Was this
answer
helpful?
Yes
No
Friday, October 23rd, 2020 AT 12:09 PM
Tiny
DORKFISH72
  • MEMBER
  • 8 POSTS
I pulled the actuator motor and tested it. It moves like it should, I then reached in to see if I could move the fork, it would not move. I noticed that the axle shaft in the sleeve was not fully retracted inside the sleeve.
I then removed the sleeve from the differential, I found the fork was ok, but the centering washer for the shaft was not sitting right and damaged, the washer on top of that was concaved, the washer that goes between the fork gear and the gear inside the diff was scarred up.
I assume this is my issue. Unless there is a internal problem with the front differential.

Since I can only imagine these few washers aren't very expensive I will replace them and assemble.

What I don't know is the proper names.

Is there a parts breakdown and identifier with part numbers out there?
Was this
answer
helpful?
Yes
No
Saturday, October 24th, 2020 AT 9:57 AM
Tiny
JACOBANDNICKOLAS
  • MECHANIC
  • 108,348 POSTS
Hi,

I attached an exploded view of the front differential. The pic is of the 8.25". If you have the 9.25, let me know.

Here is a legend of the components:

1 - Output Shaft
2 - Pinion Bearing Spacer
3 - Pinion Head Bearing Assembly
4 - Pinion Shim
5 - Stem Pinion
6 - Pinion Flange Nut
7 - Pinion Flange Washer
8 - Pinion Flange Assembly
9 - Pinion Seal
10 - Pinion Tail Bearing Assembly
11 - Carrier Housing
12 - Output Shaft Seal Assembly
13 - Output Shaft
14 - Drain Plug Assembly
15 - Drain Plug Washer
16 - Fill Plug Assembly
17 - Fill Plug O-ring Seal
18 - Carrier Locator Pin
19 - Vent Connector
20 - Differential Case
21 - Ring Gear
22 - Output Shaft Bearing Assembly
23 - 8-Point Lock Ring
24 - Sleeve and Insert Assembly
25 - Differential Side Bearing Assembly
26 - Differential Cross Pin Lock
27 - Differential Pinion Thrust Washer
28 - Differential Pinion Gear
29 - Differential Side Gear Washer
30 - Differential Side Gear
31 - Output Shaft Snap Ring
32 - Differential Pinion Gear
33 - Differential Pinion Gear Thrust Washer
34 - Differential Side Gear
35 - Differential Side Gear Washer
36 - Differential Cross Pin
37 - Ring Gear Bolt
38 - Output Shaft Bearing Assembly
39 - 8-Point Lock Ring
40 - Sleeve and Insert Assembly
41 - Differential Side Bearing Assembly
42 - Carrier Gasket
43 - Carrier Cover
44 - Tube Locator Pin
45 - Inner Output Shaft Thrust Washer
46 - Inner Output Shaft Bearing Assembly
47 - Inner Output Shaft
48 - Carrier Bolt
49 - Shifter Spring
50 - Shifter Fork
51 - Shifter Fork Rod
52 - Tube Bolt
53 - Shift Actuator Assembly
54 - Output Shaft Seal Assembly
55 - Output Shaft Bearing Assembly
56 - Tube
57 - Tube Gasket
58 - Output Shaft Locator Thrust Washer
59 - Output Shaft Thrust Washer
60 - Output Shaft Snap Ring
61 - Shifter Sleeve

_____________________________________

Let me know if this helps.

Take care,
Joe
Was this
answer
helpful?
Yes
No
Saturday, October 24th, 2020 AT 11:16 PM
Tiny
DORKFISH72
  • MEMBER
  • 8 POSTS
Thanks for that. Where can I find a part # for items 58 and 59?
Was this
answer
helpful?
Yes
No
Sunday, October 25th, 2020 AT 9:40 AM
Tiny
JACOBANDNICKOLAS
  • MECHANIC
  • 108,348 POSTS
Hi,

I'm not going to have the part numbers for those. However, copy the pic and parts list and take it with you to a dealership. They have the exploded views of internal parts and should be able to identify a part number.

Joe
Was this
answer
helpful?
Yes
No
Sunday, October 25th, 2020 AT 6:54 PM
Tiny
DORKFISH72
  • MEMBER
  • 8 POSTS
Recap, that was the issue. Replaced the damaged 58 washer, the damaged 59 washer is no longer used as the 58 washer is thicker and takes place of the 59 washer. Also replaced the damaged 45 washer, you must mic it as there are 12 different versions 1.3mm-4.8mm. Reassembled manually tested and electrically tested. Front wheels now lock in.
Thanks for the help.
Was this
answer
helpful?
Yes
No
Tuesday, October 27th, 2020 AT 5:12 PM
Tiny
JACOBANDNICKOLAS
  • MECHANIC
  • 108,348 POSTS
Great job, and you are very welcome. I'm glad to hear you got it taken care of. Please feel free to come back anytime in the future if you have questions or need help.

Take care,
Joe
Was this
answer
helpful?
Yes
No
+1
Tuesday, October 27th, 2020 AT 6:33 PM

Please login or register to post a reply.

Sponsored links