Shut off while driving will not crank or start

Tiny
RYAN FERVIDA
  • MEMBER
  • 2006 FORD MUSTANG
  • 4.0L
  • V6
  • 2WD
  • AUTOMATIC
  • 140,000 MILES
I was driving my car when it lost power and stalled. Will not crank or start now.
Have replaced the starter, battery, alternator, throttle actuator motor.

When I turn the key. I hear the starter relay click on. But no crank. No security lights. And my code reader will not link to the computer.

With the key on. I hear the throttle butterfly clicking. It stops after about ten minutes.
Saturday, January 5th, 2019 AT 10:56 AM

9 Replies

Tiny
JACOBANDNICKOLAS
  • MECHANIC
  • 108,262 POSTS
Hi and thanks for using 2CarPros.

Are you able to turn the engine manually with a breaker bar or ratchet at the crankshaft? What does the engine oil look like? Is it full? Is the coolant full?

Those may sound like funny questions, but I'm trying to determine something. Let me know.

Take care,
Joe
Was this
answer
helpful?
Yes
No
Saturday, January 5th, 2019 AT 11:05 PM
Tiny
RYAN FERVIDA
  • MEMBER
  • 5 POSTS
Yes, the engine will turn manually. That was a first concern.
Unplugged the connector to the throttle body actuator and the engine will crank but not start. Plugged back in and no crank.
Was this
answer
helpful?
Yes
No
Saturday, January 5th, 2019 AT 11:13 PM
Tiny
JACOBANDNICKOLAS
  • MECHANIC
  • 108,262 POSTS
It cranks with the throttle body actuator unplugged but not with it plugged in? Are you referring to the throttle position sensor?
Was this
answer
helpful?
Yes
No
Sunday, January 6th, 2019 AT 12:27 AM
Tiny
RYAN FERVIDA
  • MEMBER
  • 5 POSTS
No, the actuator is on one side of the throttle body and the position sensor is on the other.
Was this
answer
helpful?
Yes
No
Sunday, January 6th, 2019 AT 4:23 AM
Tiny
JACOBANDNICKOLAS
  • MECHANIC
  • 108,262 POSTS
Welcome back:

Honestly that doesn't make sense, but if I had the car in front of me, I would start checking grounds. The first one I would check is related to the Bussed Electrical Center (BEC) located in the right front of the engine compartment. It is responsible for many components including the PCM relay.

See the attached schematic and let me know what you find.

Joe
Was this
answer
helpful?
Yes
No
Sunday, January 6th, 2019 AT 7:20 PM
Tiny
RYAN FERVIDA
  • MEMBER
  • 5 POSTS
Sorry it's taken me a while to respond. This problem has me baffled also.
Cheched and cleaned up the grounds. Checked all fuses and relays.
My fear is something is wrong with the bom. I have no way to test that. There is no other noticeable symptoms.
Was this
answer
helpful?
Yes
No
Tuesday, January 8th, 2019 AT 7:32 AM
Tiny
JACOBANDNICKOLAS
  • MECHANIC
  • 108,262 POSTS
Welcome back, and no problem.

What are you referring to by BOM? Let me know if that was an error. I may be able to find diagnostic information for you.

Take care and let me know.

Joe
Was this
answer
helpful?
Yes
No
Tuesday, January 8th, 2019 AT 7:41 PM
Tiny
RYAN FERVIDA
  • MEMBER
  • 5 POSTS
Sorry meant the body control module.
Was this
answer
helpful?
Yes
No
Tuesday, January 8th, 2019 AT 7:55 PM
Tiny
JACOBANDNICKOLAS
  • MECHANIC
  • 108,262 POSTS
No problem.

Here are the directions for replacing the BCM. There are no diagnostics listed. Ryan, if you replace it, make sure to follow these directions. Otherwise, you are going to have trouble with configuring the new module.

Removal and Installation

1. CAUTION:
- Prior to the removal of the module, it is necessary to upload the module configuration information to the appropriate diagnostic equipment. This information needs to be downloaded into the new module once installed.
- Electronic modules are sensitive to static electrical charges. If exposed to these charges, damage may result.

Disconnect the battery.

2. Remove the RH A-pillar lower trim panel.
3. Disconnect the 2 front SJB electrical connectors.
4. Remove the SJB nut.
- To install, tighten to 5 Nm (44 lb-in).

5. Slide the SJB downward and position the SJB forward to access the rear electrical connectors.
6. Disconnect the 6 rear SJB electrical connectors
7. Remove the SJB.

8. CAUTION: Make sure that the wiring harnesses are correctly routed. Pinching the wiring harnesses between the SJB and the mounting surface may cause damage to the wiring harness.

NOTE: Do not remove the watershield from the new SJB.

To install, reverse the removal procedure.
- Download the module configuration information from the diagnostic tool into the new module.
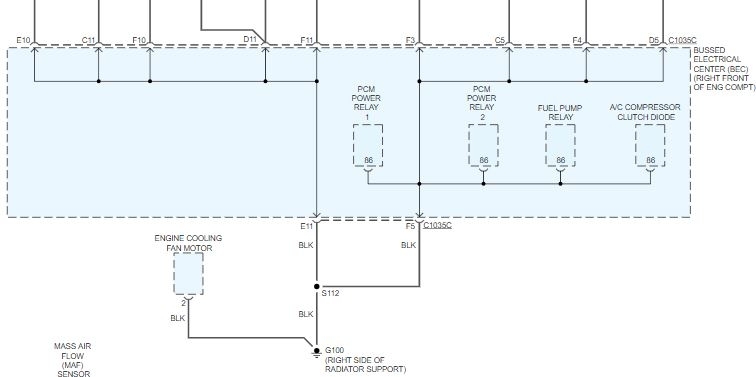
Was this
answer
helpful?
Yes
No
Tuesday, January 8th, 2019 AT 8:06 PM

Please login or register to post a reply.

Sponsored links