Hi,
Replacing front brakes isn't too hard to do. You can expect to get approximately 25,000 miles from a set of pads, but that is based on the driver.
First, here is a link that shows how to replace brakes and rotors in general. You can use this as a guide.
https://www.2carpros.com/articles/how-to-replace-front-brake-pads-and-rotors-fwd
_________________________________
Here are the directions specific to your vehicle. The attached pics correlate with the directions.
________________________________
2006 BMW 530i Sedan (E60) L6-3.0L (N52)
Removing and Installing or Replacing Brake Pads on Both Front Disc Brakes [REP-REP-
34 11 000 Removing and installing/replacing brake pads on both front disc brakes
image
Attention!
Brake pad wear sensor: After disassembly, it must be replaced (brake pad wear sensor loses its retention capability in the brake pad).
Retaining pins and expanding spring: for vehicles older than 48 months it is recommended to replace the retaining spring!
To prevent damage to the surface coating, do not mechanically clean the guide surfaces for the brake pads on the brake caliper mounting bracket if possible, and apply a thin coat of brake pad paste.
Spread brake pad paste onto the marked surfaces using a brush!
Observe guideline for applying brake pad paste on brake pads and caliper carrier.
Attention!
European version only.
In case of sport brake pads for M5/M6:
Due to the increased strain on the brake discs, we recommend that you also replace the brake discs when fitting a set of brake pads
It is absolutely essential to exchange the brake discs if cracked 13 mm even before the brake pad is worn
Necessary preliminary work:
Remove wheels.
Remove brake pad wear sensor
Observe safety information on raising the vehicle.
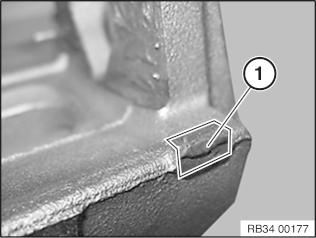
Lever out retaining spring (1) in direction of arrow towards rear.
Installation note:
Attach retaining spring (1) first at top and bottom and then allow retaining lug (2) to engage in recess of brake caliper housing.
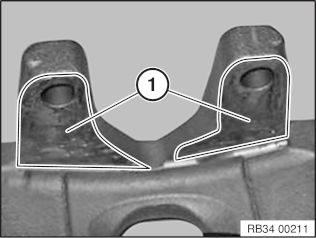
Remove plastic plugs (1).
Left:
Pull out the brake pad wear sensor towards the rear from the brake pad.
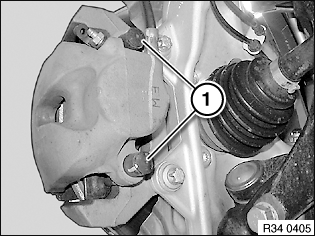
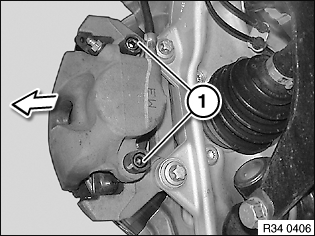
Release guide bolts (1) with special tool 34 1 080. Withdraw brake calliper backwards.
Installation note:
Only clean guide bolts; do not grease.
Check threads.
Replace all guide screws which are not in perfect condition.
Replace self-locking or microencapsulated screws
30 - 5 Nm
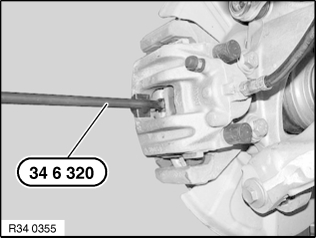
Press back brake pads and piston with special tool 34 6 320.
Attention!
When forcing piston back:
Pay attention to brake fluid level in expansion tank; brake fluid that spills over will damage paintwork.
Press brake pads inwards and remove.
The two brake pads are seated with a spring in the piston or in the brake caliper housing and must not be mixed up.
Attention!
Mark any worn brake pads.
In the event of one-sided brake pad wear, do not change brake pads round.
Observe minimum thickness of brake pads.
Clean brake pads.
Do not apply grease to brake lining backplate.
Note:
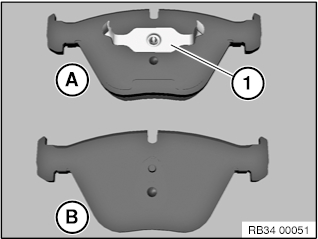
The outer brake pads gradually need to be changed as well.
The previous version (A) with retaining spring (1) is replaced by brake pads of version (B) without retaining spring!
The use of pad sets of version (A) with retaining spring continues to be permissible!
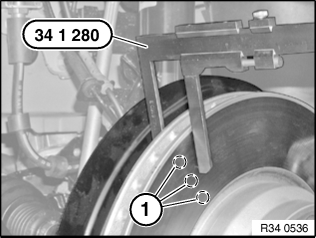
Check minimum brake disc thickness:
Position special tool 34 1 280 at three measuring points in area (1) and measure.
Compare measuring result and lowest value with setpoint value.
Attention!
New brake pads may only be fitted if the brake disc thickness is greater than the minimum brake disc thickness (MIN TH).
Check dust boot for damage and renew if necessary.
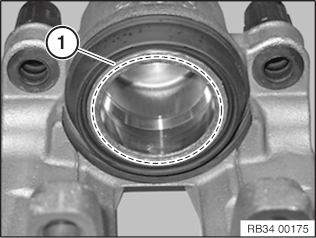
Clean contact surface (1) of brake piston with brake cleaner and apply a thin coating of brake pad paste.
Attention!
Dust boot must not come into contact with brake pad paste as this may cause the dust boot to swell.
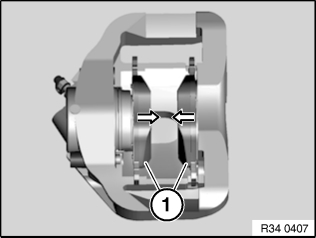
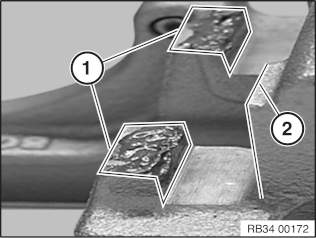
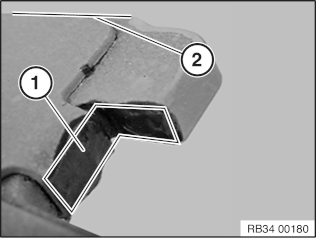
Clean contact surfaces (1) of T-heads/brake calliper housing with brake cleaner and apply a thin coating of brake pad paste.
Clean contact surface (1) of brake caliper with brake cleaner and apply a thin coating of brake pad paste.
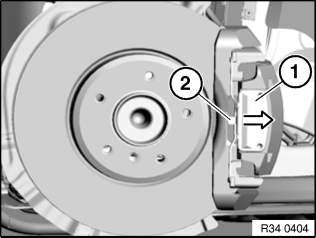
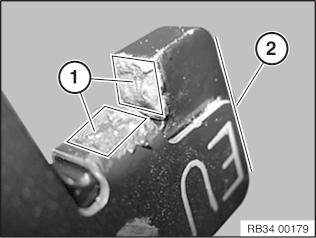
So as not to damage the surface coating, if possible do not mechanically clean the guide surfaces (1) for the brake pads on the brake caliper mounting bracket. Clean guide surfaces (1) with brake cleaner and apply a thin coating of brake pad paste.
So as not to damage the surface coating, if possible do not mechanically clean the guide surfaces (1 and 2) for the brake pads on the brake calliper mounting bracket. Clean guide surfaces (1 and 2) with brake cleaner and apply a thin coating of brake pad paste.
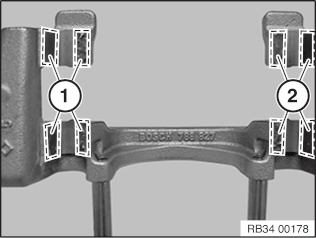
Lightly coat the T-head of the inner brake pad with brake pad paste in area (1 and 2).
Lightly coat the T-head of the outer brake pad with brake pad paste in area (1 and 2).
Note:
After completing work:
Fully depress brake pedal several times so that brake pads contact brake discs.
When installing new brake pads at front and rear axles, brake fluid level must be brought up to ”MAX” marking.
Read and comply with notes on braking in new brake discs / brake pads.
When exchanging brake pads, reset CBS display in accordance with factory specification.
Attention!
In E60 M5 and E63/64 M6, the fault memory entry "Mastervac vacuum sensor" can be saved after the brake pads have been changed.
The fault entry must be deleted. The vacuum sensor only has to be replaced if the fault is entered repeatedly.
_________________________________________
I hope this helps. Let me know if you have other questions.
Take care and God Bless,
Joe
Images (Click to enlarge)
Feb 10, 2021 at 3:21 PM