Removal & Installation (3.5RL)
Remove trim plate and screws from behind inner door handle. DO NOT remove inner handle from door panel. Remove screw at rear of door panel and door stop. Pull firmly inward to release clips for door panel and lift upward to remove. Disconnect inner handle cable and electrical connectors. Set door panel face down on covered, non-scratching surface. To install, reverse removal procedure.
Removal (Rear)
1. Remove door panel and plastic cover. See DOOR PANEL. On 3.5RL, remove inner window molding and inner sash trim. On all models, ensure power window switch is connected. Raise power window glass until mounting bolts are visible. Remove screw, release hooks and protector. Using a grease pencil, mark original adjustment position of stopper plates.
2. Mark original position of glass mounting bolts. Push glass against center channel. Remove bolts and collar from rear channel. Pull sub-seal away to reveal and remove screw. Pull glass run channel away as needed from rear channel. Move rear channel away from quarter glass and rear door glass. Ensure not to damage door molding.
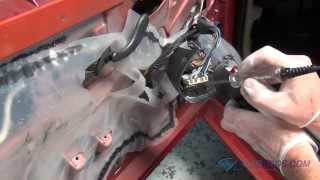
3. Remove rear channel out through window slot. Remove quarter glass. Remove bolts and carefully slide glass out through window slot. Disconnect electrical connector and harness clip from door. Loosen power window motor and regulator mounting bolts "A". See Fig. 21. Remove power window motor and regulator mounting bolts "B". Remove power window motor and regulator through hole in door. Remove power window motor from regulator.
Fig. 21: Removing Rear Power Window Motor
Installation
To install, reverse removal procedure. Tighten bolts to specification. Grease all sliding surfaces on regulator. Ensure power window moves up
and down smoothly. Adjust as necessary. Apply adhesive along edge of plastic cover to maintain a continuous seal, leaving elongated holes open.
Sunday, February 27th, 2011 AT 11:39 AM