Hello �
Not sure if you have your vehicle fixed yet.
Removal
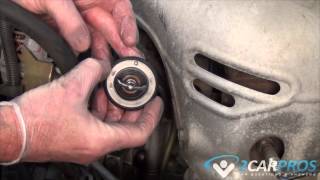
1. Drain engine cooling system by removing radiator cap and opening radiator drain **** located at lower rear corner of radiator inlet tank (8079). Three revolutions are required to open radiator drain **** to full open position.
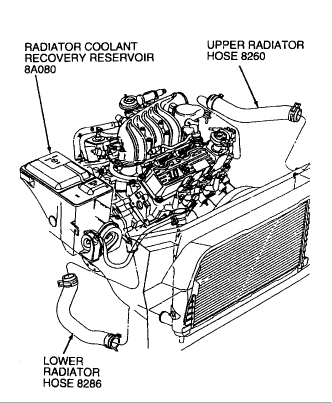
2. Remove radiator overflow hose from radiator coolant recovery reservoir and detach it from radiator.
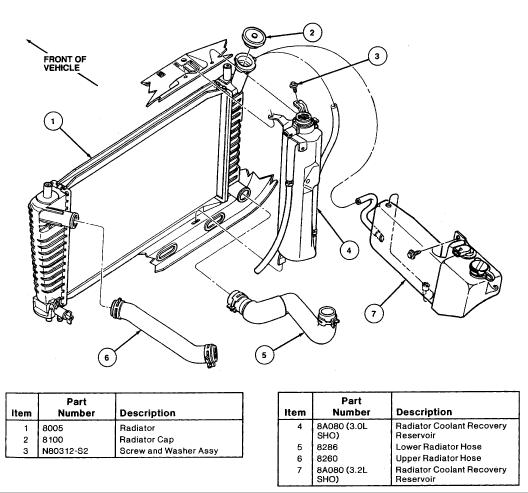
On 3. OL / 3.2L SHO, disconnect tube from radiator and remove radiator coolant recovery reservoir. Refer to illustration.
3. Disconnect battery ground cable.
4. Remove two fan shroud upper retaining screws and lift fan shroud out of lower retaining clip.
5. Disconnect the radiator electric motor wire harness and remove radiator electric motor / fan blade / fan shroud assembly.
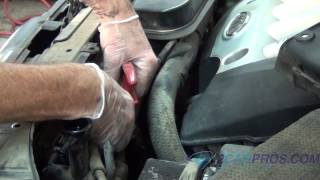
6. Loosen upper radiator hose and lower radiator hose clamps at radiator and remove hoses from radiator tank connectors.
7. Disconnect two transmission oil cooler lines from transmission oil cooler radiator fittings.
8. On 3.0L / 3. OL FF remove two upper radiator retaining screws.
9. On 3. OL / 3.2L SHO and 3.8L engines remove two hex nuts from RH radiator support bracket. Remove bracket.
10. On 3.0L / 3.2L SHO and 3.8L engines remove two screws from LH radiator support bracket. Remove bracket.
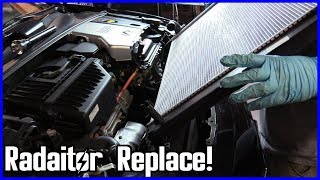
11. Tilt radiator rearward approximately 25mm (1 inch) and lift directly upward, clear of radiator support.
12. If lower radiator hose or upper radiator hose is to be replaced, loosen clamp at engine end and slip hose off connections with a twisting motion.
13. Remove radiator lower support rubber pads, if pad replacement is necessary.
Installation
1. Position radiator lower support rubber pads to lower radiator support, if necessary.
2. If lower radiator hose or upper radiator hose has been replaced, position hose on engine with index arrow in-line with mark on fitting at engine. Position the clamps between the alignment marks on both ends of the hose and slide hose on connections.
CAUTION: Ensure the hose clamps are beyond the bead and placed in the center of the clamping surface of the connection.
Any used hose clamps must be replaced with a new clamp to ensure proper sealing at the connection.
Tighten screw clamps to 2.2-3.4 Nm (20-30 lb-in).
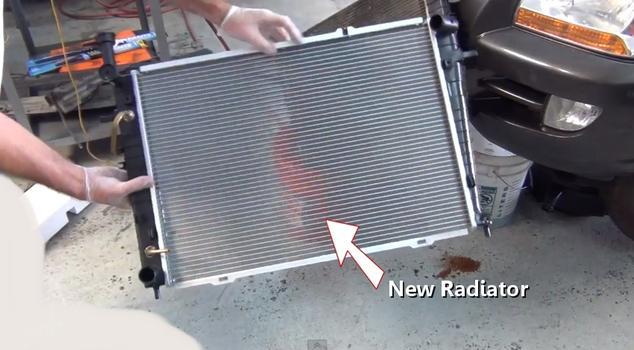
3. Position radiator into engine compartment and to radiator support. Insert the moulded pins at bottom of each radiator tank through slotted holes in lower support rubber pads.
4. Inspect radiator tank upper mounting bushings for damage. Replace if damaged.
5. On 3. OL / 3.2L SHO and 3.8L engines inspect LH and RH radiator support brackets. Replace if damaged.
6. On 3. OL/3. OL FF engine only, ensure plastic pads on bottom of radiator tanks are resting on rubber pads. Install two upper retaining bolts to attach radiator to radiator support. Tighten to 5-7 Nm (45-61 lb-in).
7. On all engines position LH and RH support bracket over radiator and radiator support. Align holes in bracket with corresponding holes in radiator support and secure with two screws. Tighten screws to 12-24 Nm (9-17 lb-ft).
8. Install upper radiator hose and lower radiator hoses to radiator. Position hose on radiator tank connector so that index arrow on hose is in line with mark on connector. Position the clamps between the alignment marks on both ends of the hose and slide hose on connections
CAUTION: Ensure the hose clamps are beyond the bead and placed in the center of the clamping surface of the connection.
Any used hose clamps must be replaced with a new clamp to ensure proper sealing at the connection.
Tighten screw clamps to 2.2-3.4 Nm (20-30 lb-in).
On vehicles with automatic transaxies, connect transmission oil cooler lines using Pipe Sealant with Teflon D8AZ-1 9554-A (ESG-M4G194-A) or equivalent oil resistant sealer.
9. Install radiator electric motor/fan blade I fan shroud assembly by connecting radiator electric motor wiring and positioning on lower retainer clips. Attach top of fan shroud to radiator with bolt and nut. Tighten bolt to 2.6-3.7 Nm (23-33 lb-in). Tighten nut to 8-12 Nm (71 - 106 lb-in).
10. Attach radiator overflow hose to radiator filler neck connector and radiator coolant recovery reservoir.
On 3. OL/3.2L SHO, install radiator coolant recovery reservoir and connect radiator overflow hose.
11. Install new 50/50 mixture of water and anti4reeze solution. Operate engine for 15 minutes. Check engine coolant level and bring it to within 38mm (1 - 1/2 inch) of radiator filler neck.
12. Connect battery ground cable.
Images (Click to make bigger)
Monday, March 21st, 2011 AT 2:02 AM