Nope. The least expensive thing to do, and the easiest, is to buy an inexpensive voltmeter. Bench-testing the starter off the engine is not a useful test for this problem. Anything that causes the starter to drag or crank slowly will not be present during the test. Almost any starter will test good under those circumstances. You need to have it tested while it's trying to crank the engine. Putting the load on it is what causes the symptom to show up.
You can find a perfectly good voltmeter at Harbor Freight Tools for less than ten bucks. They often go on sale for $2.99. Walmart, Sears, Radio Shack, and any hardware store, home improvement store, or auto parts store sells them but don't waste your money on unnecessary features that you don't need. What you need is a basic volt / ohm / amp meter. Forget about Hertz, capacitance, and stuff like that. Especially don't get one with auto-ranging. For me they take way too long to self-adjust, and it's easy to overlook which scale it has selected.
You can buy digital voltmeters that cost over $300.00. Many mechanics have them because they are used to "more expensive must be better", but once they drop one or drive over it, they usually have a cheapie in their tool box so they don't sit and cry if they wreck it.
Most digital meters have 2, 20, and 200 volt scales. That represents the maximum voltage they will display on that scale. You will not damage most meters by using the wrong scale. If you set it to the 2 volt scale and try to measure a 12 volt car battery's voltage, it will give you a "1", an "OL" or some other indication that you need to switch to a higher scale. If you select the 200 volt scale, it will measure anything from 0 to 200 volts but you will lose one place of accuracy after the decimal point. The 20 volt scale will give two decimal places of accuracy.
When you get to performing voltage drop tests, switch to the 2 volt scale. During this series of tests you'll be measuring at two places in the same circuit so when no one is activating the starter, there WILL be 0 volts displayed on the meter since the voltage is the same at both points. The meter always measures the difference in voltage between the two points where you have the probes. Once the starter is activated, it's the current flow that produces the voltage drop across any connection. That resistance to current flow is measured in "ohms", but the problem here is the resistance you're looking for is WAY too small to measure. The resistance in the wire of the meter's leads is many times greater than what you would be trying to measure. The purpose of this voltage drop test is that while you can't measure that resistance, you can measure the RESULTS of that resistance.
If it helps, think about a garden hose. When the nozzle is turned off, the pressure is the same everywhere in the hose. Even if you step on the hose and partially crush it, the pressure doesn't change anywhere. It's not until you open the nozzle that the crushed area restricts water flow and you can't get much out.
If you could measure the pressure in the hose before and after the restriction you'd have to take two readings, then calculate the difference. If the firemen opened a hydrant down the street, the pressure to your house would go down. If that's when you took the second reading, the results would be wildly inaccurate. The same thing happens to a car battery. You're looking for a place where voltage drops just 0.2 volts or more while trying to crank the engine. Between the first and second measurement to battery voltage can run down more than that so your calculation would be meaningless. By doing the voltage drop test, you're doing both measurements at once and all that is being displayed is the final calculation. All the variables such as the battery running down are eliminated.
Describing why and how to perform voltage drop tests takes WAAAAAAY longer than actually doing them. Once your helper is ready at the ignition switch, each measurement takes less than five seconds. The important numbers are no more than 0.2 volts dropped across any one mechanical connection and no more than 0.4 volts dropped across the entire positive circuit and no more than 0.4 volts dropped in the entire negative side of the circuit.
"Mechanical connections" refer to anyplace a cable is bolted to something. The easiest one to see is where a battery cable is bolted to the battery post. That's a mechanical connection. We typically do not include where a terminal or clamp is crimped to a cable but they do get included when we measure the entire circuit.
The negative cable is the simplest and easiest to test. There is one mechanical connection where the clamp bolts to the battery post. Put one meter probe on the post and the other probe on the clamp. The meter should be on the 2 volt scale and it will be reading 0.00 volts. Now read it while your helper cranks the engine. The next mechanical connection is at the other end of the cable where it bolts to the engine. Put one probe on that terminal and the other on a paint-free spot on the engine and do the test again. Each reading must be less than 0.2 volts. If one is higher, take that connection apart and clean and tighten it. The final test covers both of those connections and anything else in that circuit, in this case, the cable. Put one probe back on the engine and the other one on the battery post, then take the reading during engine cranking.
The typical readings you would expect when there is no starting problem might be 0.08 volts on one connection and 0.14 on the other one. Both pass. When you measure the entire circuit, you might read 0.35 volts. That's higher than the first two added together because now you're also including the voltage dropped across the cable, but it's still under 0.4 volts so it too passes.
The positive circuit gets a little more complicated because there are more mechanical connections to test, and that's usually where the problem will be found. Measure between the cable clamp and post like you did on the negative side. Measuring on the other end where the terminal is bolted to the starter gets tricky because it's hard to reach and the engine may be bouncing around during cranking. I prefer to connect a small jumper wire from that terminal to the meter probe so I don't have to hold onto it and try to read the meter at the same time.
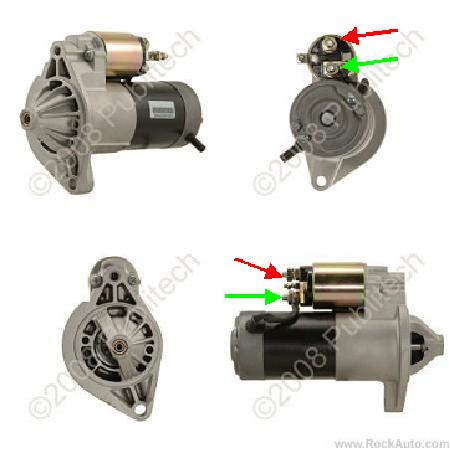
The next problem is there are mechanical connections inside the starter that are inaccessible. Here's a picture from Rockauto.com that shows your starter. The red arrows point to where the positive battery cable connects. Your meter probe will be on that stud, not the terminal on the end of the cable. In this case you can go further with the testing if necessary because another test point is accessible at the green arrow. There are two more mechanical connections inside and each one must not drop more than 0.2 volts, but we're still bound by that 0.4 volts for the entire circuit. If you go right to the green arrow, you'll be measuring the entire circuit but your meter will want to read 12 volts when the starter is not being activated. You can leave it on the 2 volts scale and just let it read "over range". You're interested in the reading during cranking which will be much lower.
If the battery voltage stays well above 9.6 volts during cranking, and there is no excessive voltage drop in either the positive or negative sides of the circuit, you can quickly verify all those tests by directly measuring the voltage going to the starter. Put one probe on the green arrow and the other probe on the case of the starter, then measure the voltage during cranking. You'll need to be on the 20 volt scale. If the voltage is above 9.6 volts but the starter still cranks too slowly, replace it. If you find less than 9.6 volts, (and it will typically be way less), you overlooked either a big voltage drop or the battery is discharged.
May 21, 2012 at 10:32 PM