Hi again It sounds like you found the problem. Here are directions for replacing the fuel pump:
REMOVAL PROCEDURE
Disconnect the negative battery cable.
Perform the Fuel Pressure Release Procedure.
Drain the fuel tank.
Remove the fuel tank.
Remove the fuel sender assembly:
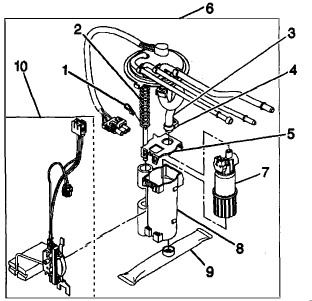
Remove the fuel sender assembly retaining nuts (1), the retaining ring (2), the fuel sender assembly (3), and the gasket (4). Discard the gasket.
Clean the gasket sealing surfaces.
IF REPLACING THE ENTIRE UNIT PROCEED TO INSTALLATION STEP 10.
Note the position of the fuel strainer (9) on the fuel pump (7).
Support the fuel sender assembly (6) with one hand and grasp the strainer (9) with the other hand.
Rotate the strainer in one direction and pull the strainer off the pump. Discard the strainer after inspection.
Inspect the strainer. Replace a contaminated strainer and clean the fuel tank.
Inspect the fuel pump inlet for dirt and debris.
If found, replace the fuel pump.
If the fuel pump is being replaced, proceed to Step 12.
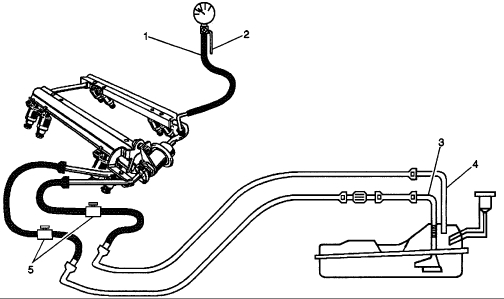
Loosen the clamp (4) and remove the fuel feed hose (3) from the fuel pump outlet.
Remove the terminal retainer.
Disconnect the fuel pump electrical connector and the electrical connector from the bottom of the sender cover.
Remove the retainer clip (1) from the fuel return pipe.
Remove the fuel pump and fuel level sensor assembly and the spring (2) from the fuel sender.
Remove the housing cover (5) from the fuel pump housing (8).
Remove the fuel pump (7) from the fuel pump housing (8).
CAUTION: Do Not run the fuel pump unless the fuel pump is submerged in fuel.
If the fuel level sensor is being replaced, proceed to Step 20.
Slide the fuel level sensor (10) from the retainers on the fuel pump housing (8).
INSTALLATION PROCEDURE
Install the fuel level sensor (10) to the fuel pump housing (8).
Install the fuel pump (7) and the isolator into the fuel pump housing (8).
Important: The small hole in the housing cover (5) aligns over the fuel level sensor (10).
Install the housing cover (5) to the fuel pump housing (8).
Important: The fuel pump and fuel level sensor assembly must be aligned directly under the fuel sender cover.
Slide the fuel pump and fuel level sensor assembly and spring (2) onto the fuel return pipe.
Compress the spring (2) and install the retainer clip (1) through the fuel return pipe.
Connect the fuel feed hose (3) to the fuel pump outlet.
Tighten the clamp (4) so that 5 to 8 teeth are engaged.
Connect the fuel pump electrical connector and the electrical connector to the bottom of the sender cover.
Install the terminal retainer.
Important: Always install a new pump strainer when replacing the fuel pump.
Install a new fuel pump strainer in the same position as noted during disassembly.
Push on the outer edge of the strainer ferrule until the strainer is fully seated.
Install the fuel sender assembly:
Position the new gasket (4) on the fuel tank (5).
Important: Do Not fold over or twist the fuel pump strainer when installing the fuel sender assembly as this will restrict fuel flow. Also, assure that the fuel pump strainer does not block full travel of the float arm.
Install the fuel sender assembly (3), the retaining ring (2), and the fuel sender retaining nuts (1).
Tighten
Nuts alternately and evenly to 3 Nm (27 lb. In).
Install the fuel tank.
Add fuel.
Install the fuel filler cap.
Connect the negative battery cable.
Inspect for leaks.
Turn the ignition switch ON for 2 seconds.
Turn the ignition switch OFF for 10 seconds.
Turn the ignition switch ON.
Check for fuel leaks.
__________________________________________________
I hope this helps. Let me know how things turn out for you or if you have other questions.
Take care,
Joe
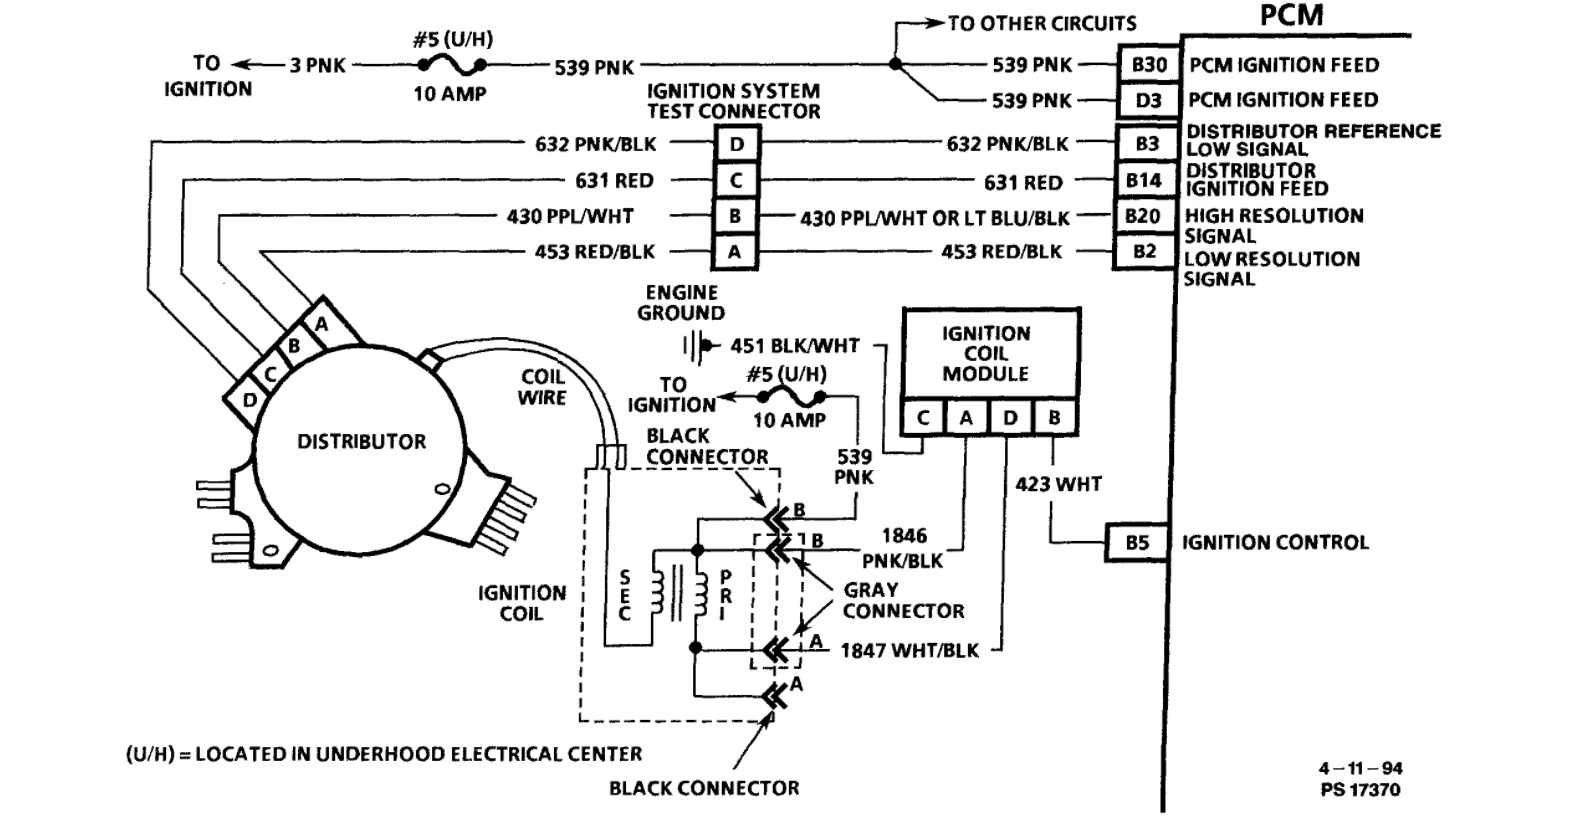
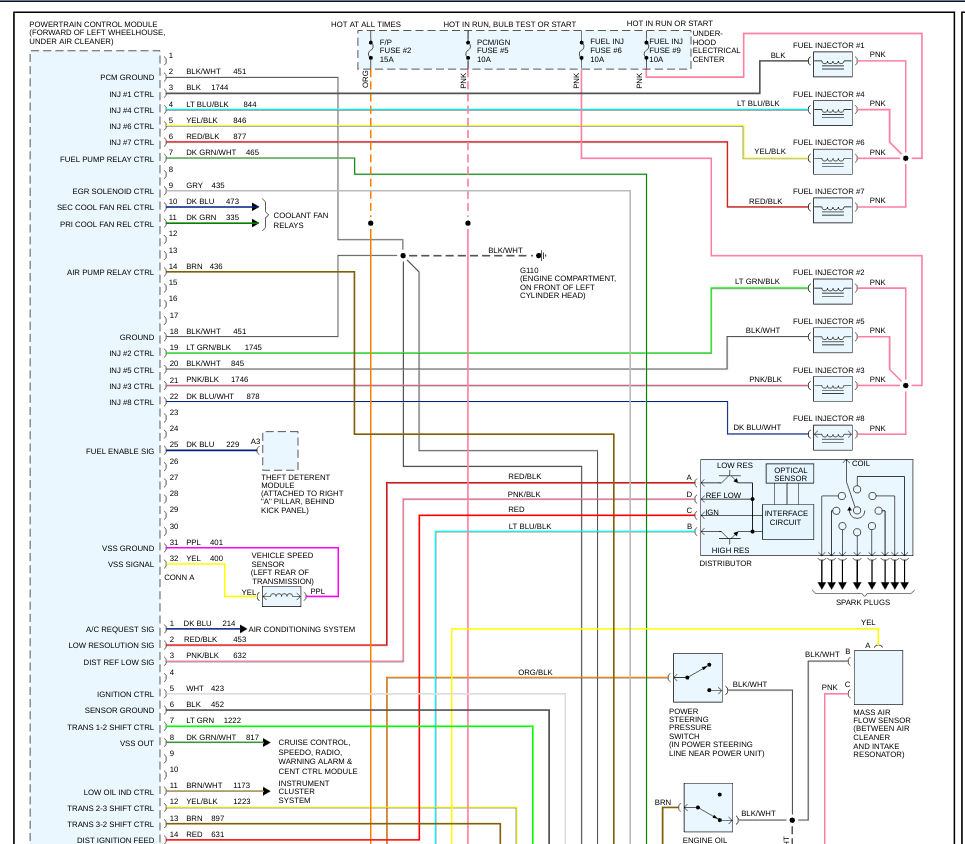
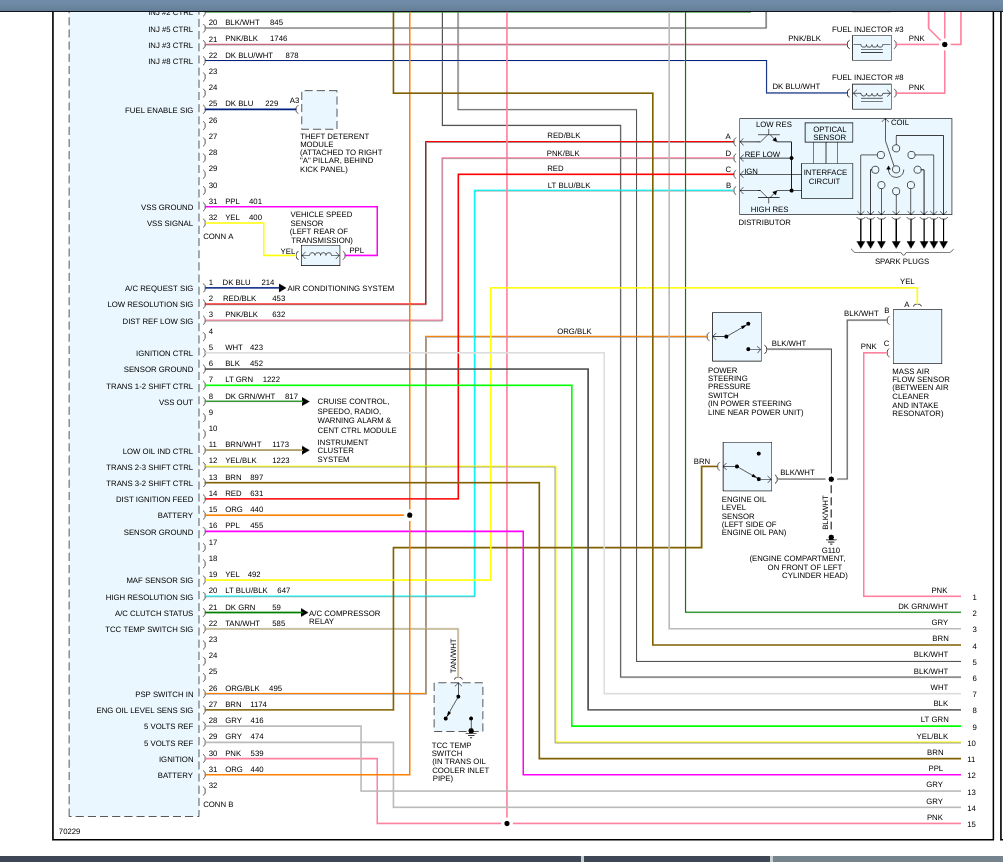
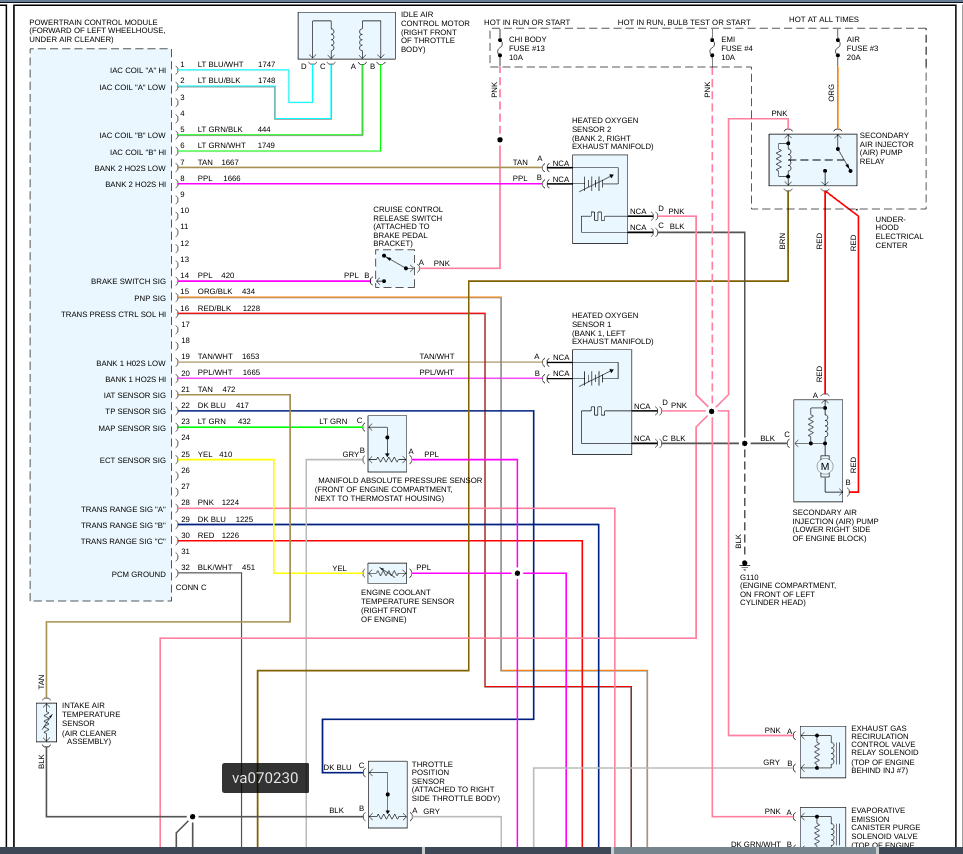
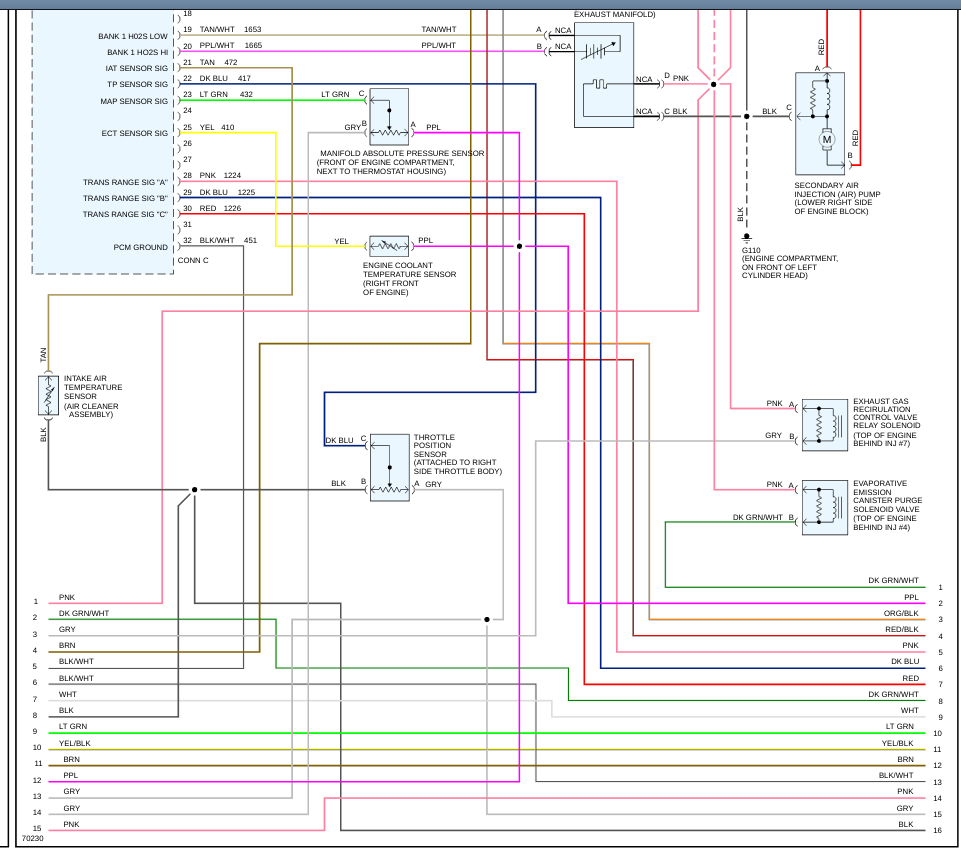
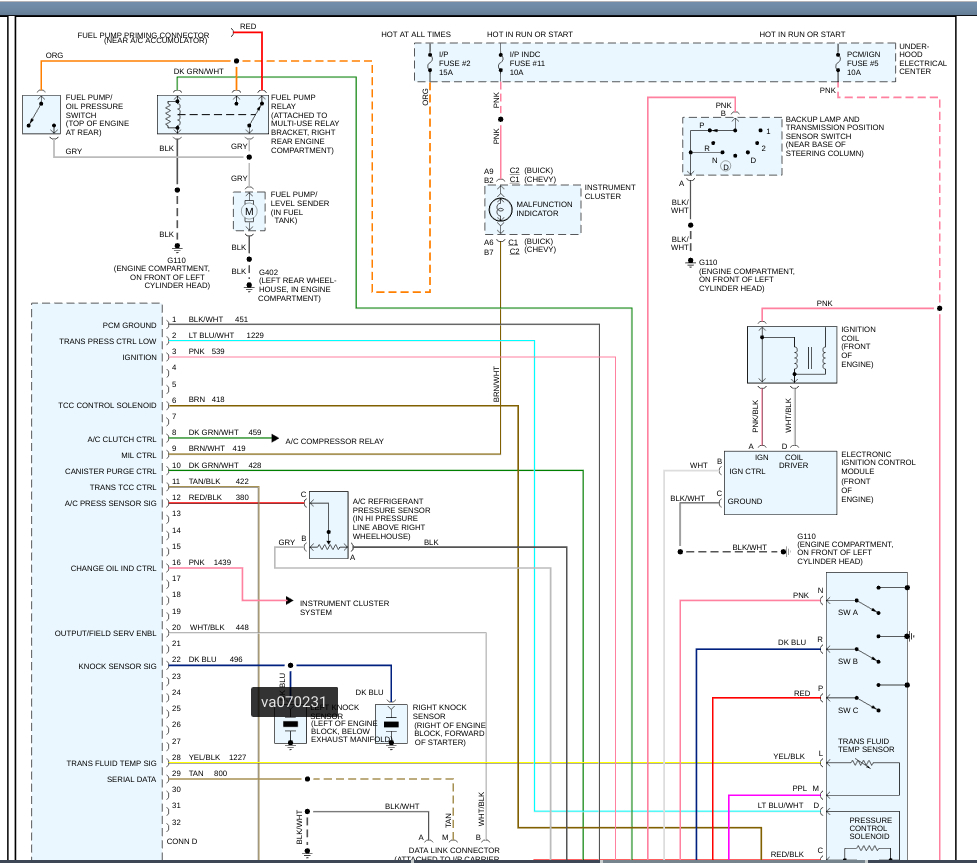
Image (Click to make bigger)
Saturday, March 6th, 2021 AT 4:36 PM
(Merged)