Power window would bind up and the window wouldn't work afterwards

Tiny
COVERLAND
  • MEMBER
  • 1992 PONTIAC GRAND PRIX
  • 80,000 MILES
Hello, I'm having a problem with my 1992 Grand Prix LE passenger front power window. I seem to remember that if someone closed the window too high in the past (kept their finger on the up button once the window was closed), it would bind up and the window wouldn't work afterwards. To clear this, you could usually go over railroad tracks (or bumpy road) with a finger on the down button and the drivers window would start working fine until it happened again - my son used to do that when he drove the car until I got it into his head what was going on. That trick isn't working to open this window - passenger front.

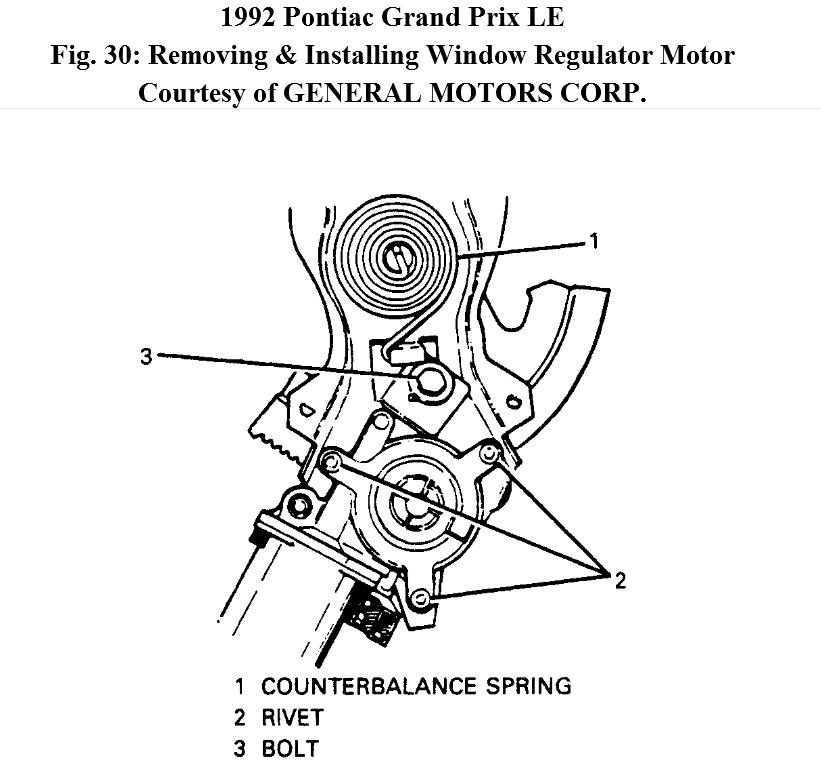
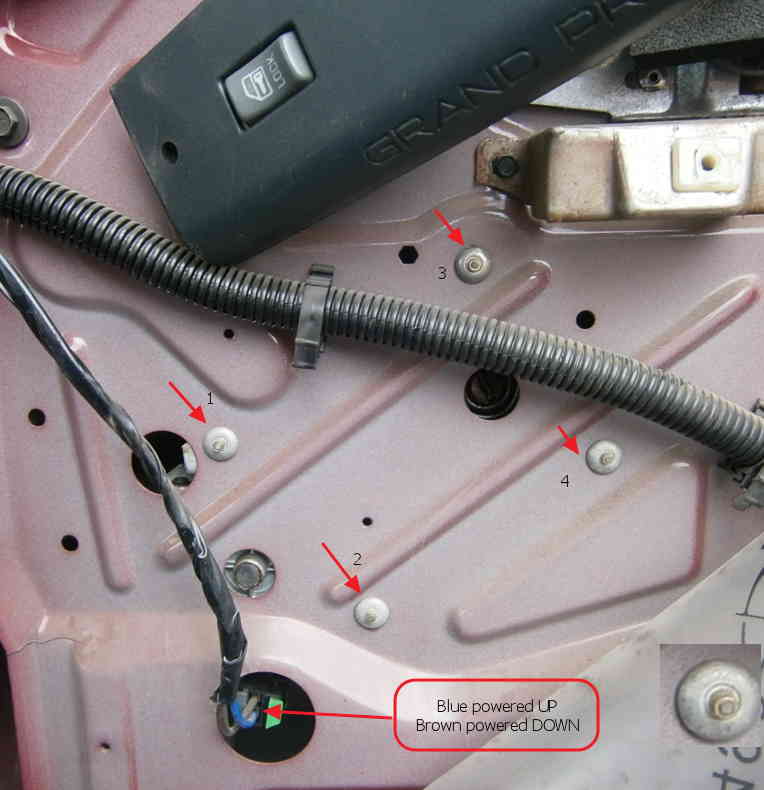
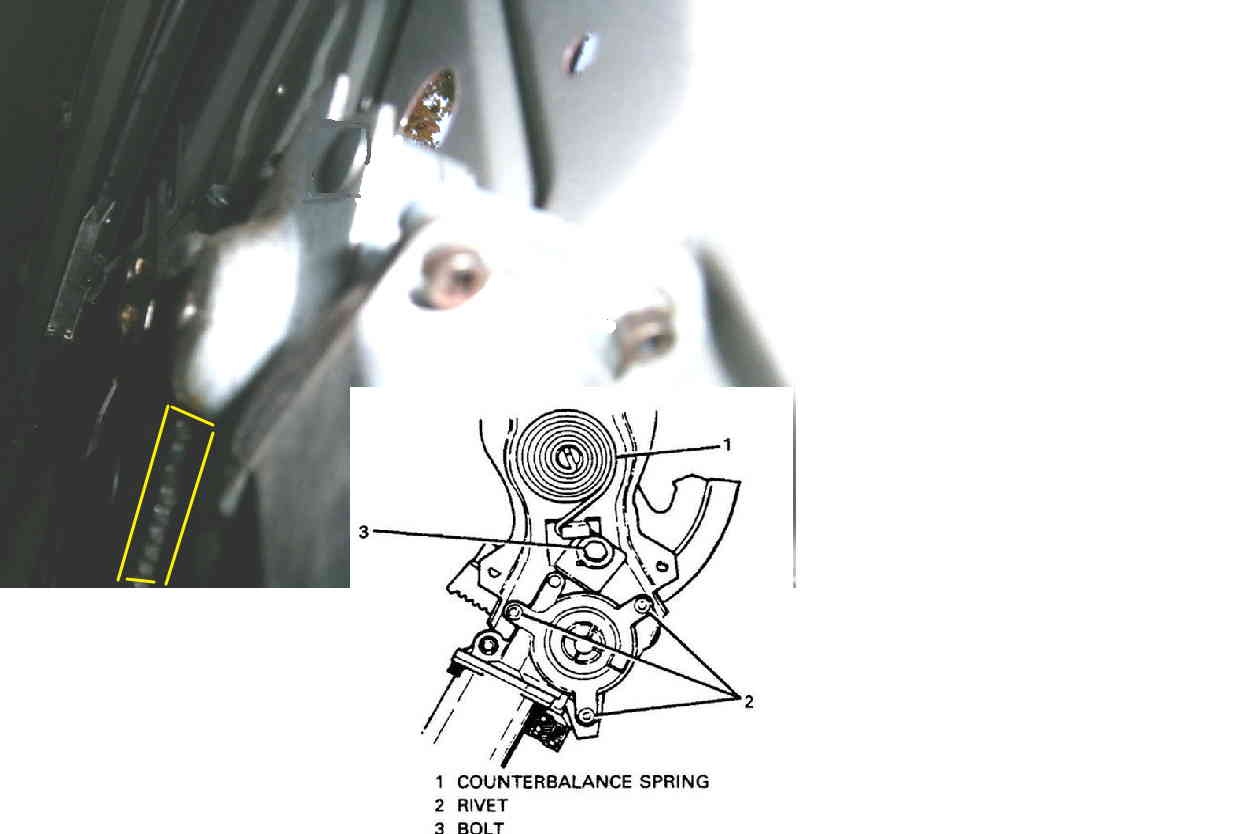
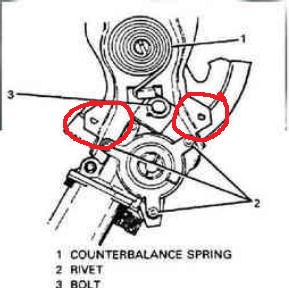
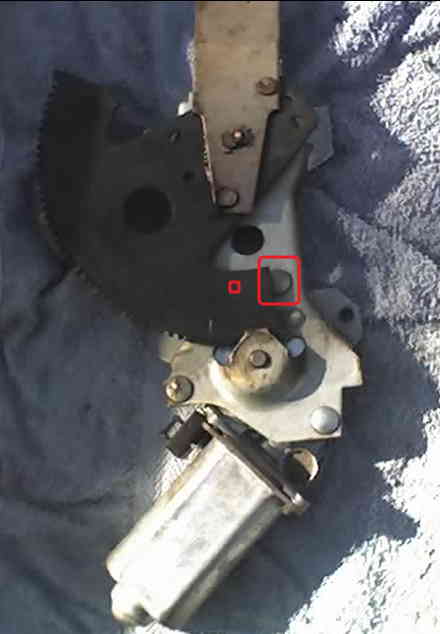
I've checked voltage at the motor and do have 12v on the blue wire when depressing the switch but haven't tried grounding the other wire (brown) yet as I've looked for a wiring diagram. I'm not anxious to drill out the rivets to replace the motor but I guess if it comes to that.

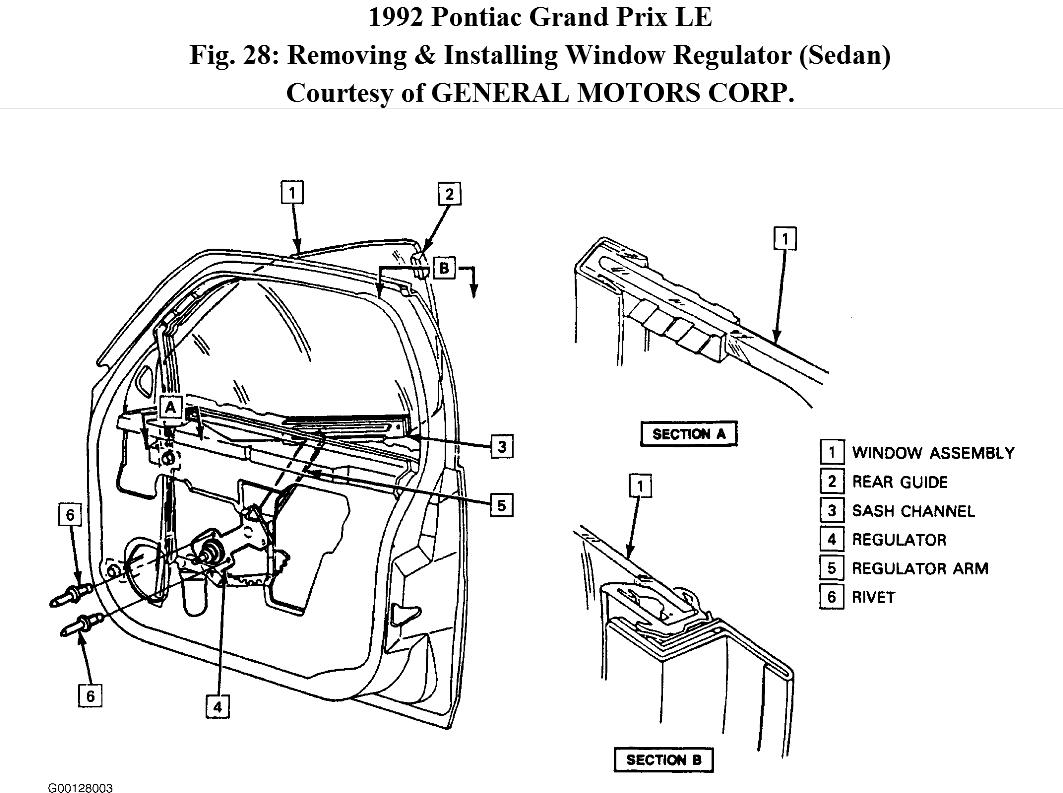
In the meantime, how might I check the window 'regulator'? I don't know much about how these regulators interact with the motor and am anxious to learn more. I'm trying to get this car going again after a couple of years in storage as it waited for my daughter to turn 16. Thanks for any help.
Do you
have the same problem?
Yes
No
Saturday, October 13th, 2012 AT 9:13 PM

18 Replies

Tiny
ASEMASTER6371
  • MECHANIC
  • 52,797 POSTS
The motor sounds like it has failed. Replace the window/regulator assembly.

When it does not work, the jolt is what brings the motor back on line.

Roy
Was this
answer
helpful?
Yes
No
Sunday, March 21st, 2021 AT 11:24 AM
Tiny
KHLOW2008
  • MECHANIC
  • 41,815 POSTS
You should test the motor first. It used to work previously because the carbons were still able to work after some jolting/vibrations.

If the motor does not respond when grounding the wire as you mentioned, you know the motor is bad. However if it starts to work, use the switch again and retest. If it stops working or continues to work, it is good for now but the motor is due for replacement. It is going to fail anytime.
Was this
answer
helpful?
Yes
No
Sunday, March 21st, 2021 AT 11:24 AM
Tiny
COVERLAND
  • MEMBER
  • 32 POSTS
I saw what I believe was the motor/regulator combo at Autozone for something like $40. Do they always come together? Also, don't know if you guys may know but there appears to be 4 rivets holding the assembly in, sound about right?
Was this
answer
helpful?
Yes
No
Sunday, March 21st, 2021 AT 11:24 AM
Tiny
KHLOW2008
  • MECHANIC
  • 41,815 POSTS
Motor can be replaced separately for factory regulators but for after market the design might be different it is best to get the complete assy.

Actually there should be 3 rivets for the factory regulator and if you are replacing the motor itself, you need to drill out the rivets.
Was this
answer
helpful?
Yes
No
Sunday, March 21st, 2021 AT 11:24 AM
Tiny
COVERLAND
  • MEMBER
  • 32 POSTS
Thanks for the replies guys. In the attached pic, I've numbered 4 rivets. I'm guessing that this change-out requires drilling the first three (numbered 1-3). At the bottom right I superimposed a blown up view of the rivets - do you think I should try to cut what's protruding as flush as I can with a pair of dikes and then drill out as necessary what's remaining until I free up the motor? Also, any surprises I should expect with the window once I free up the motor assy? (window is currently in the up position).

I'm guessing too that the motor is frame grounded since I have power on blue in the switch up position and power on brown in the switch down position. I hoped for a small miracle by tapping on the motor while holding the switch down but not today...

Here's the motor at Autozone - any thoughts?
http://www.autozone.com/autozone/parts/Dorman-Window-Lift-Motor/1992-Pontiac-Grand-Prix/_/N-iwytfZ8ijyb?itemIdentifier=54819_0_1264_4299%2C78656

Thanks again
Was this
answer
helpful?
Yes
No
Sunday, March 21st, 2021 AT 11:24 AM
Tiny
KHLOW2008
  • MECHANIC
  • 41,815 POSTS
The picture is for the motor and that is attached to the regulator by 3 rivets.

The 4 rivets is for the regulator assy, which you need to drill out to get the assy off the door before you can replace the window motor.

Removal (Sedan - Front)

1. Remove door trim panel.

2. Remove water deflector.

3. Remove rivets using 1/4" drill bit.

4. Remove regulator by disengaging regulator arm from sash channel.

5. Remove electrical connector to motor and remove regulator through door inner access hole.
Was this
answer
helpful?
Yes
No
Sunday, March 21st, 2021 AT 11:24 AM
Tiny
COVERLAND
  • MEMBER
  • 32 POSTS
Have any of you guys only replaced the motor on a Pontiac? I'd read one article somewhere about the counter balance spring really creating an issue for one guy. It 'looks' like a person could just drill the rivets and replace the geared motor without a lot of other hassle but I thought I'd ask. I ordered a Dorman motor to do the replacement and hope to get into it this weekend.
Was this
answer
helpful?
Yes
No
Sunday, March 21st, 2021 AT 11:24 AM
Tiny
KHLOW2008
  • MECHANIC
  • 41,815 POSTS
Not on a Pontiac for me but other makes are similar except some don't have any springs. The spring would tend to cause the regulator gear to overshoot and prior to taking the motor out, hold the scissor of the regulator in place by means of strings etc would prevent it from overshooting. Marking the springs direction would help in the event the regulator manages to run free.
Was this
answer
helpful?
Yes
No
Sunday, March 21st, 2021 AT 11:24 AM
Tiny
KHLOW2008
  • MECHANIC
  • 41,815 POSTS
WINDOW REGULATOR MOTOR

Removal (Front)
CAUTION:
Steps 2) and 3) must be performed once regulator is removed from door. The regulator lift arm is under tension from the counterbalance spring and can cause personal injury if the motor is removed without locking the sector gear in position.

1. Remove window regulator. See WINDOW REGULATOR.

2. Drill hole through regulator sector gear and backplate. Do not drill hole closer than
1/2" (13 mm) to edge of sector gear or backplate.

3. Install bolt and nut to lock sector gear in position.

4. Drill out ends of three rivets using 1/4" drill bit.

5. Remove motor and remaining portions of rivets. See Fig. 30.

Installation

1. Install new motor to backplate. See Fig. 30.

2. Install rivet to motor at bottom location using ball peen hammer.

3. Clamp motor to backplate using locking pliers.

4. Remove bolt and nut securing sector gear.

5. Supply power to regulator to gain access for remaining two motor rivets.

6. Install two rivets.

7. Remove locking pliers.

8. Install window regulator. See WINDOW REGULATOR.

WINDOW REGULATOR.

Installation

1. Install regulator through access hole and attach regulator arm to sash channel.

2. Install electrical connector to motor.

3. Install rivets using 1/4" x 1/2" Peel-type rivets.

4. Install water deflector.

5. Install door trim panel.
Was this
answer
helpful?
Yes
No
Sunday, March 21st, 2021 AT 11:24 AM
Tiny
COVERLAND
  • MEMBER
  • 32 POSTS
My gosh what a deal it is to replace this motor. "Regulator sector gear and backplate"? I am assuming the 'regulator sector gear' is the one that meshes with the motor gear. To drill a hole through it and bolt it so the spring doesn't come un-wound seems like quite a task. Guess I'll see. Did this come from a GM service manual so far as the 'how-to' ? Would have been great had they mentioned a size. I guess for lack of a size, I'll try to go for a 1/4" bolt.
Was this
answer
helpful?
Yes
No
Sunday, March 21st, 2021 AT 11:24 AM
Tiny
KHLOW2008
  • MECHANIC
  • 41,815 POSTS
Yes, procedure is from our database courtesy of GM. Try the smallest size avalable, it should be sufficnet to hold the arm.
Was this
answer
helpful?
Yes
No
Sunday, March 21st, 2021 AT 11:24 AM
Tiny
COVERLAND
  • MEMBER
  • 32 POSTS
[quote]2. Drill hole through regulator sector gear and backplate. Do not drill hole closer than
1/2" (13 mm) to edge of sector gear or backplate. [/Quote]

I'm going to do this tomorrow but am still a little unclear on locking the spring (the one that allegedly can come unwound and cause personal harm) so have attached a picture. Is the yellow boxed gear the "sector gear" in #2 of instructions? For the life of me, I can't locate or determine what else they may be talking about. TIA for any help.
Was this
answer
helpful?
Yes
No
Sunday, March 21st, 2021 AT 11:24 AM
Tiny
KHLOW2008
  • MECHANIC
  • 41,815 POSTS
Yes, that is the gear. I have drawn 2 red circles in the diagram. Any of these point should be good to hold the gear in position.
The idea is to prevent the arms from moving to release the spring.
Was this
answer
helpful?
Yes
No
Sunday, March 21st, 2021 AT 11:24 AM
Tiny
COVERLAND
  • MEMBER
  • 32 POSTS
Got the regulator and motor out - wow, those rivets were a challenge (since they were stubs hanging out and I couldn't get to the back side to drill the rivet).

I have a bit of a challenge too in one of the rivets being partially covered - you can see it in the large red boxed area of the attached picture. Also, it looks like a good spot to drill and bolt where I have the small box so the spring doesn't release. Thoughts?
Was this
answer
helpful?
Yes
No
Sunday, March 21st, 2021 AT 11:24 AM
Tiny
COVERLAND
  • MEMBER
  • 32 POSTS
SUCCESS. Used a grinding wheel to nip off the corner to expose the third rivet in the box and got the motor changed and window works fine again - thanks for all your help. While I have your ear on this year and model, do you guys happen to know if the transmission is sealed at the factory with no way to check or change the fluid? I had it serviced at Walmart recently and they told me it was a sealed unit with no way to check it. Thanks again for all your help.
Was this
answer
helpful?
Yes
No
Sunday, March 21st, 2021 AT 11:24 AM
Tiny
KHLOW2008
  • MECHANIC
  • 41,815 POSTS
Sorry for the delay in replying. Our notification system went bonkers and has since been restored.

Glad to know you have resolved the problem.

The information from our database indicates that you can check the transmission fluid level via a dipstick. I could not find the location nora any diagrams but if you look around the side of transmission, you should be able to locate it.
Was this
answer
helpful?
Yes
No
Sunday, March 21st, 2021 AT 11:24 AM
Tiny
COVERLAND
  • MEMBER
  • 32 POSTS
Thanks KHLow2008. This '92 Pontiac 3.1 sat a couple of years as we waited for our daughters to reach driving age. It used to be the easiest and nicest starting car we had and started great in any weather.

As we were bringing it out of retirement, we had to have the fuel pump and filter replaced to get it runnable again. Anyway, now it's a hard starter. It cranks fine, just takes numerous pumps of the accelerator pedal (8 or 10) before turning the key to start it to make it a successful start.

Think just gum-out in the gas mixed with a couple of tanks of gas run through it will resolve this issue. It ran great going into storage. TIA
Was this
answer
helpful?
Yes
No
Sunday, March 21st, 2021 AT 11:24 AM
Tiny
KHLOW2008
  • MECHANIC
  • 41,815 POSTS
If the gas is stale, you ought to have it replaced. Check the fuel pressure. If the fuel pump hose was not installed correctly during installation, it could result in pressure loss and difficult starting.
Was this
answer
helpful?
Yes
No
Sunday, March 21st, 2021 AT 11:24 AM

Please login or register to post a reply.

Sponsored links