Here is what I could find:
t is not necessary to remove the heater case for access to the heater core.
Drain enough coolant from the radiator to drain the heater core.
Loosen the heater hose clamps on the engine side of the firewall and disconnect the heater hoses. Cap the heater core tubes.
Remove the glove box liner and door assembly.
Remove the instrument panel-to-cowl brace retaining screws and remove the brace.
Move the temperature lever to WARM.
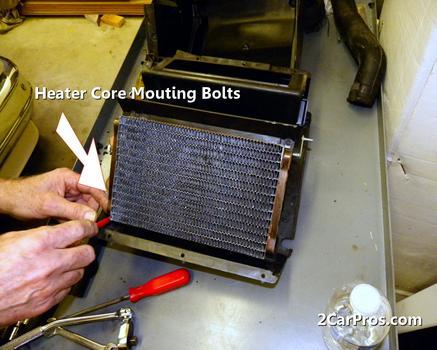
Remove the heater core cover screws. Remove the cover through the glove box.
Loosen the heater case mounting nuts on the engine side of the firewall.
Push the heater core tubes and seals toward the interior of the car to loosen the core.
Remove the heater core through the glove box opening.
Service as required and reinstall in the reverse order of removal.
If the vehicle has AC:
The instrument panel must be removed for access to the heater core.
Using an approved refrigerant recovery/recycling station which meets SAE standards, discharge the system at the service access port on the underside of the combination valve.
Disconnect the negative battery cable.
Remove the instrument panel pad:
Remove the screws attaching the instrument cluster trim panel to the pad.
Remove the screw attaching the pad to the panel at each defroster opening.
Remove the screws attaching the edge of the pad to the panel.
Fig. Fig. 3: Heater case assembly
Fig. Fig. 4: Instrument panel pad mounting
Fig. Fig. 5: Remove the case cover to expose the heater core
Fig. Fig. 6: Carefully lift the heater core out of the case
Remove the instrument panel and lay it on the front seat.
Drain the cooling system and disconnect the heater hoses at the core tubes.
CAUTION
When draining coolant, keep in mind that cats and dogs are attracted to ethylene glycol antifreeze, and could drink any that is left in an uncovered container or in puddles on the ground. This will prove fatal in sufficient quantity. Always drain the coolant into a sealable container. Coolant should be reused unless it is contaminated or several years old.
Disconnect the refrigerant lines at the combination valve. Use a back-up wrench on the suction throttling valve manifold. Cap all openings immediately!
Disconnect the wiring at the blower resistor. Remove the screw attaching the air inlet duct and blower housing assembly support brace to the cowl top panel.
Disconnect the black vacuum supply hose at the check valve, in the engine compartment.
Also in the engine compartment, remove the 2 nuts retaining the evaporator case to the firewall.
In the passenger compartment, remove the screw attaching the evaporator case support bracket to the cowl top panel.
Remove the nut retaining the left end of the evaporator case to the firewall and the nut retaining the bracket below the evaporator case, to the dash panel.
Carefully pull the case away from the firewall and remove the case from the car.
Remove the heater core access cover retaining screws and the cover.
Lift the heater core and seals from the evaporator case.
Service as required and reinstall in the reverse order of removal.
Saturday, January 1st, 2011 AT 9:59 PM