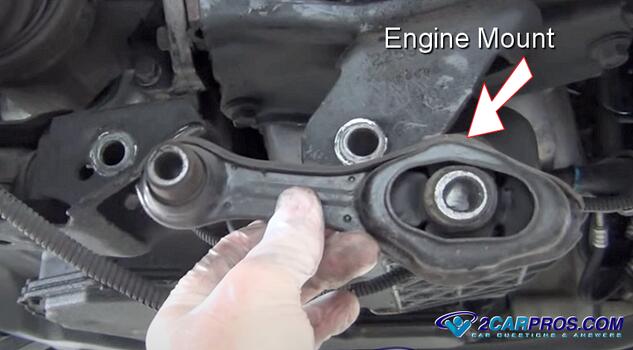
Engine mounts play a crucial role in maintaining the stability and performance of your vehicle. They not only support the engine but also reduce vibrations and noise. Over time, engine mounts can wear out and sag or get damaged, leading to various issues. This guide will walk you through the steps to inspect your car's engine mounts for damage, ensuring your vehicle remains in top condition.
Step 1: Understand the Symptoms of Damaged Engine Mounts
Before you begin the inspection, it's important to recognize the signs that may indicate your engine mounts need attention. Common symptoms include excessive vibrations, unusual noises, and the engine moving significantly when changing gears from drive to reverse or accelerating.
Step 2: Prepare Your Vehicle
Ensure your car is parked on a flat surface and the engine is turned off. Engage the parking brake and allow the engine to cool down before proceeding.
Step 3: Locate the Engine Mounts
Consult your vehicle’s manual to identify the exact location of the engine mounts. Typically, there are three or four mounts, including one at the front, one at the back, and one on each side of the engine.
Step 4: Visual Inspection
Begin with a visual inspection of each mount. Look for signs of wear, cracking, or fluid leaks (if your mounts are the hydraulic type). Also, check for any metal components that may appear bent or broken.
Step 5: Check for Hardness and Cracks
Press against the rubber part of the mount with a screwdriver or similar tool. The rubber should be firm but not overly hard. Cracks or significant hardening indicate the mount needs replacement.
Step 6: Rock the Engine Slightly
With the parking brake off and the car in park ask for the help of an assistant, while inspecting the engine with the hood open carefully rock the car by moving it forward and backwards. Observe the mounts and notice if there’s excessive movement or if the engine seems to shift position easily. This could be a sign of worn-out mounts.
Step 7: Use a Pry Bar for Further Inspection
Carefully use a large pry bar to apply pressure on the engine mount plates, one at a time. This allows you to check for abnormal play or weakness in the mounts that wasn't evident during the visual inspection or the rocking test.
Step 8: Inspect for Corrosion
Examine the metal parts of the engine mounts for any signs of rust or corrosion. Corrosion can weaken the mount's structure, leading to failure.
Step 9: Check for Alignment Issues
Inspect the alignment of the engine in relation to other components of the car. Misalignment can indicate that one or more mounts are not holding the engine in the correct position. This will be apparent if the engine is hanging lower than usual.
Step 10: Start the Engine
After the visual and physical inspection, have a helper start the engine while observing the engine from under the hood, stand off to one side of the car. While the engine is idling have your helper put the car in drive wait a few seconds and then out the transmission is reverse. Again, excessive movement indicates bad motor mounts.
Conclusion
Regular inspection of your car’s engine mounts can prevent serious damage and maintain your vehicle’s performance. If you discover any signs of wear or damage during your inspection, it’s advisable to consult with a professional mechanic for a thorough assessment and replacement if necessary. By following these steps, you can ensure the longevity and safety of your vehicle.
Tips for Maintaining Your Engine Mounts
- Regularly check your engine mounts as part of your routine vehicle maintenance.
- Avoid harsh driving conditions that can put extra stress on the mounts.
- Keep an eye on the age of your vehicle, as older cars are more prone to mount degradation.
Credits
Guide knowledge base was created by the 2CarPros Team, overseen by Ken Lavacot: Automobile repair shop owner and ASE certified master automobile technician of over 30 years.
If you have question or need help please ask one of our experts we are happy to help. Please visit our 2CarPros YouTube Channel.


