Hi,
That looks like the engine block. It isn't something that can be repaired if I'm correct. The engine will need replaced. Let's see if Danny agrees.
If he does, here are the directions for replacing the engine. The attached pics correlate with the directions. The directions are extensive.
_________________________________________
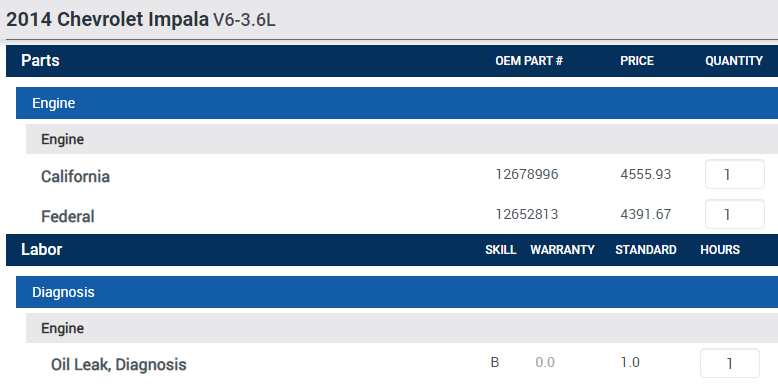
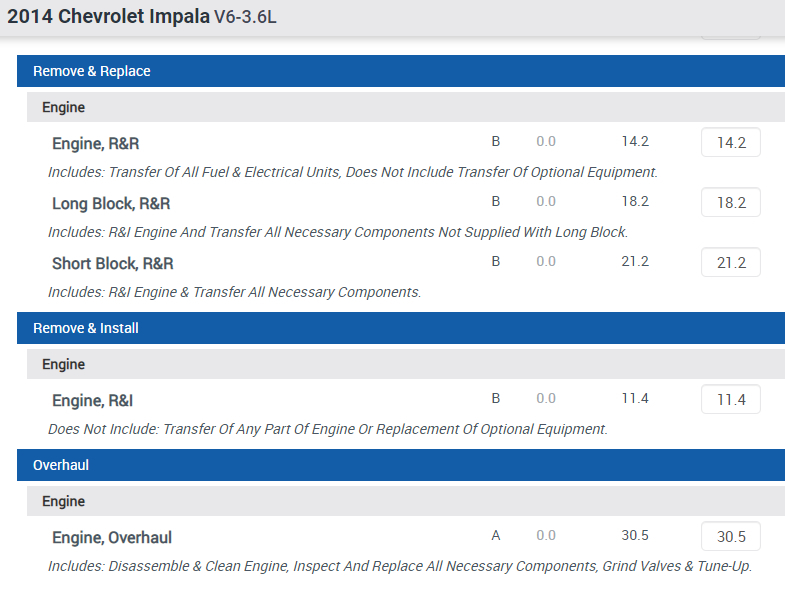
2014 Chevrolet Impala V6-3.6L
Engine Replacement
Vehicle Engine, Cooling and Exhaust Engine Service and Repair Removal and Replacement Engine Replacement
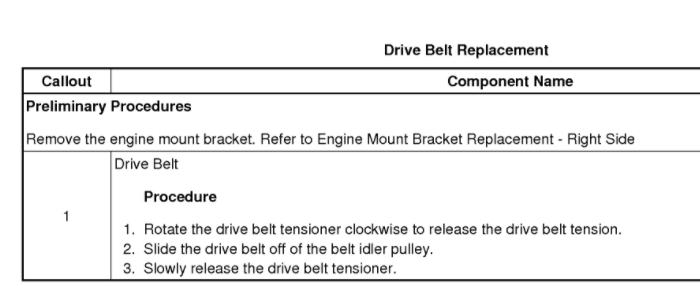
ENGINE REPLACEMENT
Engine Replacement
Removal Procedure
1. Disconnect the negative battery cable. Refer to Battery Negative Cable Disconnection and Connection See: Negative > Removal and Replacement > Battery Negative Cable Disconnection and Connection.
2. Support the vehicle. Refer to Lifting and Jacking the Vehicle See: Vehicle Lifting > Procedures > Lifting and Jacking the Vehicle.
Pic 1
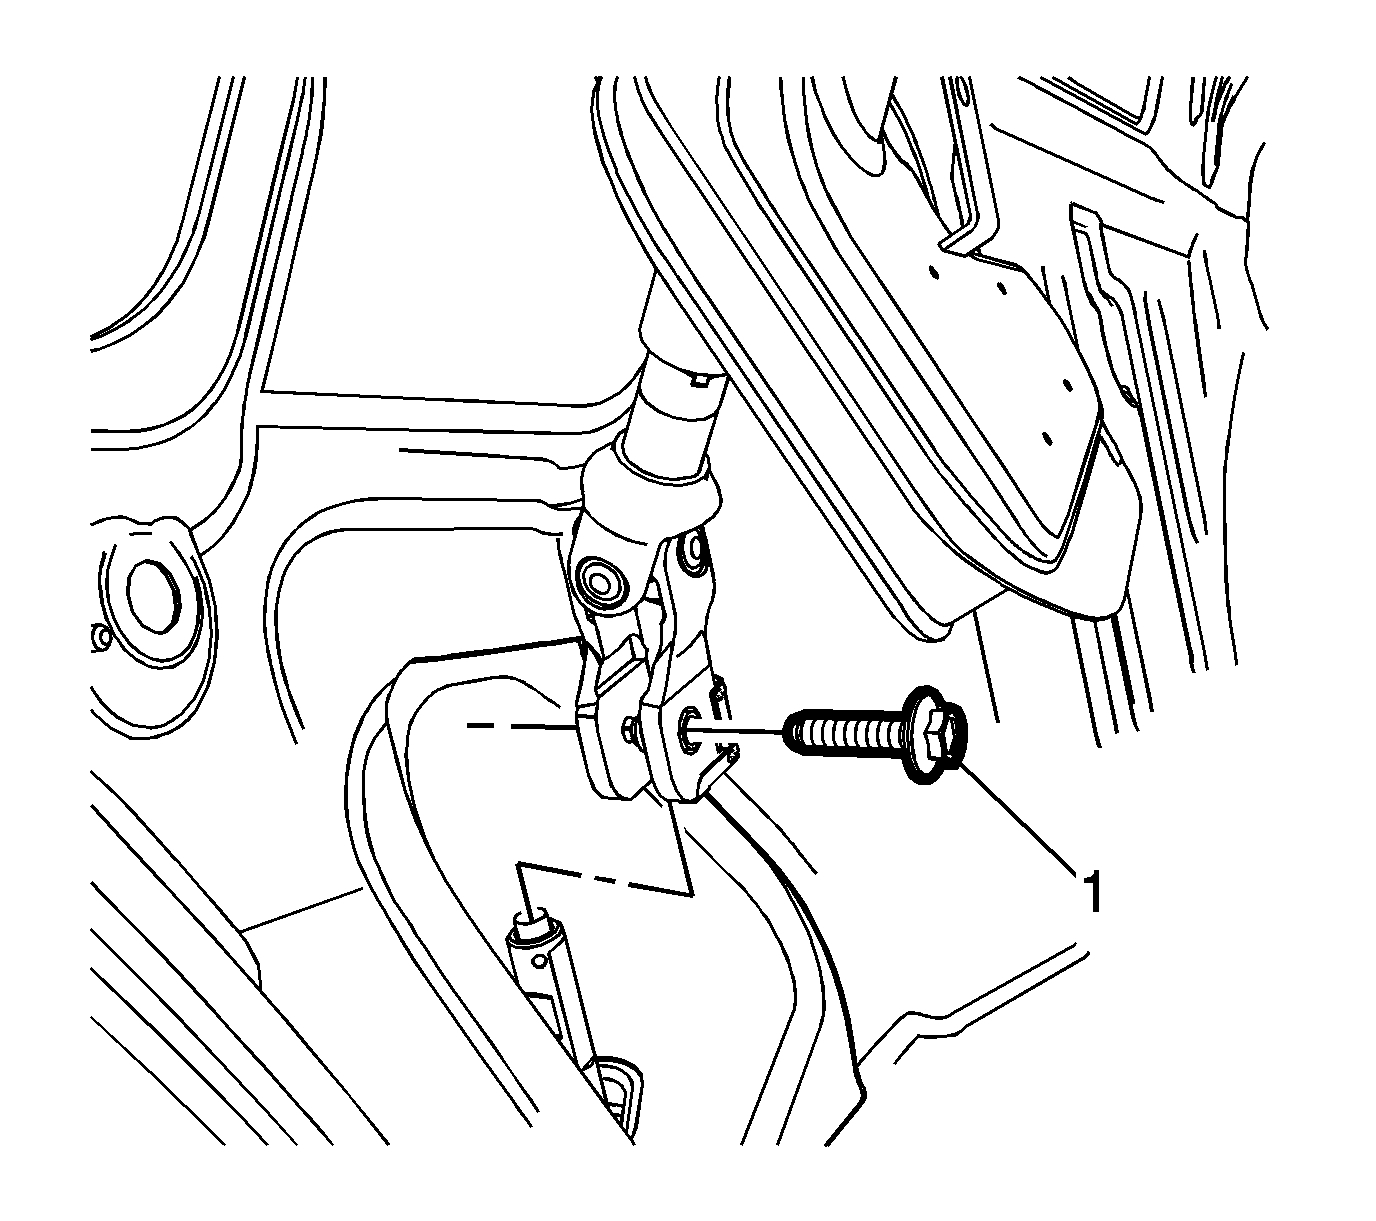
3. Remove the bolt (1) from the coupler and disconnect the steering shaft coupling from the steering gear. Refer to Intermediate Steering Shaft Replacement See: Steering Column > Removal and Replacement > Intermediate Steering Shaft Replacement.
Pic 2
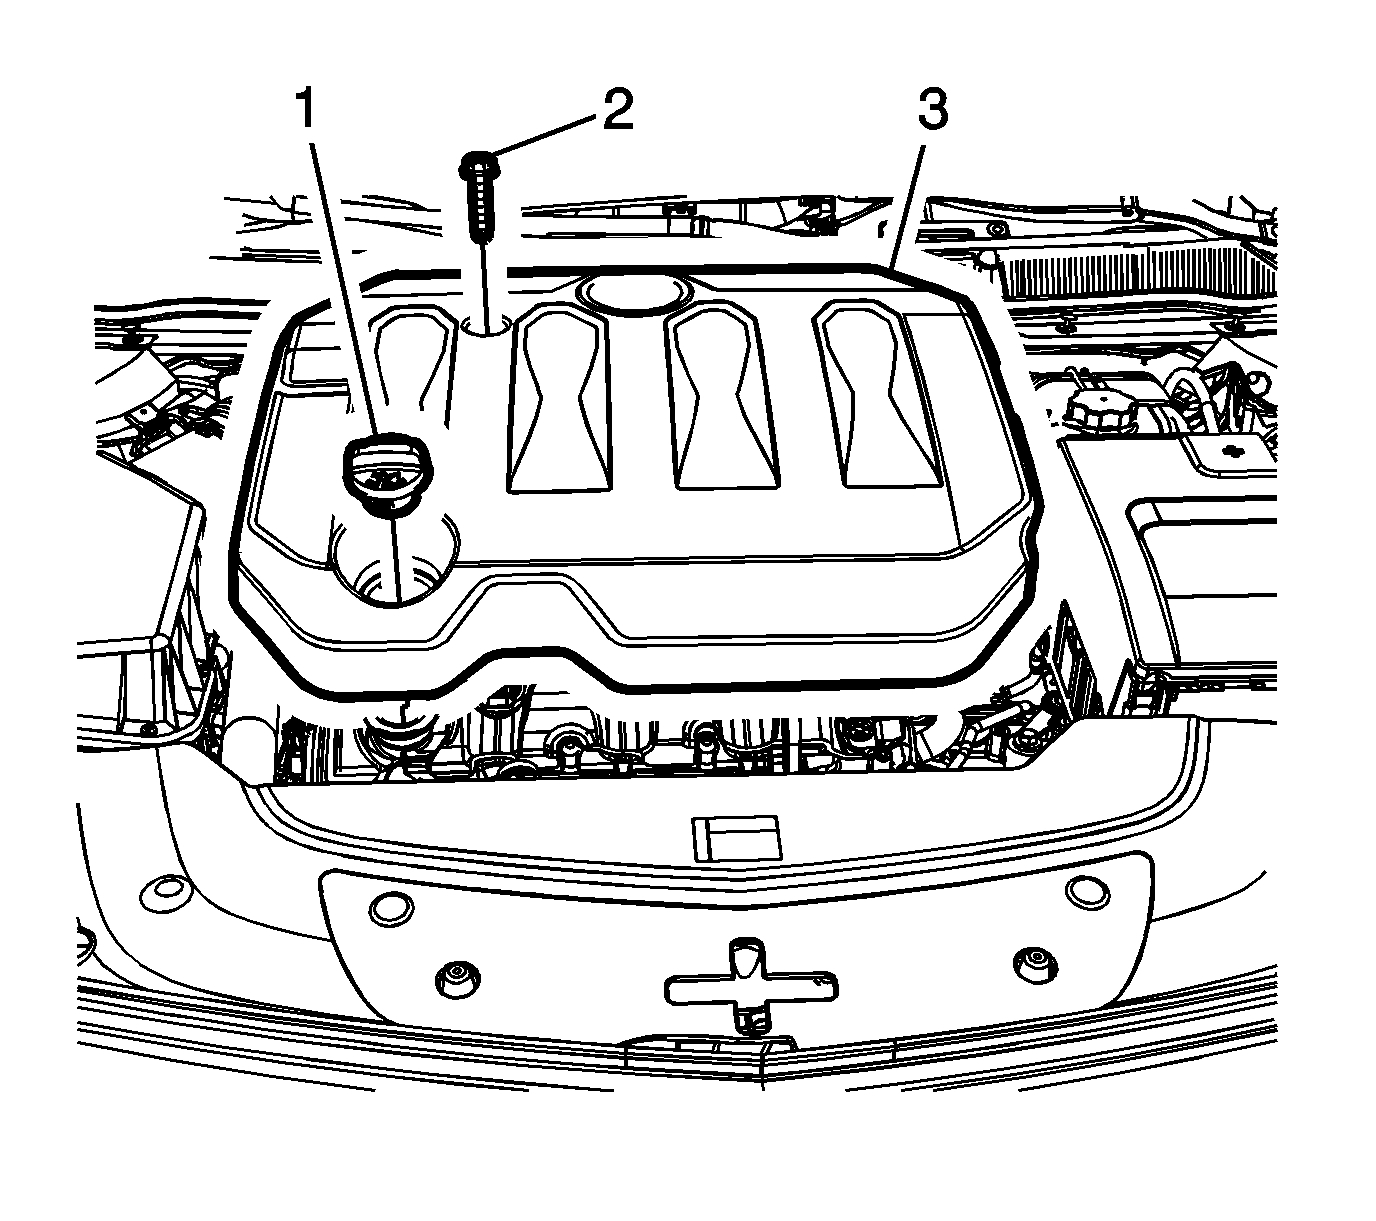
4. Remove the intake manifold cover (3). Refer to Intake Manifold Cover Replacement See: Intake Manifold > Removal and Replacement > Intake Manifold Cover Replacement.
Pic 3
5. Remove the air cleaner assembly (1). Refer to Air Cleaner Assembly Replacement See: Air Cleaner Housing > Removal and Replacement > Air Cleaner Assembly Replacement.
6. Recover the refrigerant. Refer to Refrigerant Recovery and Recharging See: Heating and Air Conditioning > Procedures > Refrigerant Recovery and Recharging.
7. Drain the cooling system. Refer to Cooling System Draining and Filling (Static) See: Cooling System > Procedures > Cooling System Draining and Filling (Static)Cooling System Draining and Filling (GE 47716) See: Cooling System > Procedures > Cooling System Draining and Filling (GE 47716).
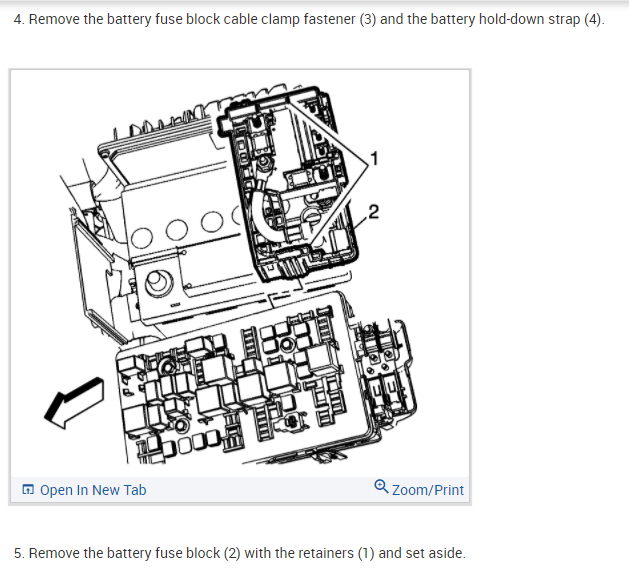
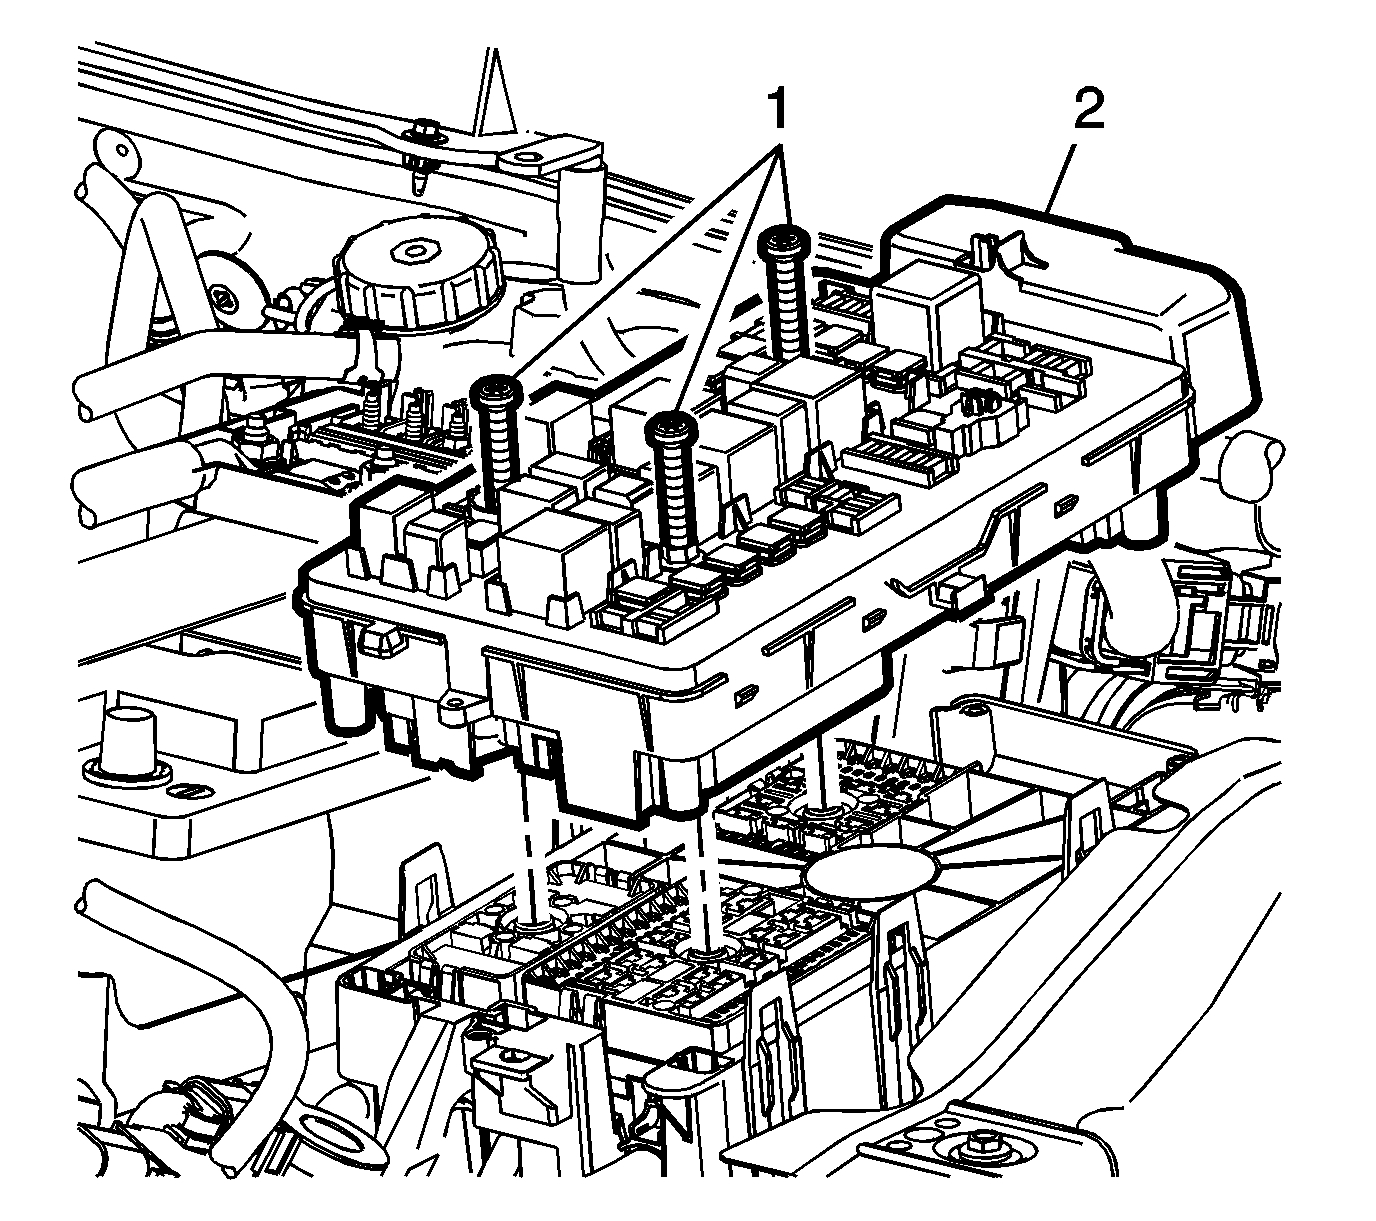
8. Remove the front compartment fuse block cover.
Pic 4
9. Remove the front compartment fuse block (2).
Pic 5
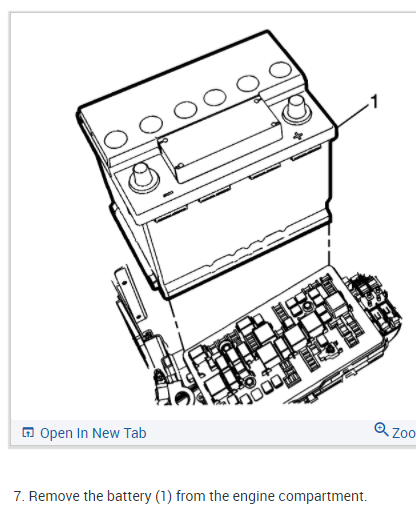
10. Remove the battery tray (2). Refer to Battery Tray Replacement See: Battery Tray > Removal and Replacement > Battery Tray Replacement.
Pic 6
11. Disconnect the transmission shift cable (3).
Pic 7
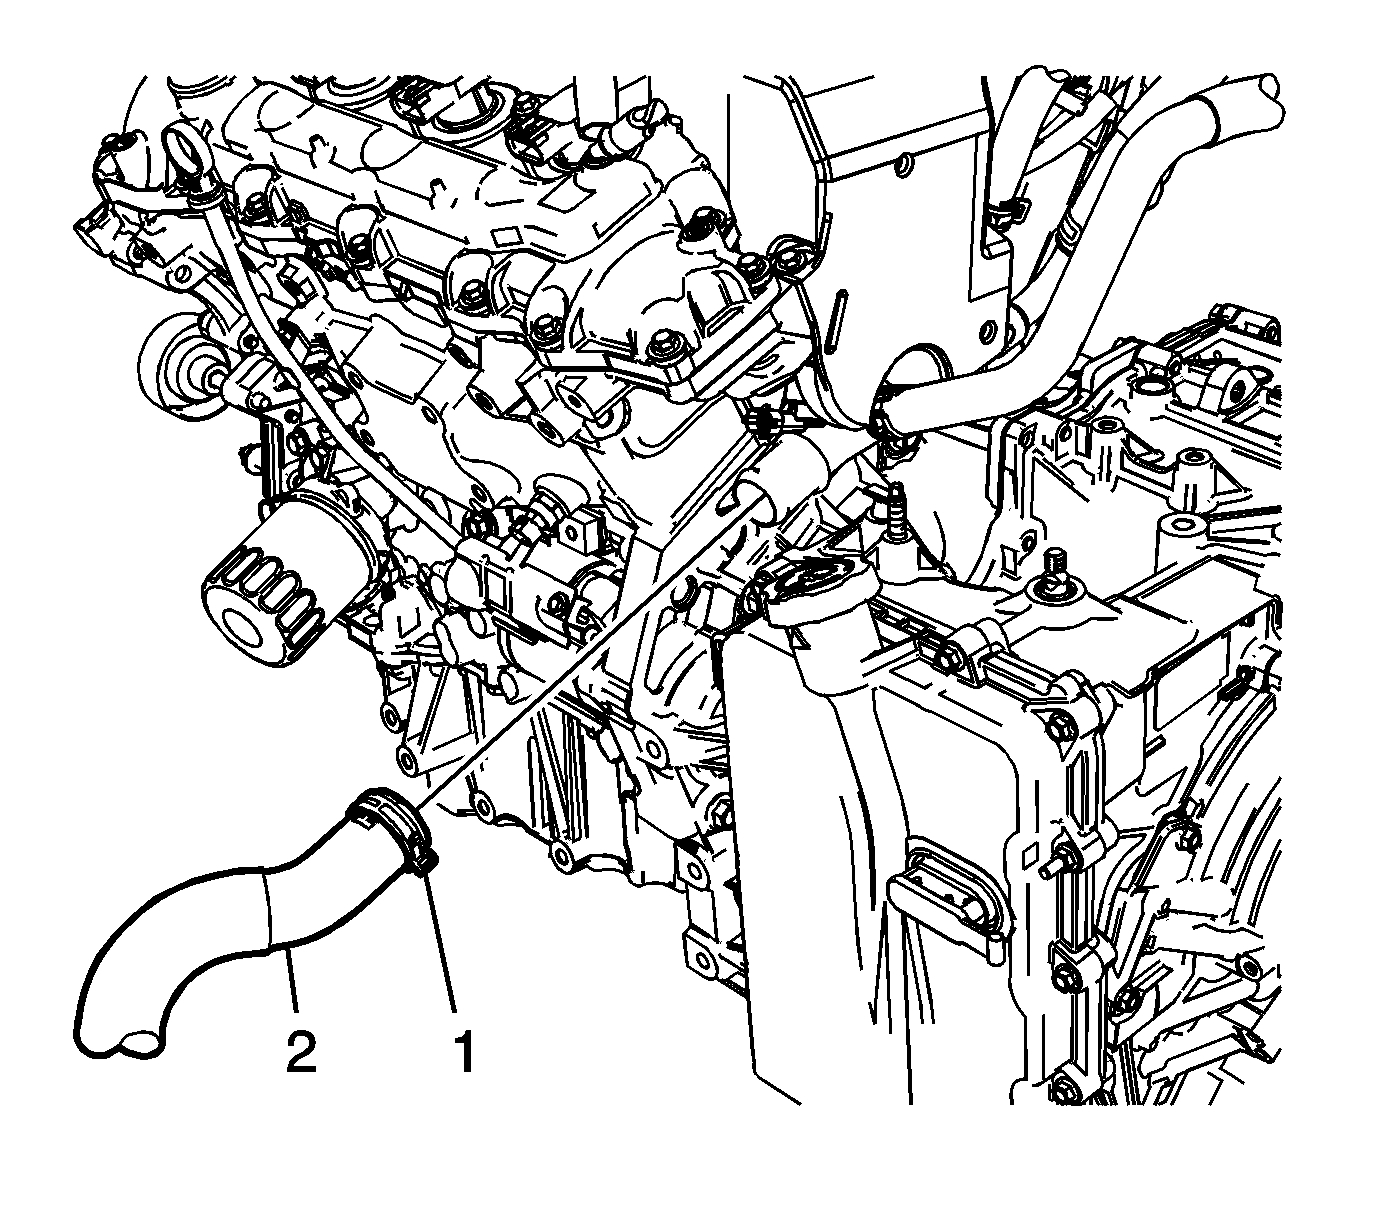
12. Disconnect the radiator outlet hose (2) from the engine. Refer to Radiator Outlet Hose Replacement (LFX) See: Radiator Hose > Removal and Replacement > Radiator Outlet Hose ReplacementRadiator Outlet Hose Replacement (LKW) See: Radiator Hose > Removal and Replacement > Radiator Outlet Hose Replacement.
13. Disconnect the radiator inlet hose from the engine. Refer to Radiator Inlet Hose Replacement (LFX) See: Radiator Hose > Removal and Replacement > Radiator Inlet Hose ReplacementRadiator Inlet Hose Replacement (LKW) See: Radiator Hose > Removal and Replacement > Radiator Inlet Hose Replacement.
Pic 8
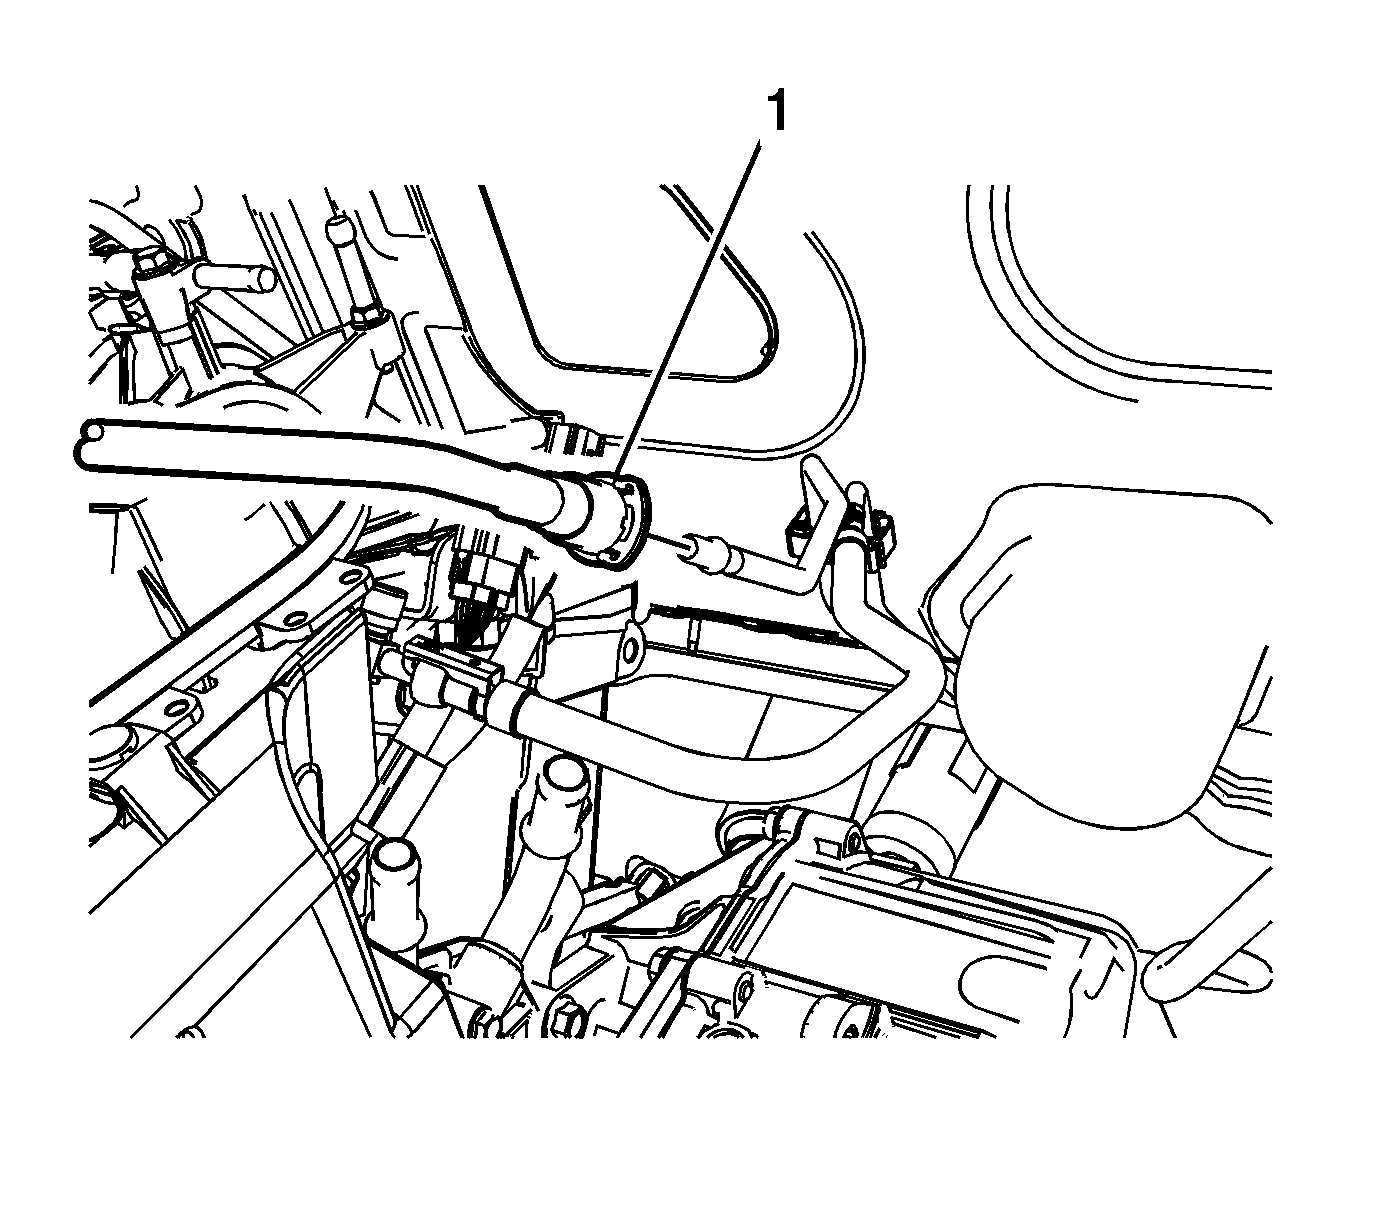
14. Release the clip from the quick disconnect (1) and remove the heater inlet hose (2) from the heater core tube.
Pic 9
15. Release the clip from the quick disconnect (1) and remove the heater outlet hose (2) from the heater core tube.
16. Remove the A/C connectors from the service ports.
17. Remove both front wheels. Refer to Tire and Wheel Removal and Installation See: Wheels and Tires > Removal and Replacement > Tire and Wheel Removal and Installation.
18. Remove right side front wheelhouse liner. Refer to Front Wheelhouse Liner Replacement.
19. Remove the exhaust front pipe. Refer to Front Pipe Replacement (LFX) See: Exhaust Pipe > Removal and Replacement > Front Pipe ReplacementFront Pipe Replacement (LKW) See: Exhaust Pipe > Removal and Replacement > Front Pipe Replacement.
Pic 10
20. Disconnect the fuel feed line (1). Refer to Metal Collar Quick Connect Fitting Service See: Fuel Line Coupler > Removal and Replacement > Metal Collar Quick Connect Fitting Service.
21. Disconnect the fuel feed line from the engine bracket retainer.
Pic 11
22. Disconnect the evaporative emission line (1). Refer to Plastic Collar Quick Connect Fitting Service See: Coolant Line/Hose > Procedures > Plastic Collar Quick Connect Fitting Service.
Pic 12
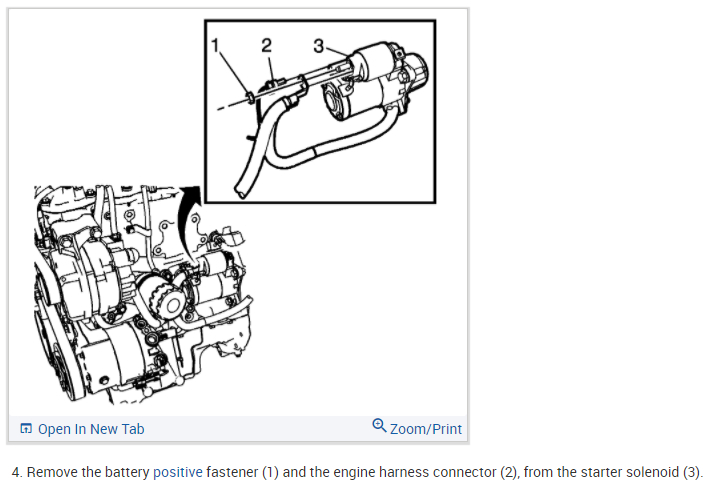
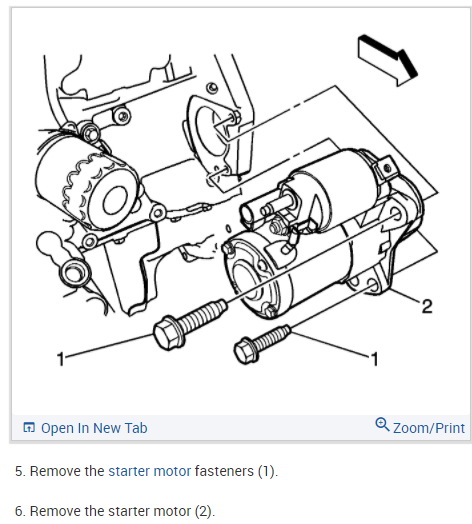
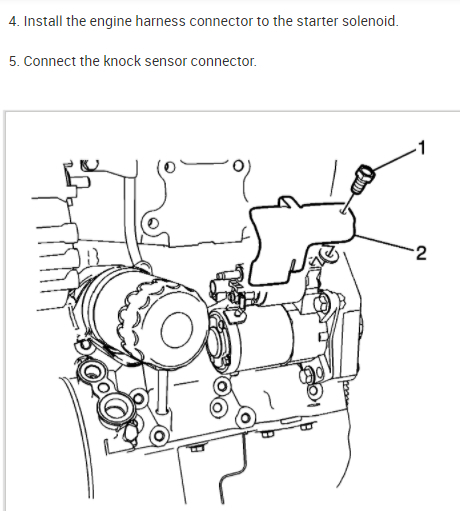
23. Remove the starter. Refer to Starter Replacement (LFX) See: Starter Motor > Removal and Replacement > Starter Replacement Starter Replacement (LKW) See: Starter Motor > Removal and Replacement > Starter Replacement.
24. Mark the torque converter to flexplate relationship.
Note: Rotate engine clockwise using the crankshaft balancer bolt to gain access to each bolt.
25. Remove the torque converter bolts.
26. Remove the wheel drive shafts from the hub/bearing assemblies. Refer to Front Wheel Drive Shaft Replacement - Left Side See: Axle Shaft Assembly > Removal and Replacement > Front Wheel Drive Shaft Replacement - Left Side and Front Wheel Drive Shaft Replacement - Right Side See: Axle Shaft Assembly > Removal and Replacement > Front Wheel Drive Shaft Replacement - Right Side.
27. Remove the front fascia. Refer to Front Bumper Fascia Replacement.
28. Disconnect and reposition harnesses as required.
29. Disconnect the power steering cooler lines from the cooler.
30. Disconnect the steering pump hydraulic lines.
31. Lower the vehicle and powertrain onto a suitable support table. Using wood blocks support the oil pan and front frame on the table.
32. Disconnect the coolant hoses from the radiator surge tank.
33. Disconnect the air conditioning hoses from the air compressor.
Note: Mechanicics wire can be used.
34. Support the radiator assembly to the core support.
Pic 13
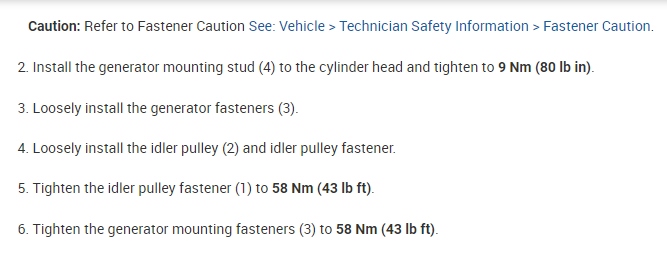
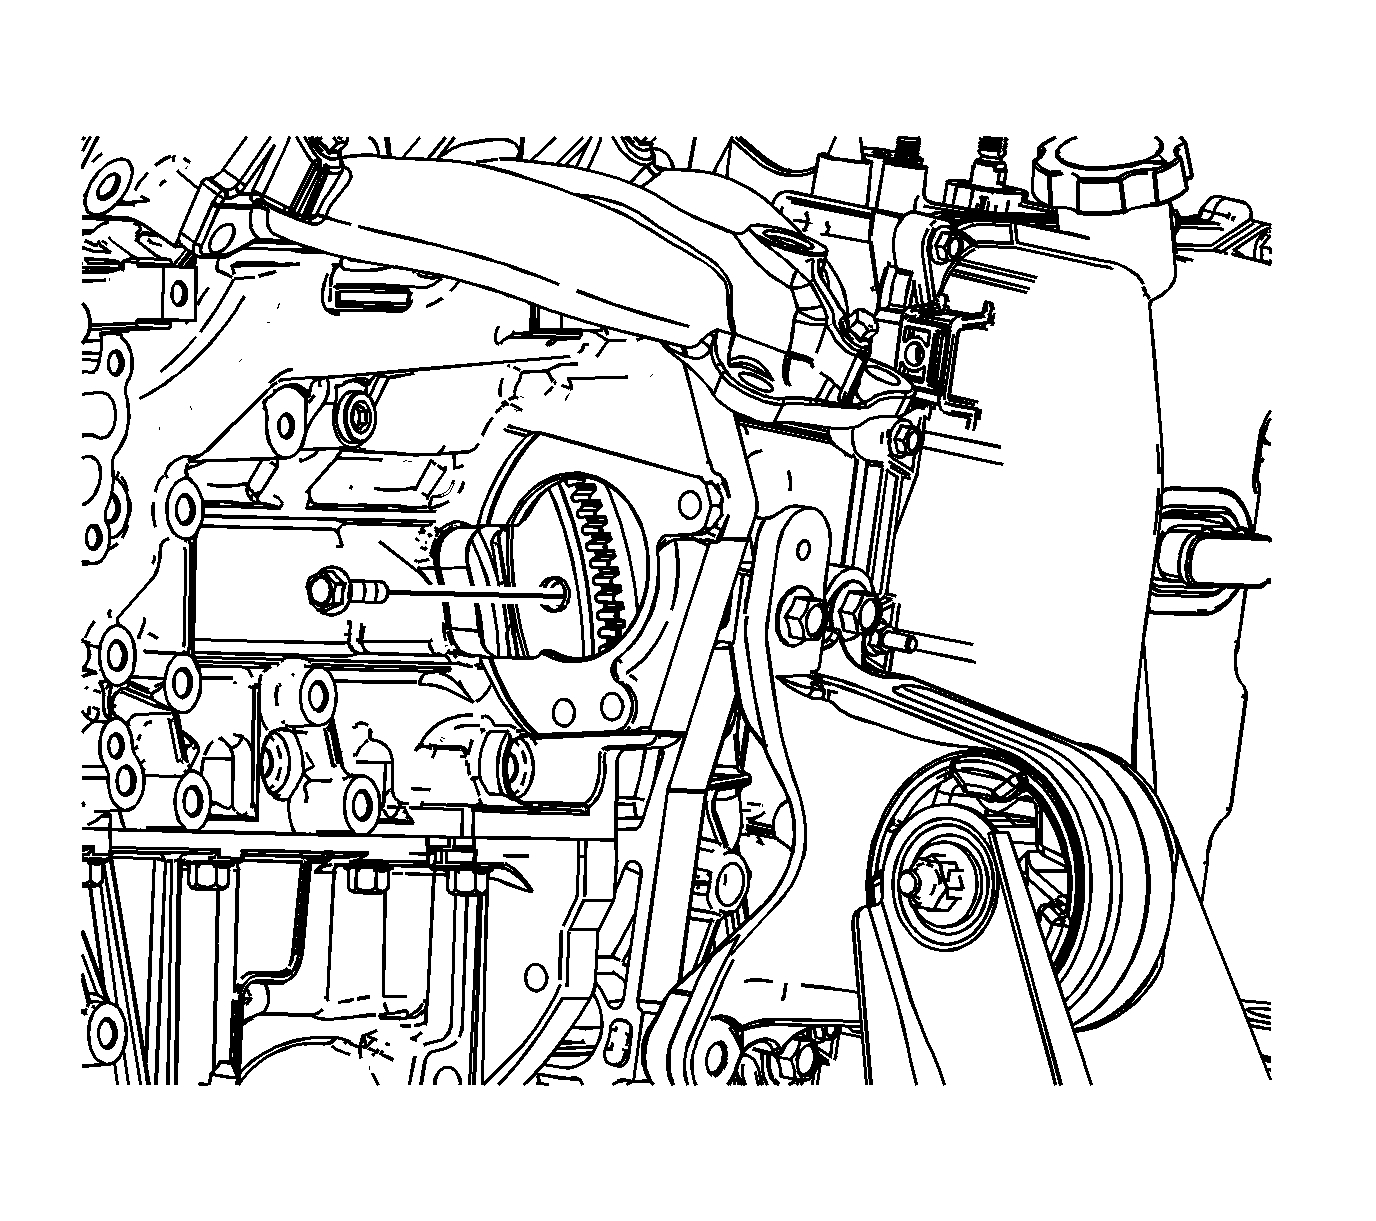
35. Remove the right side engine mount to engine bolts (2). Refer to Engine Mount Replacement - Right Side See: Engine Mount > Removal and Replacement > Engine Mount Replacement - Right Side.
36. Remove the left side transmission mount to transmission bolts. Refer to Transmission Mount Replacement - Left Side See: Transmission Mount, A/T > Removal and Replacement > Transmission Mount Replacement - Left Side.
37. Remove the front and rear frame to the body bolts. Refer to Drivetrain and Front Suspension Frame Replacement.
38. Raise the vehicle off the powertrain.
39. Remove the front and rear engine mount through bolts. Refer to Transmission Front Mount Replacement See: Transmission Mount, A/T > Removal and Replacement > Transmission Front Mount Replacement and Transmission Rear Mount Replacement See: Transmission Mount, A/T > Removal and Replacement > Transmission Rear Mount Replacement.
40. Lift the powertrain assembly off the frame and place on the floor.
41. Separate the engine from the transmission.
42. Disconnect electrical connectors as necessary.
Installation Procedure
pic 14
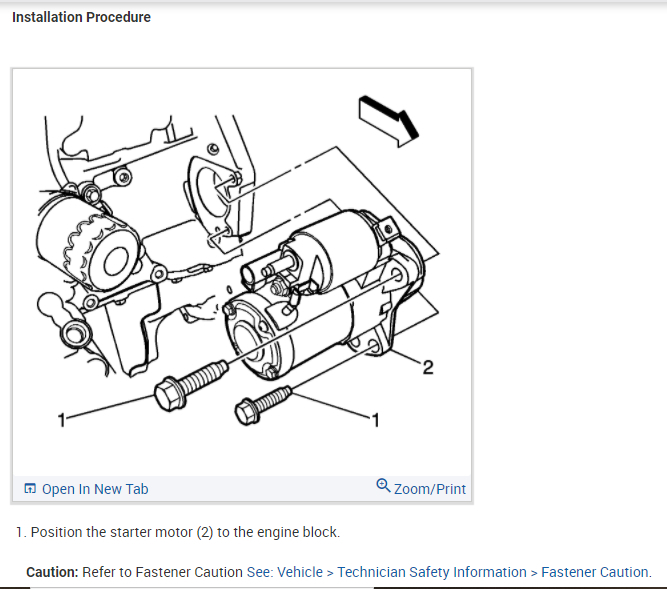
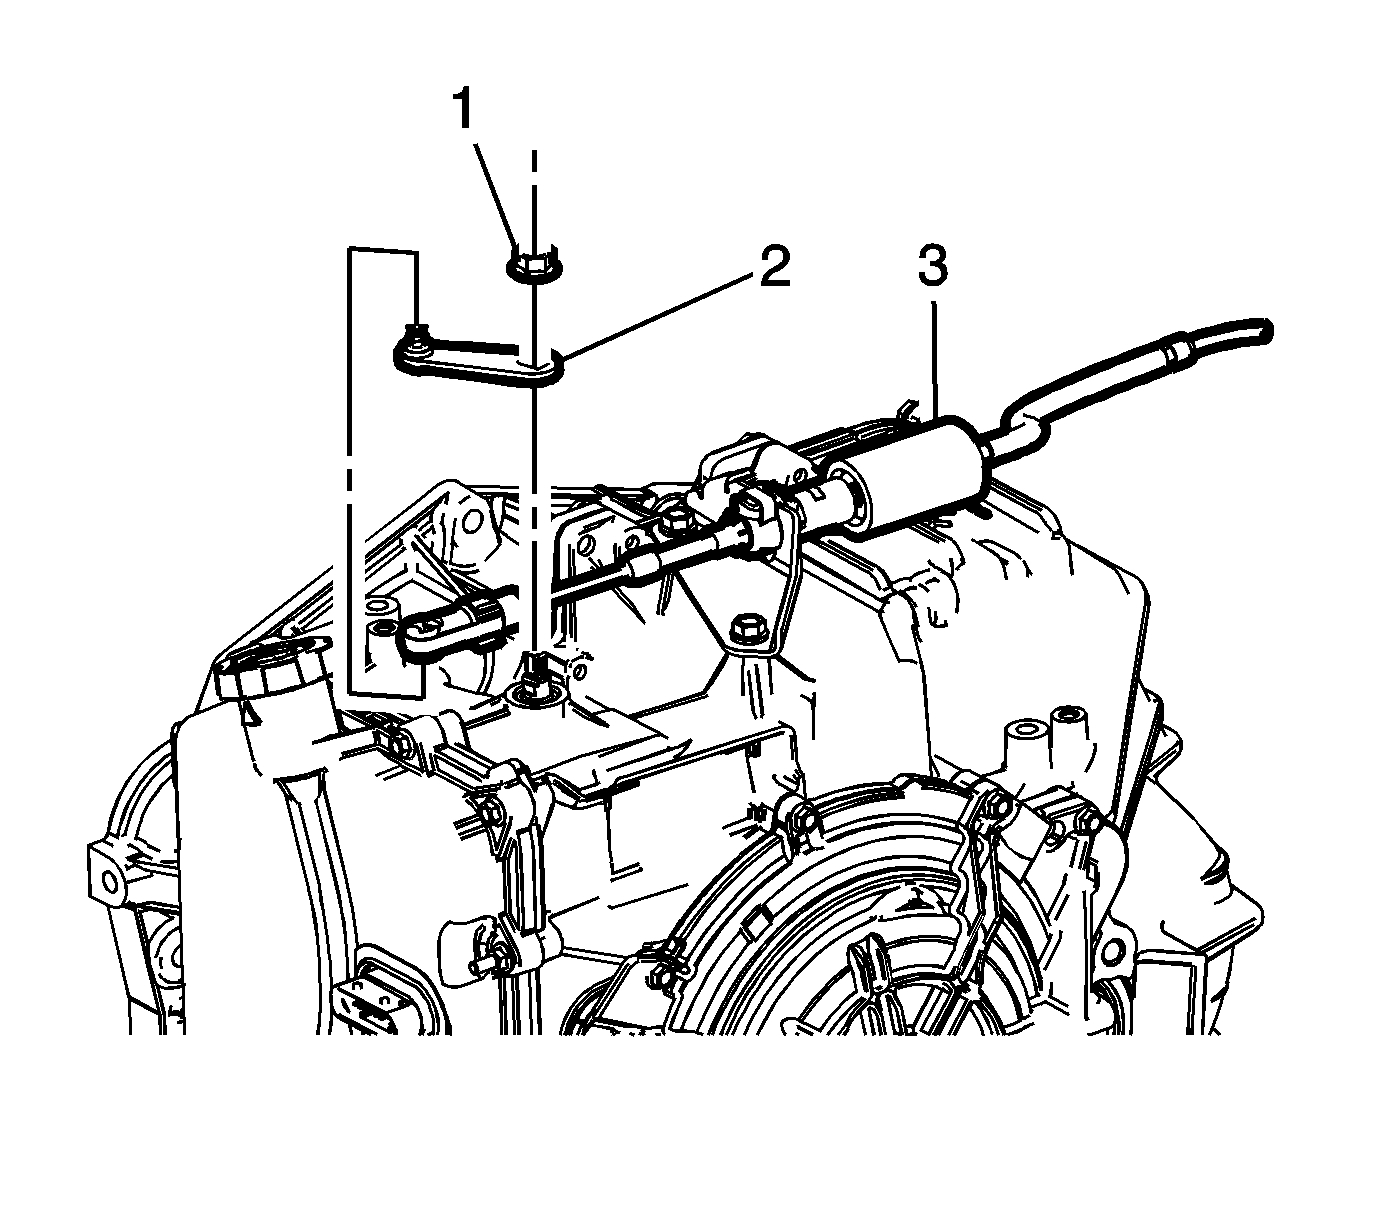
1. Install the upper transmission to engine bolt (1, 2) and tighten to 75 Nm (55 lb ft).
2. Place the powertrain assembly on the frame.
3. Place the powertrain and frame assembly on the engine support table.
4. Align the powertrain assembly to the vehicle.
5. Lower the vehicle onto the powertrain assembly.
6. Install the front and rear frame bolts. Refer to Drivetrain and Front Suspension Frame Replacement.
7. Install the left side transmission mount to transmission bolts. Refer to Transmission Mount Replacement - Left Side See: Transmission Mount, A/T > Removal and Replacement > Transmission Mount Replacement - Left Side.
Pic 15
8. Install the right side engine mount to engine bolts (2). Refer to Engine Mount Replacement - Right Side See: Engine Mount > Removal and Replacement > Engine Mount Replacement - Right Side.
9. Release the radiator from the core support.
10. Connect the air conditioning hoses to the air compressor and tighten the fasteners to 22 Nm (16 lb ft).
11. Connect the coolant hoses to the radiator surge tank.
12. Retain the harness in it original position.
13. Remove the engine support table.
14. Connect the steering pump hydraulic lines.
15. Install the front fascia. Refer to Front Bumper Fascia Replacement.
Pic 16
16. Align the torque converter and flexplate marks and install the torque convertor-to-flexplate bolts and tighten to 62 Nm (46 lb ft).
17. Install the exhaust front pipe. Refer to Front Pipe Replacement (LFX) See: Exhaust Pipe > Removal and Replacement > Front Pipe Replacement Front Pipe Replacement (LKW) See: Exhaust Pipe > Removal and Replacement > Front Pipe Replacement.
18. Install the wheel drive shafts from the hub/bearing assemblies. Refer to Front Wheel Drive Shaft Replacement - Left Side See: Axle Shaft Assembly > Removal and Replacement > Front Wheel Drive Shaft Replacement - Left Side and Front Wheel Drive Shaft Replacement - Right Side See: Axle Shaft Assembly > Removal and Replacement > Front Wheel Drive Shaft Replacement - Right Side.
Pic 17
19. Connect the steering shaft coupling to the steering gear and install the bolt (1). Refer to Intermediate Steering Shaft Replacement See: Steering Column > Removal and Replacement > Intermediate Steering Shaft Replacement.
Pic 18
20. Install the right side front wheelhouse liner (4). Refer to Front Wheelhouse Liner Replacement.
21. Install the front wheels. Refer to Tire and Wheel Removal and Installation See: Wheels and Tires > Removal and Replacement > Tire and Wheel Removal and Installation.
Pic 19
22. Install the radiator outlet hose (2). Refer to Radiator Outlet Hose Replacement (LFX) See: Radiator Hose > Removal and Replacement > Radiator Outlet Hose Replacement Radiator Outlet Hose Replacement (LKW) See: Radiator Hose > Removal and Replacement > Radiator Outlet Hose Replacement.
23. Install the radiator inlet hose. Refer to Radiator Inlet Hose Replacement (LFX) See: Radiator Hose > Removal and Replacement > Radiator Inlet Hose Replacement Radiator Inlet Hose Replacement (LKW) See: Radiator Hose > Removal and Replacement > Radiator Inlet Hose Replacement.
Pic 20
24. Install the heater inlet hose (2) to the heater core tube and clip the quick disconnect (1).
Pic 21
25. Install the heater outlet hose (2) to the heater core tube and clip the quick disconnect (1).
Pic 22
26. Install the fuel EVAP line (1).
27. Connect the fuel feel line to the engine bracket retainer.
Pic 23
28. Connect the fuel feed line (1). Refer to Fuel Feed Pipe Replacement See: Fuel Supply Line > Removal and Replacement > Fuel Feed Pipe Replacement.
Pic 24
29. Connect the transmission shiftier cable (3).
Pic 25
30. Install the front compartment fuse block (2).
31. Install the front compartment fuse block cover.
Pic 26
32. Install the battery tray (2). Refer to Battery Tray Replacement See: Battery Tray > Removal and Replacement > Battery Tray Replacement.
33. Connect the negative battery cable. Refer to Battery Negative Cable Disconnection and Connection See: Negative > Removal and Replacement > Battery Negative Cable Disconnection and Connection.
34. Fill the vehicle with coolant. Refer to Cooling System Draining and Filling (Static) See: Cooling System > Procedures > Cooling System Draining and Filling (Static)Cooling System Draining and Filling (GE 47716) See: Cooling System > Procedures > Cooling System Draining and Filling (GE 47716).
35. Recharge the air conditioning system. Refer to Refrigerant Recovery and Recharging See: Heating and Air Conditioning > Procedures > Refrigerant Recovery and Recharging.
Pic 27
36. Install the air cleaner assembly (1). Refer to Air Cleaner Assembly Replacement See: Air Cleaner Housing > Removal and Replacement > Air Cleaner Assembly Replacement.
37. Fill the engine oil. Refer to Engine Oil and Oil Filter Replacement See: Engine Oil > Removal and Replacement > Engine Oil and Oil Filter Replacement.
Pic 28
38. Install the intake manifold cover (3). Refer to Intake Manifold Cover Replacement See: Intake Manifold > Removal and Replacement > Intake Manifold Cover Replacement.
Pic 29
39. Install the bolt (1) from the coupler and connect the steering shaft coupling to the steering gear. Refer to Intermediate Steering Shaft Replacement See: Steering Column > Removal and Replacement > Intermediate Steering Shaft Replacement.
40. Connect the negative battery cable. Refer to Battery Negative Cable Disconnection and Connection See: Negative > Removal and Replacement > Battery Negative Cable Disconnection and Connection.
41. Perform the throttle learn procedure. Refer to Q38 Throttle Body: Throttle/Idle Learn See: Throttle Body > Programming and Relearning > Throttle Body Throttle/Idle Learn.
42. Perform the crankshaft position variation learn procedure. Refer to Crankshaft Position System Variation Learn See: Crankshaft Position Sensor > Programming and Relearning > Crankshaft Position System Variation Learn.
_________________________________________
I hope this helps. Let us know if you have other questions.
Take care and God Bless,
Joe
Images (Click to make bigger)
Monday, February 15th, 2021 AT 5:33 PM