Welcome to 2CarPros.
Honestly, several things can be causing this. Fuel pressure (too high), a bad idle air control valve (IAC), an engine vacuum leak and so on.
Has the check engine light come on and stay on when the engine is running? If it does, we need to have the computer scanned to identify diagnostic trouble codes. Here is a quick video showing how it is done:
https://youtu.be/YV3TRZwer8k
I realize most people don't own a scanner. However, most nationally recognized parts stores will do it for free. If the light stays on, this needs done.
Other things that can be an issue are vacuum leaks, fuel pressure, or a bad IAC.
Here are links that explain how they are checked:
https://www.2carpros.com/articles/how-to-use-an-engine-vacuum-gauge
Here is a link that explains how to replace and IAC. Before replacement, the component should be inspected to determine if there is dirt or carbon built up where it mounts on the throttle body.
https://www.2carpros.com/articles/how-to-replace-an-idle-speed-control-motor-iac
Here is a link that explains how in general to check fuel pressure:
https://www.2carpros.com/articles/how-to-check-fuel-system-pressure-and-regulator
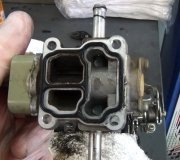
Here are directions specific to your vehicle for connecting the fuel gauge (most parts stores will lend you one) Pic 1 correlates with these directions.
FUEL PRESSURE GAGE INSTALLATION AND REMOVAL
FUEL PRESSURE GAGE INSTALLATION AND REMOVAL
TOOLS REQUIRED
- J 34730-1A Fuel Pressure Gage
- J 34730-262 Fuel Pressure Gage Fitting
INSTALLATION PROCEDURE
CAUTION:
- Gasoline or gasoline vapors are highly flammable. A fire could occur if an ignition source is present. Never drain or store gasoline or diesel fuel in an open container, due to the possibility of fire or explosion. Have a dry chemical (Class B) fire extinguisher nearby.
- Refer to Fuel Gage Leak Caution in Service Precautions.
NOTE: Clean all of the following areas before performing any disconnections in order to avoid possible contamination in the system:
- The fuel pipe connections
- The hose connections
- The areas surrounding the connections
1. Disconnect the negative battery terminal.
CAUTION: Refer to Battery Disconnect Caution in Service Precautions.
2. Remove the fuel pressure connection valve cap.
3. Install the J 34730-262 to the fuel pressure connection.
IMPORTANT: Install the fuel pressure gage fitting above the belt in order to avoid contact with the belt.
4. Connect the J 34730-1A to the fuel pressure connection. Wrap a shop towel around the fuel pressure connection while connecting the fuel pressure gage in order to avoid spillage.
5. Install the bleed hose into an approved container and open the valve to bleed the system pressure. The fuel connections are now safe for servicing.
6. Drain any fuel remaining in the fuel pressure gage into an approved container.
7. Close the bleed valve on the fuel pressure gage.
8. Command the fuel pump ON with a scan tool.
9. Inspect for fuel leaks.
REMOVAL PROCEDURE
1. Place the fuel pressure gauge bleed hose into an approved container and open the bleed valve to bleed fuel system pressure.
pic 1
2. Place a shop towel under the fuel pressure gage adaptor fitting to catch any remaining fuel spillage.
3. Remove the J 34730-1A from the adaptor fitting.
4. Remove the J 34730-262.
5. Drain any fuel remaining in the fuel pressure gage into an approved container.
6. Install the cap on the fuel pressure connection.
Here are the manufacturer's fuel pressure specifications.
Fuel Pressure (Key ON, Engine OFF) .................... 358-405 kPa (52-59 psi)
________________________
Last, this vehicle has a throttle cable. Make sure it isn't frayed or sticking. Check on the throttle body to make sure it moves freely.
If you find it is bad, here are the directions for replacement. The remaining pics correlate with these directions.
ACCELERATOR CONTROLS CABLE REPLACEMENT
REMOVAL PROCEDURE
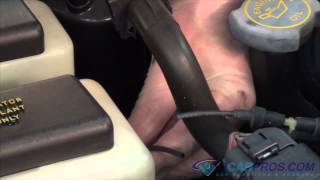
pic 2
1. Disconnect the accelerator cable from the throttle body lever.
2. Disconnect the accelerator cable from the accelerator cable bracket.
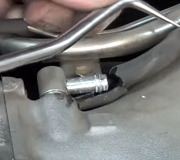
pic 3
3. Remove the left instrument panel sound insulator.
4. Disconnect the accelerator cable from the accelerator pedal.
5. Pull the accelerator cable through the bulkhead.
pic 4
6. Remove the accelerator cable from the vehicle. Note the cable routing for aid in installation.
INSTALLATION PROCEDURE
pic 5
1. Install the accelerator cable into the vehicle using routing noted during removal.
NOTE: Do not route flexible components (hoses, wires, conduits, etc.) within 50 mm (2 in) of moving parts unless flexible components can be securely fastened. This is necessary in order to prevent possible interference and damage to the component.
pic 6
2. Connect the accelerator cable through the slot in the accelerator pedal lever.
3. Seat the snap retainer in the accelerator pedal lever.
pic 7
4. Connect the accelerator cable to the throttle body lever.
5. Connect the accelerator cable to the accelerator cable bracket.
6. Inspect and check for complete throttle opening and closing positions by operating the accelerator pedal. Also check for poor carpet fit under the accelerator pedal.
7. Install the left instrument panel sound insulator.
Let me know if this helps or if you have other questions. Also, let me know the results.
Take care,
Joe
Images (Click to make bigger)
SPONSORED LINKS
Friday, May 31st, 2019 AT 7:51 PM