Dash lights not coming on

Tiny
KYLE MENDES
  • MEMBER
  • 19 POSTS
All fuses work with the key in "on".
Was this
answer
helpful?
Yes
No
Monday, August 3rd, 2020 AT 3:15 PM (Merged)
Tiny
KASEKENNY
  • MECHANIC
  • 18,907 POSTS
So if all the fuses are working then I would go to the component with no back lighting and make sure the power is getting to it. If it is then the bulb is burned out. If you don't have power then you have a short between the fuse and component but this is unlikely based on what happened.

When you shorted the circuit the bulb is sometimes the weakest point which caused the open.

The only issue is it looks like the cluster is an LCD back light. I am not able to find if this is replaceable. If not then you will need to replace the cluster to fix it. However, I would pull the cluster out and see if you can access the bulb from behind it.
Was this
answer
helpful?
Yes
No
Monday, August 3rd, 2020 AT 3:15 PM (Merged)
Tiny
KYLE MENDES
  • MEMBER
  • 19 POSTS
So there are bulbs that illuminate all the dials and the odometer back-lighting. I shorted out the dash, then in the mix of things, swapped in the new bulbs. Only to find they were still out. So bulbs have been changed since this debacle. I guess the next step I could do is check the wiring harness for 12 V power. If that's fine. Then I assume the cluster is fried somewhere? Is that fixable at all? I don't really want to swap clusters because then my mileage wouldn't match. Also, the radio back-light and climate control still don't work, so it can't just be the cluster.
Was this
answer
helpful?
Yes
No
Monday, August 3rd, 2020 AT 3:15 PM (Merged)
Tiny
KASEKENNY
  • MECHANIC
  • 18,907 POSTS
Yeah. I would check for 12 volts and if you have it then more than likely the component is failed at this point. The cluster has a circuit board that may have been damaged.

The way I would approach this is to look at each issue individually. It could all be related but if you just search for the common denominator you will pull your hair out. If you fix one and it fixes the rest then that is just a bonus. If not then you fix one and then move onto the next.
Was this
answer
helpful?
Yes
No
Monday, August 3rd, 2020 AT 3:16 PM (Merged)
Tiny
DDODGE
  • MEMBER
  • 1 POST
  • 2004 HONDA CRV
  • 4 CYL
  • 2WD
  • AUTOMATIC
  • 115,000 MILES
The temperature control knob light is apparently burned out. How do I remove or get to the bulb for replacement?
Was this
answer
helpful?
Yes
No
Monday, August 3rd, 2020 AT 3:16 PM (Merged)
Tiny
KHLOW2008
  • MECHANIC
  • 41,815 POSTS
Hi ddodge,

HEATER CONTROL PANEL REMOVAL AND INSTALLATION
1. Remove the center panel (see DASHBOARD CENTER PANEL REMOVAL/INSTALLATION ).
2. Remove the self-tapping screws and the heater control panel (A) from the dash board (B).
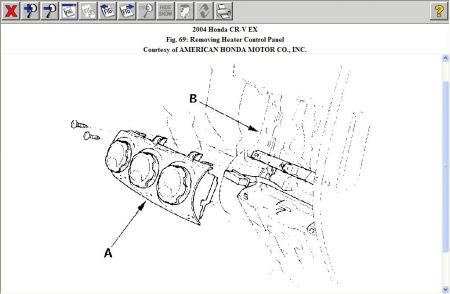

https://www.2carpros.com/forum/automotive_pictures/192750_Heater04CRV01a1_1.jpg


3. Install the control panel in the reverse order of removal. After installation, operate the control panel controls to see whether it works properly.
4. Run the self-diagnosis function to confirm that there are no problems in the system.

DASHBOARD CENTER PANEL REMOVAL/INSTALLATION
Special Tools Required KTC trim tool set SOJATP2014

NOTE:
Take care not to scratch the dashboard and related parts.
Use the appropriate tool from the KTC trim tool set to avoid damage when prying components.

1. Remove the screws from the bottom of the dashboard center panel (A).
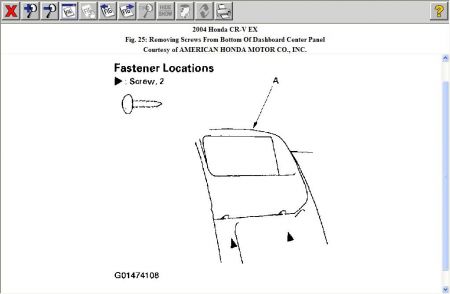

https://www.2carpros.com/forum/automotive_pictures/192750_DashPanel04CRV01_1.jpg


2. Pull out on the bottom of the dashboard center panel (A) to create a gap between the
and panel. Gently pull out along the panel to release the clips, then remove the panel. Disconnect the hazard warning switch connector (B).
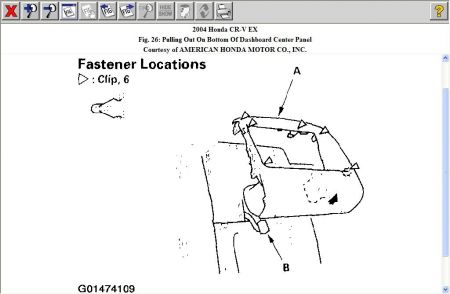

https://www.2carpros.com/forum/automotive_pictures/192750_DashPanel04CRV02_1.jpg


3. Install the panel in the reverse order of removal, and note these items: Ã Â Â Make sure the hazard warning switch connector is plugged in properly. Ã Â Â Replace any damaged clips. Ã Â Â Push the clips into place securely.

HEATER CONTROL PANEL BULB REPLACEMENT
1. Discharge the static electricity (which accumulated on you when you removed the climate control unit) by touching the door striker or other body parts.
2. Remove the self-tapping screws, then carefully separate the heater control panel display (A) from the control panel (B). Do not kink or pull on the wires between the display and the control panel. Do not touch the electronic components on the printed circuit board in the control panel.
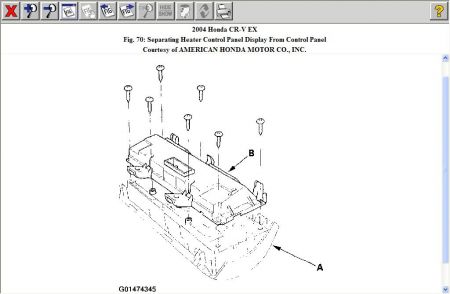

https://www.2carpros.com/forum/automotive_pictures/192750_Heater04CRV01a_1.jpg


3. Remove the bulb(s) with a flat-tip screwdriver.

https://www.2carpros.com/forum/automotive_pictures/192750_Heater04CRV01b_1.jpg


4. Install the bulb(s) in the reverse order of removal.

Was this
answer
helpful?
Yes
No
+1
Monday, August 3rd, 2020 AT 3:16 PM (Merged)
Tiny
KYLE MENDES
  • MEMBER
  • 19 POSTS
That's crazy how one low voltage LED short can screw up so many things. So testing these components individually, I should see if power's even getting there right? So for the climate control for example, I need to find a wiring diagram to see which terminal is power, then can I just hook up the car battery to the power terminal? I'm assuming no due to fuses and such.
Was this
answer
helpful?
Yes
No
Monday, August 3rd, 2020 AT 3:16 PM (Merged)
Tiny
KASEKENNY
  • MECHANIC
  • 18,907 POSTS
Yes. I included the diagram for the HVAC control panel. You want to see if you have 12 volts on the black/yellow wire. Do I understand correctly that the controls don't work or just the back lighting? If it is just the illumination doesn't work then check power on the Illumination circuits shown. If no power then we need to chase those. If you have power, then it is the unit.
Was this
answer
helpful?
Yes
No
Monday, August 3rd, 2020 AT 3:16 PM (Merged)
Tiny
KYLE MENDES
  • MEMBER
  • 19 POSTS
Yes, the car's fully functional for headlights, with exception of radio back light, gauge lights, and climate with headlights switched on.
Was this
answer
helpful?
Yes
No
Monday, August 3rd, 2020 AT 3:16 PM (Merged)
Tiny
KYLE MENDES
  • MEMBER
  • 19 POSTS
I discovered something new. My power windows are all out. So darn. I was sure I checked that relay but I'll have to check again. A mobile electronics place near me charges $70.00 an hour to fix. I really don't want to pay but I can't figure this out.
Was this
answer
helpful?
Yes
No
Monday, August 3rd, 2020 AT 3:16 PM (Merged)
Tiny
KASEKENNY
  • MECHANIC
  • 18,907 POSTS
Sorry for the delay I was out of town. Were you able to check the power on those illumination circuits that I supplied on the wiring diagram?
Was this
answer
helpful?
Yes
No
Monday, August 3rd, 2020 AT 3:16 PM (Merged)
Tiny
KYLE MENDES
  • MEMBER
  • 19 POSTS
So wherever there is a wire harness check to see if 12 volts is at the black and yellow port?
Was this
answer
helpful?
Yes
No
Monday, August 3rd, 2020 AT 3:16 PM (Merged)
Tiny
KASEKENNY
  • MECHANIC
  • 18,907 POSTS
Well. The black and yellow wire is the ignition feed for the heater control which is what power the back lighting.

So if your issue is that the backlighting does not come on when the headlights are on then we need to check the ignition feed for power. If you have it then we need to test for power on the illumination circuits which for the HVAC control head are the Red and Red/Black wires.

Unfortunately these wire colors are probably going to be different for each module unless they share a splice.

Let's just turn the headlights on so that the backlighting should be on and test for voltage on these three wires. Let me know what it is and we can go from there. Thanks
Was this
answer
helpful?
Yes
No
Monday, August 3rd, 2020 AT 3:16 PM (Merged)
Tiny
KYLE MENDES
  • MEMBER
  • 19 POSTS
Finally got around to this. Been busy at work. So black/yellow, red, and red/black all have power. I had one terminal at the clip and the other on ground to measure.
Was this
answer
helpful?
Yes
No
Monday, August 3rd, 2020 AT 3:16 PM (Merged)
Tiny
KYLE MENDES
  • MEMBER
  • 19 POSTS
Okay, did more testing. On the dash clusters (two harnesses of A and B) B2 had only 6 volts, B1 had nothing. A6 had 4 volts, A7 was normal. Those were the only ones that seemed pertinent due to lighting circuits. These are on the chart listed a few posts up by me.
Also, I out in a new relay for the one I fried and the windows still don't work.
Was this
answer
helpful?
Yes
No
Monday, August 3rd, 2020 AT 3:16 PM (Merged)
Tiny
KASEKENNY
  • MECHANIC
  • 18,907 POSTS
Okay. Let's stay on the lights. If we fix that and the windows still don't work we will need to get a new post started for that. We need to keep each post limited to one issue because others will not find the solution to the window issue if it was not related. If we fix the lights and it fixes the windows as well (I doubt it will) then that is a bonus.

As for the lights, I am not sure why did didn't pick up on this before. The bulbs you replaced with LED bulbs, were they filament bulbs? If so, try getting the proper replacement bulb and switch them out and see what happens. LED's operate on a totally different level then these bulbs and when you add LED's to non LED circuits, you need to add resistors in order for them to not cause issues.
Was this
answer
helpful?
Yes
No
Monday, August 3rd, 2020 AT 3:16 PM (Merged)
Tiny
KYLE MENDES
  • MEMBER
  • 19 POSTS
These are meant to be exact replacements though. And everything did work until my screwdriver connected terminals on one bulb base causing the short.
Was this
answer
helpful?
Yes
No
Monday, August 3rd, 2020 AT 3:16 PM (Merged)
Tiny
KASEKENNY
  • MECHANIC
  • 18,907 POSTS
Okay. I understand but things are not really adding up because when you touched the screw driver and shorted it, it should have blown a fuse or maybe damaged the socket. All these issues don't seem to add up with just simply changing the bulbs.

I get that they say they are direct replacements but I have seen many times where you change them and it causes these crazy issues. Just swapping them out will rule this out as a possible cause.
Was this
answer
helpful?
Yes
No
Monday, August 3rd, 2020 AT 3:16 PM (Merged)
Tiny
KYLE MENDES
  • MEMBER
  • 19 POSTS
Okay, I'll put the incandescent's back, at least the ones I have left. See if they work. I could have not tested the fuses properly too. I'm pretty sure I did, but I suppose I could have messed up.
Was this
answer
helpful?
Yes
No
Monday, August 3rd, 2020 AT 3:16 PM (Merged)
Tiny
KASEKENNY
  • MECHANIC
  • 18,907 POSTS
Okay. Clearly there could be something else going on but we need to rule this out or we will pull our air out. Thanks
Was this
answer
helpful?
Yes
No
Monday, August 3rd, 2020 AT 3:16 PM (Merged)

Please login or register to post a reply.

Sponsored links