Coolant leaking

Tiny
JSTURNER00
  • MEMBER
  • 2007 TOYOTA CAMRY
  • 2.4L
  • 4 CYL
  • AUTOMATIC
  • 134,000 MILES
So I noticed that my car was leaking some type of fluid. I took it to a shop immediately and they said that it was coolant, (i first assumed oil due to my oil stick barely showing any oil even though it was recently filled and had an oil changed and the inspected all over).

I was told that a pressure test was done on the radiator (low pressure) and that was the culprit as well as the water pump (fluid was visibly seen leaking from here as well).

The next day, (before any work was done to the car-no work has been done on the car yet) while I was driving I heard a popping noise coming from the right passenger side then the battery light came on. Thinking it was the coolant again I waited and filled it up again. However, the battery light was still on and now the steering wheel was difficult to turn. I was able to pull over and get the car towed.
However, I noticed that one of the belts was broken into pieces.

Could the belt and some other problem be the issue to why there is a coolant leak? Note: The engine has not overheated at all- the only issue I have noticed was the coolant leak. Also, what parts would I possibly need to fix the issue?
Friday, December 4th, 2020 AT 2:37 PM

5 Replies

Tiny
ASEMASTER6371
  • MECHANIC
  • 52,797 POSTS
Good evening,

Most likely the leaking water pump sent water to the belt and it slipped and came off.

https://www.2carpros.com/articles/water-pump-replacement

Either that or the pulley was worn out and wobbling causing the belt to come off.

https://www.2carpros.com/articles/replace-serpentine-belt

Roy

DRIVE BELT

COMPONENTS
imageOpen In New TabZoom/Print

REMOVAL
1. REMOVE FRONT WHEEL RH
2. REMOVE ENGINE UNDER COVER RH
3. REMOVE FRONT FENDER APRON SEAL RH

imageOpen In New TabZoom/Print

4. REMOVE V-RIBBED BELT
(a) Using SST and 19 mm socket wrench, loosen the V-ribbed belt tensioner arm clockwise, then remove the V-ribbed belt.
SST 09216-42010

NOTICE:
Be sure to connect SST and the tools so that they are in line during use.
When retracting the tensioner, turn it clockwise slowly for 3 seconds or more. Do not apply force rapidly.
After the tensioner is fully retracted, do not apply force any more than necessary.

INSPECTION

imageOpen In New TabZoom/Print

1. INSPECT V-RIBBED BELT
(a) Visually check the V-ribbed belt for excessive wear, frayed cords, etc. If any defect has been found, replace the V-ribbed belt.

HINT:
Cracks on the rib side of a belt are considered acceptable. If the belt has chunks missing from the ribs, it should be replaced.
A "new belt" is a belt which has been used for less than 5 minutes with the engine running.
A "used belt" is a belt which has been used for 5 minutes or more with the engine running.

Removal

1. Disconnect cable from negative battery terminal
2. Remove front wheel opening extension pad rh
3. Remove front wheel opening extension pad lh
4. Remove engine under cover rh
5. Remove engine under cover lh
6. Drain engine coolant
7. Remove front fender apron seal rh
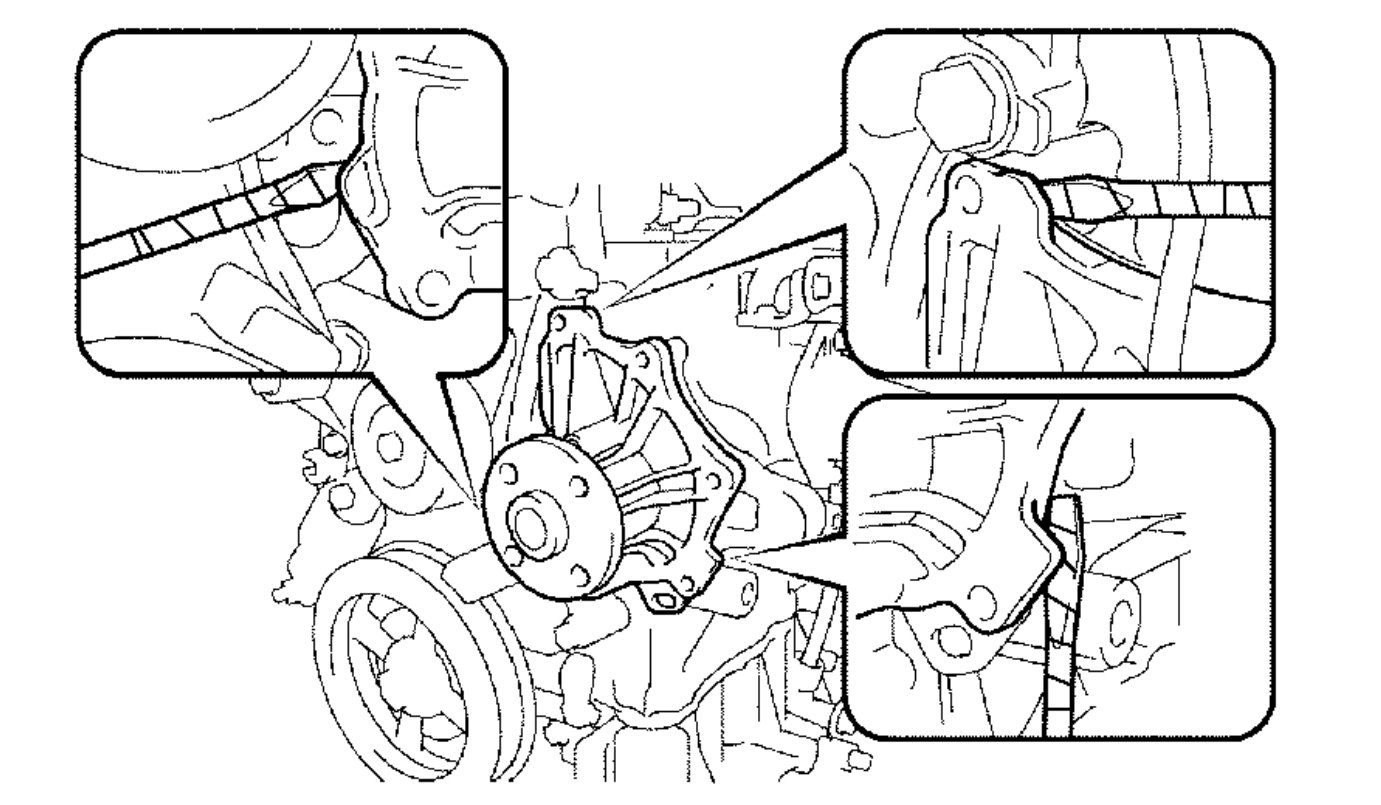
8. Remove no. 2 engine mounting stay rh
9. Remove engine moving control rod sub-assembly
10. Remove no. 2 engine mounting bracket rh
11. Remove v-ribbed belt
12. Remove generator assembly

imageOpen In New TabZoom/Print

13. REMOVE WATER PUMP PULLEY
(a) Using SST, remove the 4 bolts and water pump pulley.
SST 09960-10010 (09962-01000, 09963-00700)

imageOpen In New TabZoom/Print

14. REMOVE WATER PUMP ASSEMBLY
(a) Remove the clamp of the crankshaft position sensor from the water pump.
(b) Disconnect the wire of the crankshaft position sensor from the clamp bracket.

imageOpen In New TabZoom/Print

(c) Remove the 4 bolts, 2 nuts and clamp bracket.

imageOpen In New TabZoom/Print

(d) Using a screwdriver, pry between the water pump and cylinder block, and then remove the water pump.

HINT: Tape the screwdriver tip before use.

NOTICE: Be careful not to damage the contact surfaces of the water pump and cylinder block.

INSPECTION

imageOpen In New TabZoom/Print

1. INSPECT WATER PUMP ASSEMBLY
(a) Visually check the drain hole and air hole for coolant leakage.
If leakage is found, replace the water pump assembly.

imageOpen In New TabZoom/Print

(b) Turn the pulley, and then check that the water pump bearing moves smoothly without making a "click" sound.
If it does not move smoothly, replace the water pump assembly.
Was this
answer
helpful?
Yes
No
Friday, December 4th, 2020 AT 3:44 PM
Tiny
JSTURNER00
  • MEMBER
  • 10 POSTS
The belt is still visibly attached and in the right places (to my knowledge) it is just frayed. So I would need to purchase a water pump, a belt, belt tensioner (with a pulley)? Is there anything else I should probably look into having my mechanic replace while he's working in that area (I have little to no knowledge about the work the previous owners have done to the car)?
Was this
answer
helpful?
Yes
No
Friday, December 4th, 2020 AT 3:58 PM
Tiny
ASEMASTER6371
  • MECHANIC
  • 52,797 POSTS
Yes, to all but I would also replace the thermostat and flush the system.

https://www.2carpros.com/articles/replace-thermostat

https://www.2carpros.com/articles/coolant-flush-and-refill-all-cars

Roy

THERMOSTAT

COMPONENTS
imageOpen In New TabZoom/Print

Removal
1. Remove front wheel opening extension pad lh
2. Remove front wheel opening extension pad rh
3. Remove engine under cover lh
4. Remove engine under cover rh
5. Drain engine coolant
6. Disconnect radiator hose outlet

imageOpen In New TabZoom/Print

7. REMOVE WATER INLET
(a) Remove the 2 nuts and disconnect the water inlet from the cylinder block.
8. REMOVE THERMOSTAT
(a) Remove the gasket from the thermostat.

INSPECTION

imageOpen In New TabZoom/Print

1. INSPECT THERMOSTAT
(a) The valve opening temperature is inscribed on the thermostat.

imageOpen In New TabZoom/Print

(b) Immerse the thermostat in water, and then gradually heat the water.
(c) Check the valve opening temperature of the thermostat.
Standard valve opening temperature: 80 to 84°C (176 to 183°F)
If the valve opening temperature is not as specified, replace the thermostat.

imageOpen In New TabZoom/Print

(d) Check the valve lift.
Standard valve lift: 10 mm (0.39 inch) or more at 95°C (203°F)
If the valve lift is not as specified, replace the thermostat.
(e) Check that the valve is fully closed when the thermostat is at low temperatures (below 77°C (171°F)).
If it is not fully closed, replace the thermostat.
Was this
answer
helpful?
Yes
No
Friday, December 4th, 2020 AT 4:08 PM
Tiny
JSTURNER00
  • MEMBER
  • 10 POSTS
So the belt was completely off the pulleys which caused the steering issue. It actually was the water pump and radiator causing the issue. And those issues were fixed.

However, now there is another issue, when I drove it a short distance there a light vibration when I braked and when I was parking the car, when I had the car in drive the car "stopped". The lights and the car was still on but when I put the car in drive the steering locked and the oil, battery, and check engine light came on. I noticed that although the car wasn't leaking coolant there was a small leak of some other fluid (thought to be transmission fluid). What could possibly cause that issue?
Was this
answer
helpful?
Yes
No
Friday, December 11th, 2020 AT 6:15 AM
Tiny
ASEMASTER6371
  • MECHANIC
  • 52,797 POSTS
Okay, since that is another issue not related to the first issue, please open a new question and we will be glad to help.

For your convenience here is the link: https://www.2carpros.com/questions/new

Roy
Was this
answer
helpful?
Yes
No
Friday, December 11th, 2020 AT 4:06 PM

Please login or register to post a reply.

Sponsored links