I suggest you purchase a service manual for your vehicle. It only cost about $25 and will give you detailed illustrations as well as helpful hints and tips.
Here's the proper procedure:
***NOTE***
Remove both drums, but only do one side of the vehicle at a time. This will allow you to refer to the other side if things become confusing.
REMOVAL & INSTALLATION
Raise and safely support the vehicle with safety stands.
Mark the relationship of the wheel to the axle flange to help maintain wheel balance after assembly.
Remove the rear tire and wheel assembly.
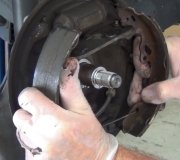
Remove the wheel and drum. (To get the drum off, you'll have to use a brake spoon to turn the "star wheel from the back of the backing plate. This will release the tension on the shoes and allow the drum to come off)
Using tool J-38400, or an equivalent brake spanner and remover, remove the actuator spring from the adjuster lever. Use care not to distort the spring when removing it.
CAUTION
During the following steps when removing the retractor spring from either shoe and lining assembly, do not over stretch the spring. This will reduce its effectiveness. Keep fingers away from retractor spring to prevent your fingers from being pinched between the spring and shoe web or spring and the backing plate.
Lift the end of the retractor spring from the adjuster shoe assembly. Insert the hook end of the J-38400 between the retractor spring and the shoe. Pry slightly to remove the spring end from the hole in the shoe.
Pry the end of the retractor spring toward the axle with the flat end of the tool until the spring snaps down off the shoe web onto the backing plate.
Remove the adjuster shoe and lining assembly, adjuster actuator and adjusting bolt/screw assembly.
Disconnect the parking brake lever from the shoe. DO NOT remove the parking brake lever from the cable end unless it is being replaced.
Using J-38400 or the equivalent, lift the end of the retractor spring from the adjuster shoe assembly.
Insert the hook end of the J-38400 or the equivalent between the retractor spring and the shoe. Pry slightly to remove the spring end from the hole in the shoe. Pry the end of the retractor spring toward the axle with the flat end of the tool until the spring snaps down off the shoe web onto the backing plate.
Remove the parking brake shoe and lining assembly.
If necessary, remove the retractor spring from the anchor plate. If only the shoe and linings are being replaced, it is not necessary to remove the retractor spring.
To install:
Clean all the brake spring completely with brake solvent and allow to air dry.
Disassemble, clean and lubricate the adjuster screw. Once lubricated, reassemble.
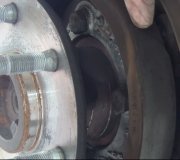
Clean the backing plate and after it is dry apply a thin coat of brake grease to the brake shoe contact points on the backing plate.
Position the brake shoe, that connects to the parking brake lever, on the backing plate.
Using J-38400 or the equivalent, pull the end of the retractor spring up to rest on the web of the shoe. Pull the end of the retractor spring up until it snaps into the slot in the brake shoe.
Connect the parking brake lever.
Install the remaining shoe and the adjuster screw assembly.
Position the brake shoe, using J-38400 or the equivalent, pull the end of the retractor spring up to rest on the web of the shoe. Pull the end of the retractor spring up until it snaps into the slot in the brake shoe.
Using J-38400 or the equivalent, spread the brake shoes and work the adjuster screw into position.
Install the actuator spring with the U-shaped end going through the web.
Install the brake drum, as outlined earlier in this section.
Install the tire and wheel assembly and hand-tighten the lug nuts.
Adjust the brakes.
Carefully lower the vehicle, then tighten the lug nuts to 100 ft. Lbs. (140 Nm).
Road test the vehicle for proper brake operation.
SPONSORED LINKS
Sunday, February 7th, 2010 AT 10:12 PM