Hi,
I have to be honest, if there are no fluid leaks, you need to replace the master cylinder. Chances are the internal plungers have failed and are allowing brake fluid to bypass them. However, confirm there are no leaks before doing this. Since you filled the fluid, pump the brakes several times to see if the fluid level drops. Take a look through this link:
https://www.2carpros.com/articles/brake-pedal-goes-to-the-floor
If you determine the master cylinder is the problem, here is a link that explains how in general to replace it:
https://www.2carpros.com/articles/how-to-replace-a-brake-master-cylinder
Here are the directions specific to your vehicle for replacement. The two attached pics correlate with the directions.
____________________________________
1990 Nissan-Datsun Truck D21 Hardbody 2WD L4-2389cc 2.4L SOHC MFI (KA24E)
Removal/Installation
Vehicle Brakes and Traction Control Hydraulic System Brake Master Cylinder Service and Repair Procedures Removal/Installation
REMOVAL/INSTALLATION
Brake Booster And Master Cylinder
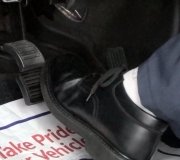
pic 1
1. Connect a vinyl tube to the bleeder screws.
Brake Bleeding
pic 2
2. Depress brake pedal, open bleeder valves and drain fluid into suitable container. Repeat until master cylinder is empty.
3. Disconnect brake lines, remove master cylinder attaching nuts, then master cylinder.
4. Reverse procedure to install, bleed brakes.
CAUTION:Do not spill brake fluid on painted areas, it may cause paint damage.
For additional information see Notes, Warnings, and Hints. See: Brake Master Cylinder > Fundamentals and Basics
___________________________
Here are the directions for bleeding the system. The remaining pics correlate with these directions
__________________________
1990 Nissan-Datsun Truck D21 Hardbody 2WD L4-2389cc 2.4L SOHC MFI (KA24E)
Brake Bleeding Procedure
Vehicle Brakes and Traction Control Hydraulic System Brake Bleeding Service and Repair Procedures Brake Bleeding Procedure
BRAKE BLEEDING PROCEDURE
CAUTION:
- Make sure all parts are clean before reassembly.
- Use only clean brake fluid.
- Do not allow dirt or other foreign matter to contaminate the brake fluid.
- Do not mix different brands of brake fluid.
- Avoid spilling brake fluid on painted, plastic or rubber surfaces as it can damage the finish; Wash spilled brake fluid off immediately with clean water.
NOTE: The reservoir on the master-cylinder must be full at the start of bleeding procedure, and checked after bleeding each wheel-cylinder. Add fluid as required. Use only DOT 3 brake fluid.
PROCEDURE
1. Have someone slowly pump the brake pedal several times, then apply steady pressure.
WARNING: Do not Full Stroke the brake pedal, this may damage the master-cylinder. Place a 2 inch block of wood under the brake pedal to prevent Full Stroking.
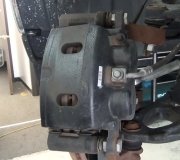
pic 3
Brake Bleeding
pic 4
2. Loosen the brake bleed screw to allow air to escape from the system. Then tighten the bleed screw securely. Repeat this step until a steady stream of brake fluid is emitted.
NOTE: Do not release the brake pedal until the bleeder valve is fully shut.
3. Repeat the procedure for each wheel in the sequence shown below.
pic 5
pic 6
WITH L.S.V. AND PROPORTIONING VALVE
Brake Bleeding Sequence
1. Load Sensing Valve air bleeder (LSV) if equipped.
2. Left rear.
3. Right rear.
4. Left front.
5. Right front.
WARNING: Do not bleed the brakes with the drums removed. The wheel cylinders will over-extend and eject the pistons.
________________________________________
Let me know if this helps or if you have other questions.
Take care,
Joe
Images (Click to make bigger)
SPONSORED LINKS
Tuesday, January 28th, 2020 AT 5:58 PM