Welcome to 2CarPros.
Honestly, my first suspect is the master cylinder. The plungers in it use the same area for years. Then, work is done, the system is bled, and the plungers now go to the end of their travel into dirt, corrosion, or anything that has built up. As a result, the plungers are damaged and allow fluid to bypass and the pedal goes to the floor. This past Saturday, I was called in on a similar issue. A brake line ruptured on an S-10. Line was replaced, but they couldn't get proper bleeding and the pedal went to the floor. I explained the same thing, so the tech replaced the MC and after that, the brakes were fine.
If there are no leaks, this is my primary suspect.
Take a look at these links:
https://www.2carpros.com/articles/brake-pedal-goes-to-the-floor
https://www.2carpros.com/articles/how-to-replace-a-brake-master-cylinder
___________________________________________________
Here are the directions for replacing the MC specific to your vehicle. The attached pics correlate with the directions.
__________________________________________________
PROCEDURES
A: REMOVAL
1. Thoroughly drain brake fluid from reservoir tank.
2. Disconnect fluid level indicator harness connector.
3. Remove brake pipes from master cylinder.
4. Remove master cylinder mounting nuts, and take out master cylinder from brake booster.
CAUTION: Be extremely careful not to spill brake fluid. Brake fluid spilt on the vehicle body will harm the painted surface; wipe it off quickly if spilt.
B: DISASSEMBLY
1. PRECAUTIONS FOR DISASSEMBLING
1. Remove mud and dirt from the surface of brake master cylinder.
2. Prepare tools necessary for disassembly operation, and arrange them neatly on work bench.
3. Clean work bench.
2. DISASSEMBLING PROCEDURE
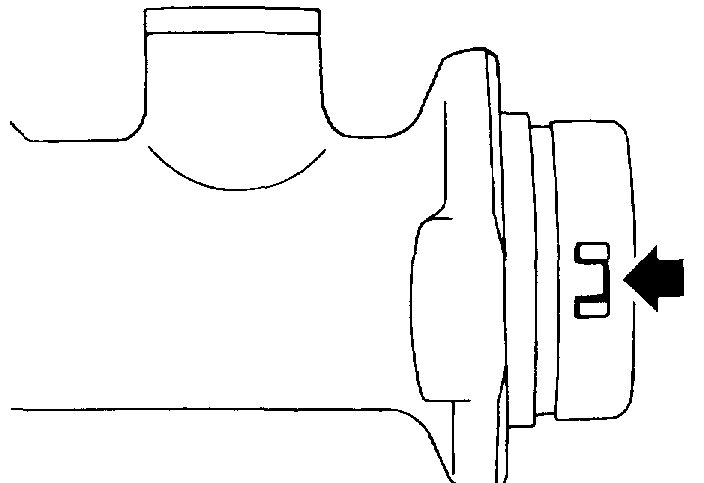
1. Remove reserve tank.
pic 1
2. Remove cylinder pin. (only vehicle equipped with ABS)
3. Pry up the pawl and remove the piston retainer.
pic 2
NOTE: Piston may jump out from master cylinder.
4. Extract primary piston assembly and secondary piston assembly.
CAUTION:
- Do not disassemble the piston assembly; otherwise, the spring set value may be changed.
- Use brake fluid or methanol to wash inside wall of cylinder, pistons and piston cups. Be careful not to damage parts when washing. If methanol is used for washing, do not dip rubber parts, such as piston cups, in it for more than 30 seconds; otherwise, they may become swelled.
C: INSPECTION
If any damage, deformation, wear, swelling, rust, and other faults are found on the primary piston assembly, secondary piston assembly, supply valve stopper, or gasket, replace the faulty part.
CAUTION:
- The primary and secondary pistons must be replaced as complete assemblies.
- The service limit of the clearance between each piston and the master cylinder inner dia. is 0.11 mm (0.0043 inch).
- When handling parts, be extremely careful not to damage or scratch the parts, or let any foreign matter get on them.
D: ASSEMBLY
1. PRECAUTIONS FOR ASSEMBLING
1. When assembling, be sure to use recommended brake fluid.
2. Ensure that the inside wall of cylinder, pistons, and piston cups are free from dirt when assembling.
3. Be extremely careful not to damage, scratch, or dent cylinder inside wall, pistons, and piston cups.
4. Do not drop parts. Never attempt to use any part that has been dropped accidentally.
2. ASSEMBLING OPERATION
1. Assembling piston assembly:
Apply recommended brake fluid to inside wall of cylinder, and to outer surface of piston assembly, and install piston assemblies carefully into cylinder.
2. Assembling cylinder pin:
pic 3
3. Press the pawl and install the piston retainer into the master cylinder.
E: INSTALLATION
To install the master cylinder to the body, reverse the sequence of removal procedure.
Tightening torque:
Master cylinder mounting nut 14 ± 4 Nm (1.4 ± 0.4 kg-m, 10.1 ± 2.9 ft. lbs.)
Piping flare nut 15 +3/-2 Nm (1.5 +0.3/-0.2 kg-m, 10.8 +2.2/-1.4 ft. lbs.)
CAUTION: Be sure to use recommended brake fluid.
________________________________________
Let me know if this helps or if you have other questions.
Take care,
Joe
Images (Click to make bigger)
SPONSORED LINKS
Wednesday, May 15th, 2019 AT 8:41 PM