Blowing the 10 amp heater fuse anytime A/C or defrost selected

Tiny
HAMFIST
  • MEMBER
  • 2004 TOYOTA SIENNA
  • 3.3L
  • V6
  • 4WD
  • AUTOMATIC
  • 165,000 MILES
Well, the fuse that runs the whole HVAC system pops anytime the A/C button is pressed.

I first thought it was the control, so I got a used one off eBay, replaced the fuse, pushed the button, pop.

I thought the blower motor might be the culprit, nope.

This is getting serious. Disconnected the magnet clutch on the compressor, pop. Nope.

Relay for the heater, mag clutch. Ecu for fan, both fans. All off the circuit, still pops when A/C selected.

Purchased emanualonline. Can't find out what the button activates on that circuit other than whats listed above. Heck I don;t see the button on the diagrams.

One weird thing, last attempt, the engine was running for about 30 minutes and the cooling fans never came on. Does the heater core in the dash circulate enough to negate that?

I am lost, need help.
Tuesday, November 26th, 2019 AT 8:04 PM

22 Replies

Tiny
94 TRANSAM
  • MECHANIC
  • 680 POSTS
Hello,

Below you will find the diagrams for the AC circuit.
The AC button goes through the ECU comes back through the 10A fuse then through the MG CLT Relay then goes right to the AC clutch. Be sure the relay you are checking is the MG CLT and not the heater relay. Location in diagram.

If the relay is good then you have a short somewhere in the line from the button to the ECU or more likely from the ECU to the clutch. Test both circuits to ground and make sure you have no reading.

Here is a walk through on circuit testing:

https://www.2carpros.com/articles/how-to-use-a-voltmeter

As for the cooling fans not coming on, that would have nothing to do with the AC so I would check both relays and the cooling fan switch.

Rich
Was this
answer
helpful?
Yes
No
Wednesday, November 27th, 2019 AT 5:04 PM
Tiny
CARADIODOC
  • MECHANIC
  • 33,751 POSTS
First lets verify which fuse is blowing. I suspect it's fuse # 37 since that is just for the heater system. Fuse # 14 is also a ten-amp fuse, but there's a lot of other stuff on that circuit.

For these first three diagrams, I have the first two turned around. The second one is the first diagram for this system. The last two diagrams are just the first two with red lines added to show fuse # 37, (red arrows), feeds five circuits. The first circuit is the coil for the heater fan relay. That coil is not likely to be shorted. Same with the coil for the compressor clutch relay. You had the compressor clutch relay unplugged already, so we can ignore that circuit for now. That was the third circuit.

The last two places are fed through the joint connector. At first it looks like two different fuses are feeding that circuit, but if you look closer, you'll see there's actually two different circuits there. My green arrow is pointing to the very hard-to-see dot that signifies that is a connection. From there, current goes to the controller, then, on the last diagram, it feeds the air inlet control servo motor. From there I can't tell what takes place, but it suggests there's electronics in that assembly, so that is a good suspect.

I'd start by unplugging that motor. If that doesn't stop the fuse from blowing, you're better off using my trick to avoid having to buy a lot of fuses. In place of the blowing fuse, plug in a pair of generic spade terminals, then use a pair of clip leads to connect them to a 12-volt light bulb. For this type of circuit, a 3057 brake light bulb will work well, and it has a base that makes it easy to connect the clip leads.

Now, when you power up the circuit and the short is present, the bulb will be full brightness and will get hot, so be careful where you lay it. It will limit current flow to a safe one-amp. When you unplug something, move a wiring harness around, or do anything that makes the short go away, the bulb will get dim or go out.

If you unplug the controller, and that makes the light get dim, there is something on the other side, (the output side), that is shorted, but at least this will narrow it down for now.
Was this
answer
helpful?
Yes
No
+1
Wednesday, November 27th, 2019 AT 5:59 PM
Tiny
HAMFIST
  • MEMBER
  • 64 POSTS
Yes, it is fuse number 37. I did see that on the same diagram that I have as well to the air Inlet Servo motor. I will try all those tricks as soon as I can, thank you so very much!
Was this
answer
helpful?
Yes
No
Wednesday, November 27th, 2019 AT 6:11 PM
Tiny
KEN L
  • MASTER CERTIFIED MECHANIC
  • 42,949 POSTS
Please let us know what you find. We are interested to see what it is.
Was this
answer
helpful?
Yes
No
Sunday, December 1st, 2019 AT 2:52 PM
Tiny
HAMFIST
  • MEMBER
  • 64 POSTS
Finally got back at it.

I dropped the glove box and unplugged the actuator motor that controls recirc/fresh air. Started the car. Put on the blower, rolled the knob over to defrost, all while gritting, my teeth. No pop! Checked all settings! All worked. I guess I need that actuator. Let it run for a bit checking air from all settings. Left to go home. Let her know everything worked but recirc.

Or so I thought.

I drove home and 45 minutes later, I pull in my driveway and get a text, no air movement.

She said it worked flawlessly for 15 minutes, then without any input from her. It just stopped blowing air. Said she had it on defrost / foot when it happened

Guess im headed there tomorrow again to see what else happened.
Was this
answer
helpful?
Yes
No
Monday, December 2nd, 2019 AT 4:16 PM
Tiny
HAMFIST
  • MEMBER
  • 64 POSTS
Back to square 1. It's still unplugged. Unlike last night, rolling the knob to defrost pops it again, or hitting ac. Why would it work for 15 minutes, then go back to this?

I just unhooked fans and the magnetic clutch just to start again, but the fuse still popped.

What else is on this circuit?

Okay, just got a setup with a bulb and extra fuses.

Also, if the car isn't running, the fuse wont pop. I can select ac and defrost, but once the engine is started, it will pop. I hope that's good information.
Was this
answer
helpful?
Yes
No
Tuesday, December 3rd, 2019 AT 6:13 AM
Tiny
HAMFIST
  • MEMBER
  • 64 POSTS
Here is some news:The mini fuses make it super difficult to plug in wires for a bulb, back to fuses to waste.

Unplugged the mag clutch relay. No fuse pop, but with relay in and mag clutch wire unhooked, pop.

I replaced the relay before, but never took it out of the loop.

So, is the short before or after the relay? My guess is after, because if it was before, it would pop with it removed. Also I got 13vdc at 2 pins on the relay plug.

The relay is new and I swapped it with the one next to it just to be sure its good.

I plugged the fresh/recirc motor back in, no pop. Red herring?

I'm going to sit here for 15 minutes like she did last night, and move everything to be sure.

Blazing hot in here, 20 minutes later, no pop, all good, come summer, I will trace the short from the relay to the mag clutch, if that is a good fix for now that is.
Was this
answer
helpful?
Yes
No
Tuesday, December 3rd, 2019 AT 7:03 AM
Tiny
CARADIODOC
  • MECHANIC
  • 33,751 POSTS
If it appears the short is after the relay, you can use the light bulb trick to bypass the relay instead of the fuse. I'm not familiar with the type of relay used in that model, so I added a drawing of the common styles. If you have the 1"-cube relay, use terminals 30 and 87. If you have the skinnier relay, use the two terminals with the arrows pointing to them. Some other relays will have a drawing on the side that shows the two contacts. On some relays, the terminals for the contacts are wider than those for the coil.

Plug the terminals into the relay socket, attach the bulb, then stick in a new fuse. The bulb will again be full brightness when the short is occurring.
Was this
answer
helpful?
Yes
No
Tuesday, December 3rd, 2019 AT 12:43 PM
Tiny
HAMFIST
  • MEMBER
  • 64 POSTS
I don't see any added drawings or files, they are small 4 prong relays, rectangular, size of a Hershey treasure chest candy.

My plan was just to pop off the box housing and trace the wire to the compressor, and just run a fresh wire, if the short isn't obvious.
Was this
answer
helpful?
Yes
No
Tuesday, December 3rd, 2019 AT 6:24 PM
Tiny
CARADIODOC
  • MECHANIC
  • 33,751 POSTS
Sorry that they didn't show up. We're all having multiple computer problems lately. I'll try it again.
Was this
answer
helpful?
Yes
No
+1
Tuesday, December 3rd, 2019 AT 6:36 PM
Tiny
HAMFIST
  • MEMBER
  • 64 POSTS
Yup the middle style.
Was this
answer
helpful?
Yes
No
Tuesday, December 3rd, 2019 AT 6:52 PM
Tiny
CARADIODOC
  • MECHANIC
  • 33,751 POSTS
Thank goodness. I just went into our online service manual web site we use to try to find the relays used in your vehicle, and that has all changed too within the last few days. I'll no longer be able to paste diagrams. They removed the manufacturer's diagrams too. I hope this isn't permanent because it's going to put me out of business, so to speak. I can still help you with any diagrams I've posted already. I have those saved on my computer.
Was this
answer
helpful?
Yes
No
Tuesday, December 3rd, 2019 AT 7:12 PM
Tiny
HAMFIST
  • MEMBER
  • 64 POSTS
I get all my factory wiring from emanualonline. Com.
Was this
answer
helpful?
Yes
No
Wednesday, December 4th, 2019 AT 4:57 AM
Tiny
KEN L
  • MASTER CERTIFIED MECHANIC
  • 42,949 POSTS
If I can jump in here the servo motors all use this fuse. I would unplug the blend door actuators to see which one doesn't pop the fuse then replace that one. Here are the complete air conditioner wiring diagrams for the front and rear air. Check out the diagrams (below). Please let us know what you find. We are interested to see what it is.
Was this
answer
helpful?
Yes
No
Sunday, December 8th, 2019 AT 12:16 PM
Tiny
HAMFIST
  • MEMBER
  • 64 POSTS
As stated above, the short is between the relay for the compressor and the compressor itself.

I will dig into it when spring hits so she can have A/C for the summer. As for now, the defrost and all air flow settings work, the A/C is just disabled.
Was this
answer
helpful?
Yes
No
Sunday, January 12th, 2020 AT 8:22 AM
Tiny
CARADIODOC
  • MECHANIC
  • 33,751 POSTS
Remember, the light bulb trick is perfect to bypass the compressor clutch relay. The only problem is the clutch coil draws quite a bit of current under normal circumstances, and in relation, a brake light bulb doesn't draw so much, so most of the 12 volts will be dropped across the test bulb. That means the bulb will already be fairly bright when the short is not in the circuit, and it can't get much brighter when you make the short occur. The difference in brightness can be hard to see when you're not working near the bulb.

The solution for that is to use a bulb that allows more current to pass. A 9004 or 9007 head lamp bulb will work better than a 3057 brake light bulb. Brake light bulbs allow one amp of current to flow. Typical head lamp bulbs will allow five amps to flow with the low-beam filament and around six amps with the high-beam. That's if you use the ground / common terminal and one of the other terminals. If you use the low and high terminals, it will allow around 2 1/2 amps to flow.
Was this
answer
helpful?
Yes
No
+1
Monday, January 13th, 2020 AT 1:07 PM
Tiny
HAMFIST
  • MEMBER
  • 64 POSTS
Turns out there was a short somewhere in the harness from the fuse box to the A/C compressor. Ran a fresh wire, all solved.
Was this
answer
helpful?
Yes
No
Saturday, August 7th, 2021 AT 1:36 PM
Tiny
ASEMASTER6371
  • MECHANIC
  • 52,797 POSTS
Good find.

Glad it is fixed.

Thanks for using 2CarPros.

Roy
Was this
answer
helpful?
Yes
No
Wednesday, August 11th, 2021 AT 4:54 AM
Tiny
CARADIODOC
  • MECHANIC
  • 33,751 POSTS
The problem with that solution is you don't know what caused the short or whether it's going to affect other wires in that harness. Two common causes are the harness is draped over the sharp edge of a metal bracket and this is the first wire to rub through the insulation, and water snuck in and caused corrosion, either at a soldered splice or where someone previously sliced the insulation to take a voltage reading.

I never allowed my students to cut or poke a wire to take a reading, and running a new wire without knowing what was wrong with the original one was also not an acceptable repair on a customer's car. I've also been involved with wire harnesses laying on the inner fender, sliding back and forth as the engine rocks, and they rub through the paint and the wires' insulation. By the time the first wire shorted, in this case for the back-up lights, (which were the clue), and the radiator cooling fan were on the same circuit, and a half dozen adjacent wires were almost rubbed through too. The complaint was intermittent overheating due to a dead radiator fan. Our AC system specialist found the burned fuse link wire, replaced it, and the fan motor which he logically assumed was tight or shorted. The van came back at least four more times over a few weeks for the same fuse link wire. It was just by chance and luck I noticed he had no back-up lights when he went to run the van back outside. The new fuse wire had already burned open. Putting it in reverse caused the engine to rock, the harness to slide, and the short to occur. If that cause hadn't been found and he just ran a new wire, who knows which wire would have rubbed through next, and would it have left the owner sitting on the side of the road, ... On a Saturday night, ... After midnight, ... In the middle of winter, ... Too far to walk home?

A similar problem occurred on a truck after someone installed an aftermarket dual exhaust system. They did a real nice job, but they didn't see the wire harness that was being tugged up by the pipe where it went over the rear axle. That harness melted through after a few weeks. The problem was fuses would blow intermittently when the brake light or the left signal were turned on. In this case we had the luxury of knowing the recent history, so we knew where to look first. If we didn't have that knowledge, someone might have cut the wire for the left rear brake / signal, and ran a new one. The wires for the right brake / signal, tail lights, and ABS speed sensor were in that harness too. One by one each of them would have developed the same intermittent short.

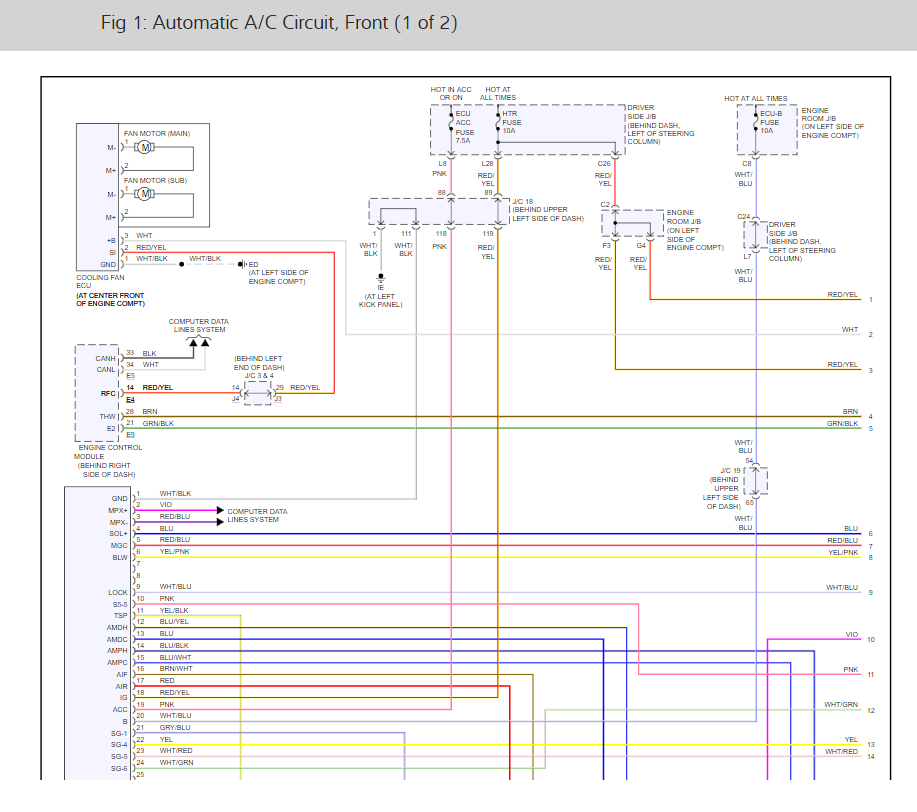
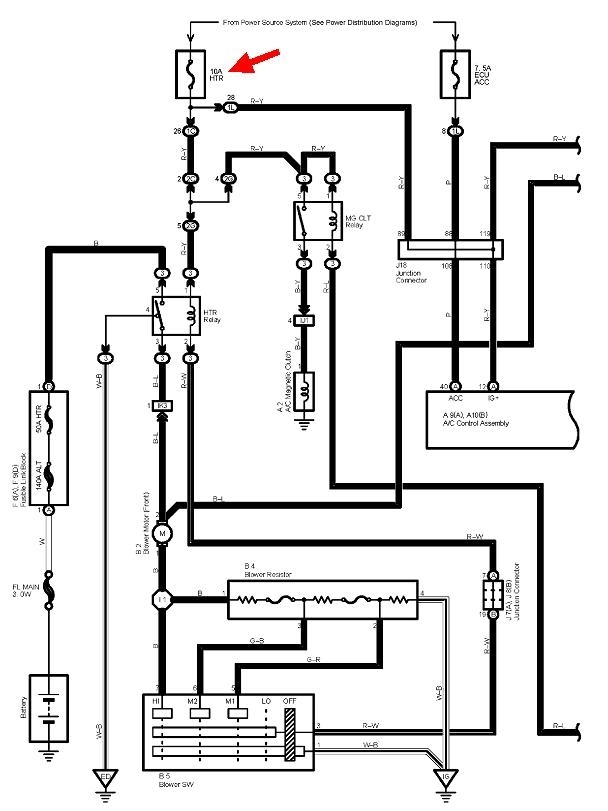
One advantage to your AC compressor clutch circuit is there's no other wires spliced into it, so that eliminates the likelihood of a corroded splice. And the need to follow multiple wires. Other than what I've mentioned, that wire you eliminated has to be shorted to something. This diagram indicates there's no ground wire in the harness for the clutch coil. The feed and ground wires touching each other is another possible cause eliminated.

One thing to be aware of is, as with an ignition coil, when voltage is switched off to any coil of wire, it creates its own voltage spike. Even little relay coils do that. To prevent those spikes from feeding back and possibly damaging other components, they're shorted out by diodes placed backward in the circuit. During normal operation, it's like those diodes aren't even there. They're "forward-biased", meaning turned on, and act like a wire when those spikes occur. That shorts them out making them harmless. It is customary to use a diode in the compressor clutch's circuit for the same reason. Some manufacturers put the diode right across the two terminals in the coil's plug. Some splice them into the wire harness, but to do that you have to also have the ground wire running through there. If there is some other ground wire I didn't see, and if they did put the diode in there, it is eliminated now by cutting out that wire. I have a suspicion that won't cause a problem, but the manufacturers had some reason for wanting to include them in the circuit.

What's more confusing is in your first post you did a real nice job of describing everything you did already, and that included removing the clutch relay, and unplugging the clutch, and the fuse still blew. If the wire to the clutch has a short, it would have been isolated / removed when the relay was removed. I know you've been at this quite a while, and sometimes you gotta just throw in the towel and run the new wire. I hope the system keeps working, but it sure would be nice to know what really happened. If it gives you more trouble, we'll be here for you.
Was this
answer
helpful?
Yes
No
Wednesday, August 11th, 2021 AT 8:27 PM
Tiny
HAMFIST
  • MEMBER
  • 64 POSTS
Well, being vt, at 200,000 rust has taken its toll. No longer inspectable. I just did both manifold cats as well recently. Ugh, oh well.
Was this
answer
helpful?
Yes
No
Thursday, August 12th, 2021 AT 9:09 AM

Please login or register to post a reply.

Sponsored links