Blend Door Actuator? Vents don't switch?

Tiny
HMAC300
  • MECHANIC
  • 48,601 POSTS
This one in pic it'sunder panel by blower so the panel has to come off which isn't hard, but try the fuse pulling thing it may start to work again and reset.
Was this
answer
helpful?
Yes
No
+7
Thursday, September 24th, 2020 AT 10:34 AM (Merged)
Tiny
CHRIS CHAMBERS
  • MEMBER
  • 1 POST
  • 2002 CHEVROLET TAHOE
  • 5.3L
  • V8
  • 4WD
  • AUTOMATIC
  • 210,456 MILES
I can hear it cycling from the vent to the floor and to the defroster, but it wont stay on either one.
Was this
answer
helpful?
Yes
No
Thursday, September 24th, 2020 AT 10:34 AM (Merged)
Tiny
CJ MEDEVAC
  • MECHANIC
  • 11,004 POSTS
Hello,

This is because the actuator has lost is sensing ability so it "hunts" replace the blend door actuator and the problem should go away.

Here is a guide to help you

https://www.2carpros.com/articles/replace-blend-door-motor

Please let us know if you need anything else to get the problem fixed.

Cheers
Was this
answer
helpful?
Yes
No
Thursday, September 24th, 2020 AT 10:34 AM (Merged)
Tiny
NEIL JOHNSON
  • MEMBER
  • 1 POST
  • 2001 CHEVROLET TAHOE
Heater problem
2001 Chevy Tahoe V8 Four Wheel Drive Automatic

heater not working properly found blend door motor inop, replaced motor but checking heater core temps seem to be partly blocked hose temps drop alot from side to side whats the best way to flush the core to clean out better
Was this
answer
helpful?
Yes
No
Thursday, September 24th, 2020 AT 10:34 AM (Merged)
Tiny
JACOBANDNICKOLAS
  • MECHANIC
  • 108,269 POSTS
There really isn't anything special when flushing the heater core. My only suggestion is to back flush it too. Basically, force pressurized water through both directions.
Was this
answer
helpful?
Yes
No
Thursday, September 24th, 2020 AT 10:34 AM (Merged)
Tiny
TAHOEJOE70
  • MEMBER
  • 3 POSTS
  • 2001 CHEVROLET TAHOE
  • 5.3L
  • V8
  • 4WD
  • AUTOMATIC
  • 200,000 MILES
How to replace mode actuator?
Stuck in defrost mode. Temperature switch and fan switch work fine.

Thanks in advance.
Was this
answer
helpful?
Yes
No
Thursday, September 24th, 2020 AT 10:34 AM (Merged)
Tiny
JACOBANDNICKOLAS
  • MECHANIC
  • 108,269 POSTS
Hi and thanks for using 2CarPros.

Here are the directions related to replacement of the mode door actuator. All attached pictures correlate with these directions. Note: After the directions, I attached the re-calibration procedures.
__________________________________________

MODE ACTUATOR REPLACEMENT
REMOVAL PROCEDURE

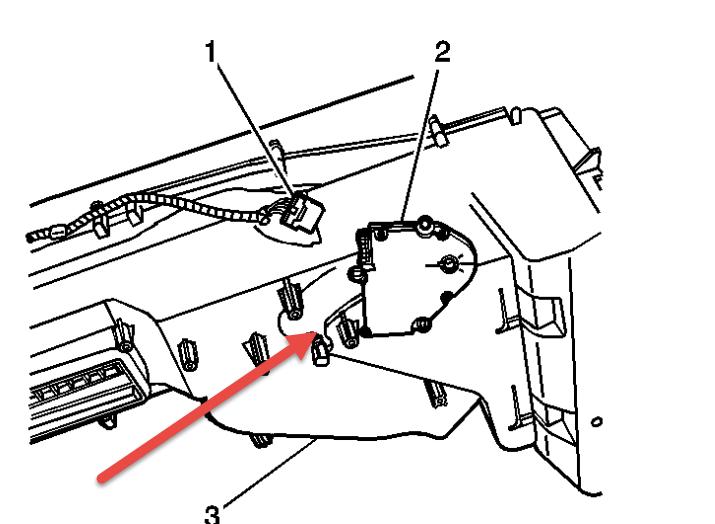
1. Remove the floor air outlet duct extension (1) from the floor duct (2).

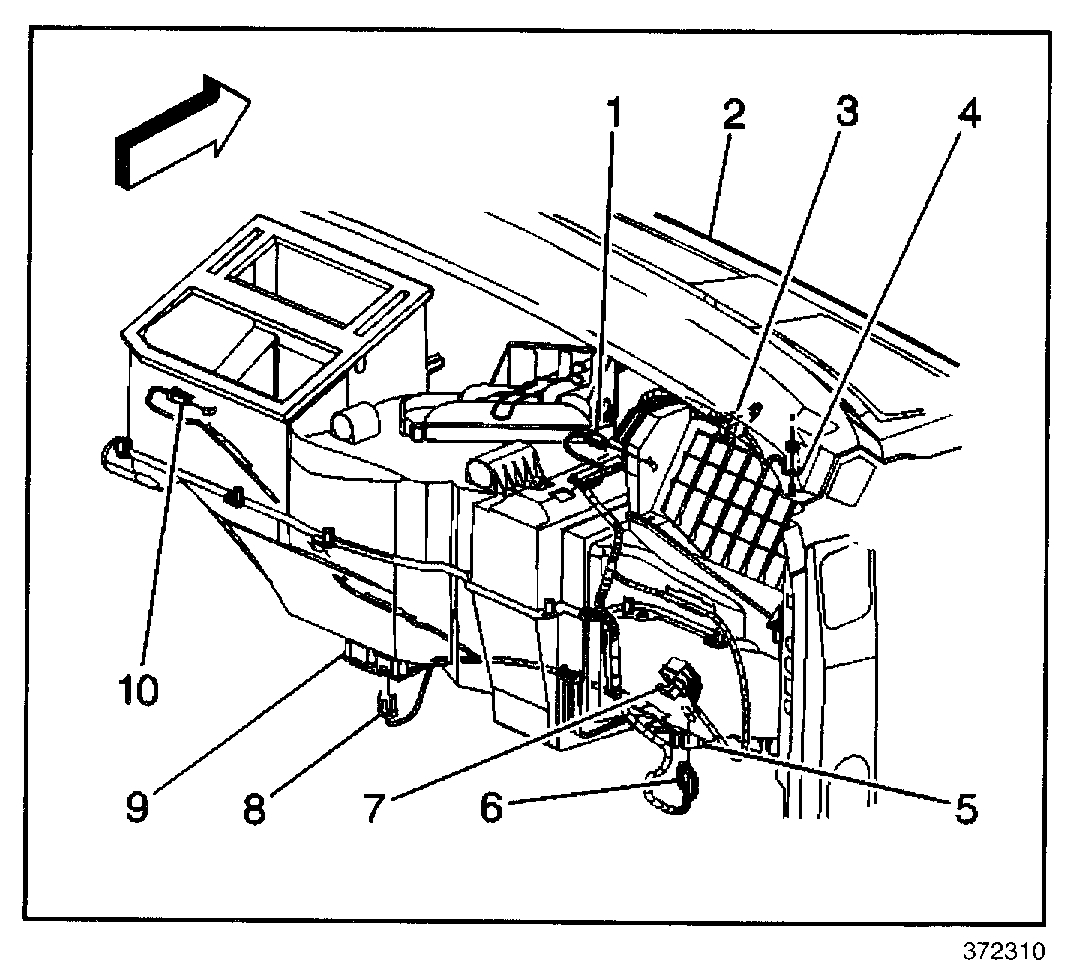
2. Disconnect the electrical connection at the mode actuator (10).
3. Remove the mode actuator mounting screws from the HVAC module.
4. Remove the mode actuator as an assembly with the actuator cam.

INSTALLATION PROCEDURE
1. Install the mode actuator as an assembly with the actuator cam.
- Line up the heater/defroster lever with the mode actuator cam slot.
- Line up the A/C lever with the mode actuator cam.

NOTE: Refer to Fastener Notice in Service Precautions.

2. Install the mode actuator mounting screw to the HVAC module.

Tighten
Tighten the mode actuator mounting screw to 1.6 N.M (14 lb in).
3. Connect the electrical connection at the mode actuator (10).
4. Install the floor air outlet duct extension (1) to the floor air duct (2).
5. Calibrate the HVAC module actuators. Refer to Re-Calibrating Actuators.

_________________________

Recalibration:

Actuator Recalibration

The HVAC control module will relearn the actuator limits whenever power is disconnected and re-connected to the module.
Use the following steps to perform the calibration update:

1. Turn OFF the ignition.
2. Remove the battery positive voltage circuit fuse of the HVAC Control Module.

Important: The scan tool must be disconnected from the vehicle to properly perform the calibration procedure. If a scan tool is connected before this procedure is completed, then new calibration values will not be stored.

Important: Failure to wait 60 seconds will not allow the HVAC control module sufficient time to clear the old calibration values.

3. Wait 60 seconds.
4. Install the fuse.
5. Turn ON the ignition.

____________________________

Let me know if this is what you needed or if you have other questions.

Take care,
Joe
Was this
answer
helpful?
Yes
No
+2
Thursday, September 24th, 2020 AT 10:34 AM (Merged)
Tiny
TAHOEJOE70
  • MEMBER
  • 3 POSTS
Thanks for your fast and complete Help!
Was this
answer
helpful?
Yes
No
Thursday, September 24th, 2020 AT 10:34 AM (Merged)
Tiny
JACOBANDNICKOLAS
  • MECHANIC
  • 108,269 POSTS
Happy to help. Let me know if you need anything.

Joe
Was this
answer
helpful?
Yes
No
Thursday, September 24th, 2020 AT 10:34 AM (Merged)

Please login or register to post a reply.

Sponsored links