Why is my engine overheating?

Tiny
ANONYMOUS
  • MEMBER
  • 1998 CHRYSLER SEBRING
  • 12,000 MILES
The gauge to cooling system says normal but car over heats, I have to put water in it when ever I use it. Ive have plugged it in the past due to radiator leak. Today the water is frozen cap wouldnt come off and the reserve is frozen. What do I do?
Monday, December 24th, 2012 AT 6:26 PM

16 Replies

Tiny
ASEMASTER6371
  • MECHANIC
  • 52,797 POSTS
First, sealer is a very bad idea as it clogs the radiator. second, you do not have sufficient anti freeze in the system. you may have damaged the block from this. it needs to be thawed out and pressure tested to see if the system is ok. this guide can help us fix it

https://www.2carpros.com/articles/engine-overheating-or-running-hot

Roy
Was this
answer
helpful?
Yes
No
Monday, December 24th, 2012 AT 10:49 PM
Tiny
PHANTOMCHEF
  • MEMBER
  • 1 POST
  • 1998 CHRYSLER SEBRING
1998 Chrysler Sebring 6 cyl Front Wheel Drive 197000 miles

my car was over heating and so I checked under the hood and the fan is not working. Why would the fan quite and what do I need to check?
Was this
answer
helpful?
Yes
No
Saturday, September 26th, 2020 AT 10:17 AM (Merged)
Tiny
RASMATAZ
  • MECHANIC
  • 75,992 POSTS
Check and test the cooling fan motor, fan relay and coolant temperature sensor-also if it has an engine temperature gauge switch check that too-could also very well be the computer too.
Was this
answer
helpful?
Yes
No
Saturday, September 26th, 2020 AT 10:17 AM (Merged)
Tiny
JOHNF150
  • MEMBER
  • 2 POSTS
  • 1997 CHRYSLER SEBRING
  • 6 CYL
  • 2WD
  • AUTOMATIC
  • 138,000 MILES
Replaced thermastat and radiator, still overheats. Has dual cooling fans, smaller fan runs intermitantly, larger never.
Was this
answer
helpful?
Yes
No
Saturday, September 26th, 2020 AT 10:17 AM (Merged)
Tiny
DOCFIXIT
  • MECHANIC
  • 18,828 POSTS
Do both fans operate with A/C on? If no check for voltage to high speed fan ie. Large fan
Was this
answer
helpful?
Yes
No
Saturday, September 26th, 2020 AT 10:17 AM (Merged)
Tiny
JOHNF150
  • MEMBER
  • 2 POSTS
No fans do not run with AC on. I also noticed the new antifreeze is looking a little milky instead of green. Could it be the head gasket.
Was this
answer
helpful?
Yes
No
Saturday, September 26th, 2020 AT 10:17 AM (Merged)
Tiny
KATHY FERRELL
  • MEMBER
  • 4 POSTS
  • 1996 CHRYSLER SEBRING
  • 2.4L
  • 4 CYL
  • 2WD
  • 90,000 MILES
I just changed my water pump and timing belt because the water pump went out. Now when I turn the car off it gurgles into the over flow. My car does not show that it is hot it sits where it did before. I have a gauge and a light so not sure if it's just air or is it hot.
Was this
answer
helpful?
Yes
No
Saturday, September 26th, 2020 AT 10:18 AM (Merged)
Tiny
JACOBANDNICKOLAS
  • MECHANIC
  • 108,014 POSTS
Welcome to 2CarPros.

I hate to ask, but was it overheated before the work was done? Also, with the engine running, are you seeing any bubbles in the coolant? I'm asking because it could be a head gasket related issue resulting from overheating.

Take a look through this link.

https://www.2carpros.com/articles/head-gasket-blown-test

Also, I assume a 50 / 50 mix of coolant and water were used to refill the cooling system. If you used straight water, that could be an issue as well as a bad radiator cap.

Let me know if anything in the aforementioned link mirrors what you are experiencing.

Take care,
Joe
Was this
answer
helpful?
Yes
No
+2
Saturday, September 26th, 2020 AT 10:18 AM (Merged)
Tiny
KATHY FERRELL
  • MEMBER
  • 4 POSTS
Hello, yes the car overheated before the work. I looked today and was little low on oil so added it I have full 50 50 to add but don't see a drain plug. I don't see water in oil and it's not milky. I looked at the link you sent and I'm wondering if it's releasing gases? I thought I seen bubbles but it was few and they went away as soon as it started to circulate my cap looks new. The car runs but acts like a vacuum leak kinda rough idle. What is a thermos lock? I will drain the water in morning and maybe it will help. If it is the head gasket have you tried any of the pour in stuff? Thank you for helping me.
Was this
answer
helpful?
Yes
No
Saturday, September 26th, 2020 AT 10:18 AM (Merged)
Tiny
JACOBANDNICKOLAS
  • MECHANIC
  • 108,014 POSTS
Kathy, as far as hydrostatic lock, that is when the coolant or other liquid enters one of the engine cylinders and the piston can't move up because it is being blocked.

As far as the bubbles, there really shouldn't be any. Try this. When the engine is cold, open the radiator cap and start the engine. If the coolant starts coming out, there is a good chance it is a head gasket. As far as draining and refilling the cooling system, that really isn't going to change anything. However, I did upload a picture for you to see where the drain is located.

Check what I suggested. If nothing is found, then we may have to do an engine compression test to see if there is a cylinder with low compression. That would make the vehicle run rough or have a miss.

Also, I don't know if you need it, but here is a link that shows how to drain and flush the radiator.

https://www.2carpros.com/articles/coolant-flush-and-refill-all-cars

As far as the pour in head gasket products, I have heard that some actually work. However, it is a temporary fix.

Let me know what you find or if you have other questions.

Take care,
Joe
Was this
answer
helpful?
Yes
No
+1
Saturday, September 26th, 2020 AT 10:18 AM (Merged)
Tiny
KATHY FERRELL
  • MEMBER
  • 4 POSTS
Well not finding the drain plug. I took lower hose off and got right fluid in the car, but your right I watched the bubbles and with car running and cap off the water did start to come out. So I must of blown the head gasket when water pump went out. Now to decide do I want a temporary fix or fix it? How hard of a job is to do the head gaskets? Lol I appreciate your help.
Was this
answer
helpful?
Yes
No
Saturday, September 26th, 2020 AT 10:18 AM (Merged)
Tiny
JACOBANDNICKOLAS
  • MECHANIC
  • 108,014 POSTS
Welcome back:

It's a big job. I hope you are sitting. Here are the directions. First will be the cylinder head removal and then the timing. All attached pics correlate with the directions.

___________________________________

1996 Chrysler Sebring L4-2.0L DOHC
Removal and Installation
Vehicle Engine, Cooling and Exhaust Engine Cylinder Head Assembly Service and Repair Procedures Removal and Installation
REMOVAL AND INSTALLATION
1. Disconnect battery ground cable.
2. Relieve fuel system pressure as follows:
a. Disconnect fuel pump harness connector at fuel tank.
B. Start engine and let it run until it stalls, then turn ignition switch to off.
C. Disconnect battery ground cable.
D. Reconnect fuel pump harness connector.

3. Drain engine coolant, then drain crankcase.
4. Disconnect electrical connectors from A/C compressor clutch, power steering pump switch, oxygen sensor, engine coolant temperature switch and sensor, MAP sensor and intake air temperature sensor.
5. Disconnect accelerator cable.
6. Disconnect TPS, IAC motor and injector harness electrical connectors.
7. Disconnect ignition coil, camshaft position sensor and EGR solenoid electrical connectors.
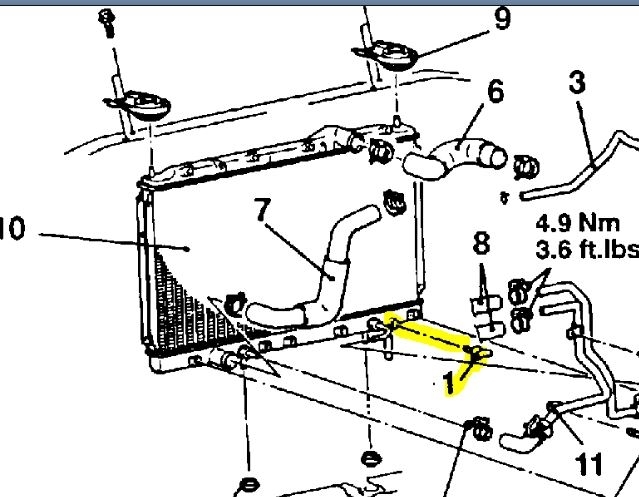
8. Disconnect heater hose, upper radiator hose, overflow tube and water hose connection.

NOTE: Mark relationship between radiator hose and clamp for installation reference.

9. Disconnect fuel high pressure and return hoses.
10. Disconnect purge air hose.
11. Disconnect power brake booster vacuum hose connection.
12. Remove intake manifold stay.
13. Remove intake and exhaust camshafts as described under Engine/Camshaft, Engine/Service and Repair/Camshaft Replacement.
14. Disconnect exhaust pipe from exhaust manifold.
15. Remove cylinder head attaching bolts, then remove cylinder head and gasket. After cylinder head removal, remove intake and exhaust manifold as necessary.

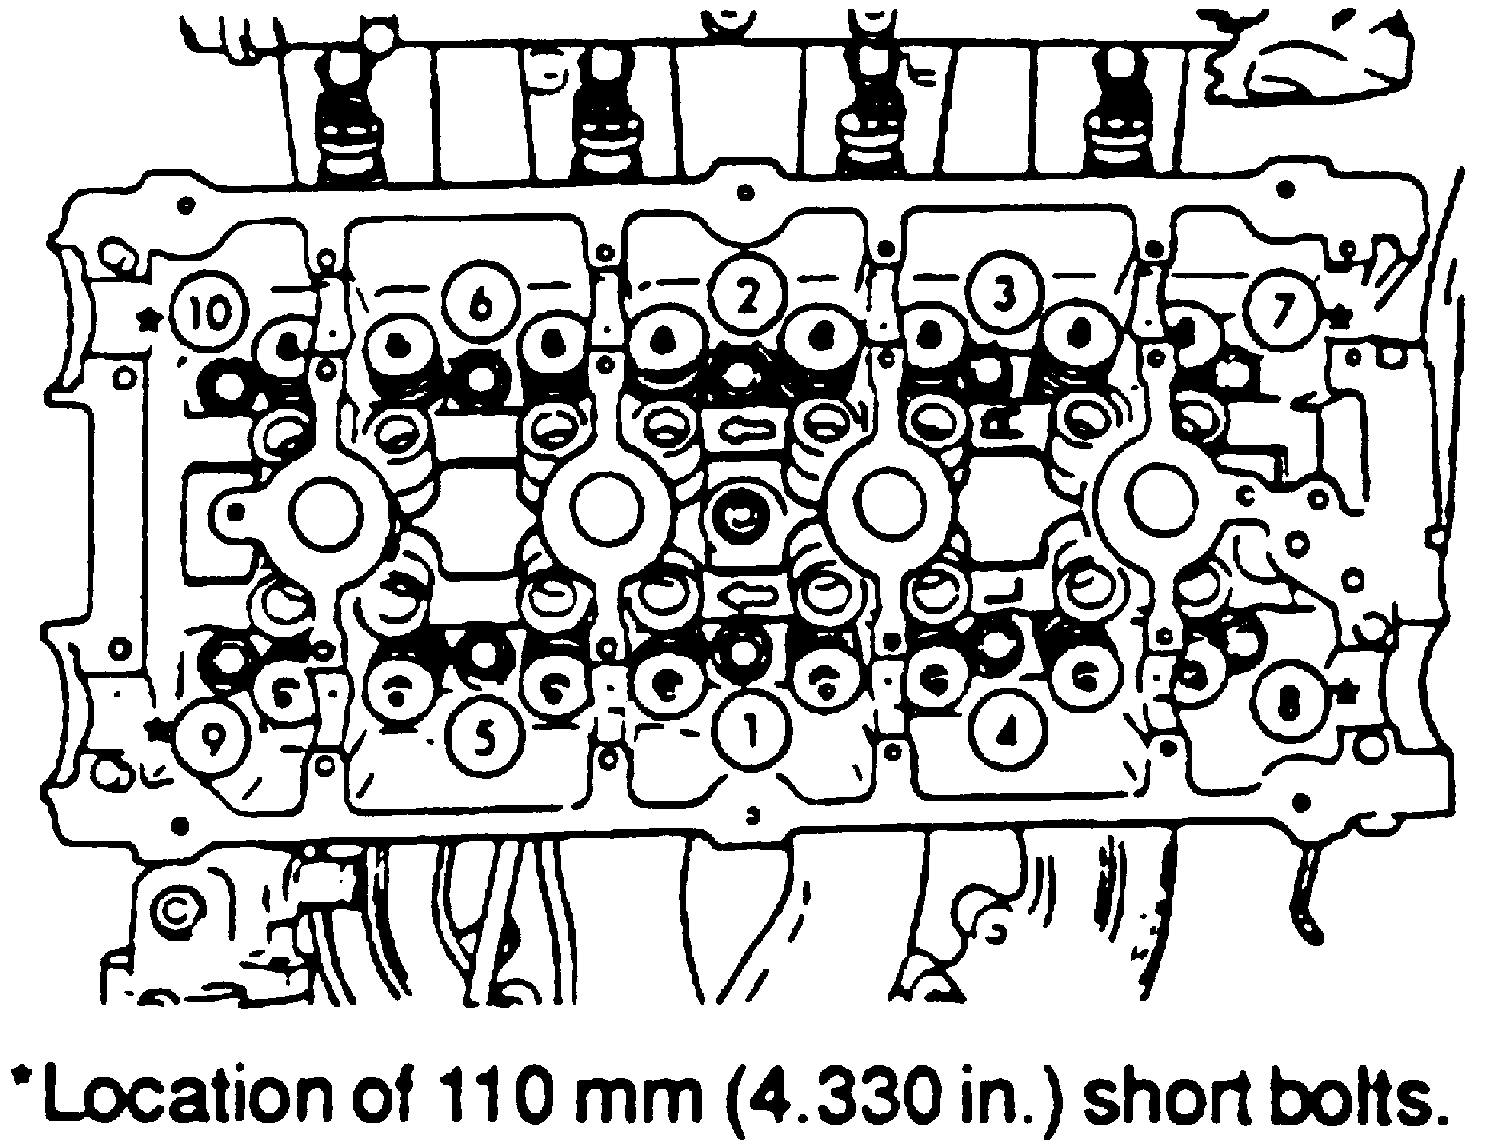
Fig. 28 Cylinder Head Bolt Tightening Sequence

See pic 1

16. Reverse procedure to install, noting the following:
a. Prior to installation, inspect cylinder head bolts for stretching by placing a straightedge against bolt threads. If all threads do not contact straightedge, replace bolt.
B. Clean bolt threads and lubricate with clean engine oil.

Without Multi Layer Steel Head Gasket

c. Tighten cylinder head bolts in sequence shown in Fig.28.
Torque bolts 1 through 6 to 25 ft.-Lbs, and bolts 7 through 10 to 20 ft.-Lbs.
Next, torque bolts 1 through 6 to 50 ft.-Lbs. And bolts 7 through 10 to 20 ft. Lbs.
Again, torque bolts 1 through 6 to 50 ft.-Lbs, then bolts 7 through 10 to 20 ft.-Lbs.
Finally, tighten all bolts an additional 90°.

With Multi Layer Steel Head Gasket

Note: The four short bolts are placed in the corners.

Step 1
Torque all center bolts to 34 Nm (25 Ft Lbs), Torque the 4 corner bolt to 27 Nm (20 Ft Lbs)
Step 2
Torque all center bolts to 68 Nm (50 Ft Lbs), Torque the four corner bolts to 47 Nm (35 Ft Lbs),
Step 3
Re-torque all center bolts to 68 Nm (50 Ft Lbs), Re-torque the 4 corner bolts to 47 Nm (35 Ft Lbs).
Step 4
Tighten all bolts in the Specified sequence an additional 90° (1/4 turn).

D. When installing radiator hoses, align marks on clamps and respective hoses

CAUTION: When the following parts are replaced with new ones, be sure to use the scan tool to synchronize the camshaft position sensor with the crankshaft position sensor again or disconnect the negative battery cable for 10 seconds or more:
- Camshaft
- Camshaft Sprocket
- Timing Belt
- Tensioner
- Cylinder Head
- Head Gasket
- Crankshaft Sprocket
- Crankshaft
- Cylinder Block, etc.

_________________________________________________________________________________________

Now for the real headache. If you do this, I would recommend replacing the timing belt and accessories at the same time.

_________________________________________________________________________________________

Timing Belt Removal and Installation
Vehicle Engine, Cooling and Exhaust Engine Timing Components Timing Belt Service and Repair Procedures Timing Belt Removal and Installation
TIMING BELT REMOVAL AND INSTALLATION
NOTE:
With the timing belt removed, avoid turning the camshaft or crankshaft. If movement is required, exercise extreme caution to avoid valve damage caused by piston contact.

REMOVAL

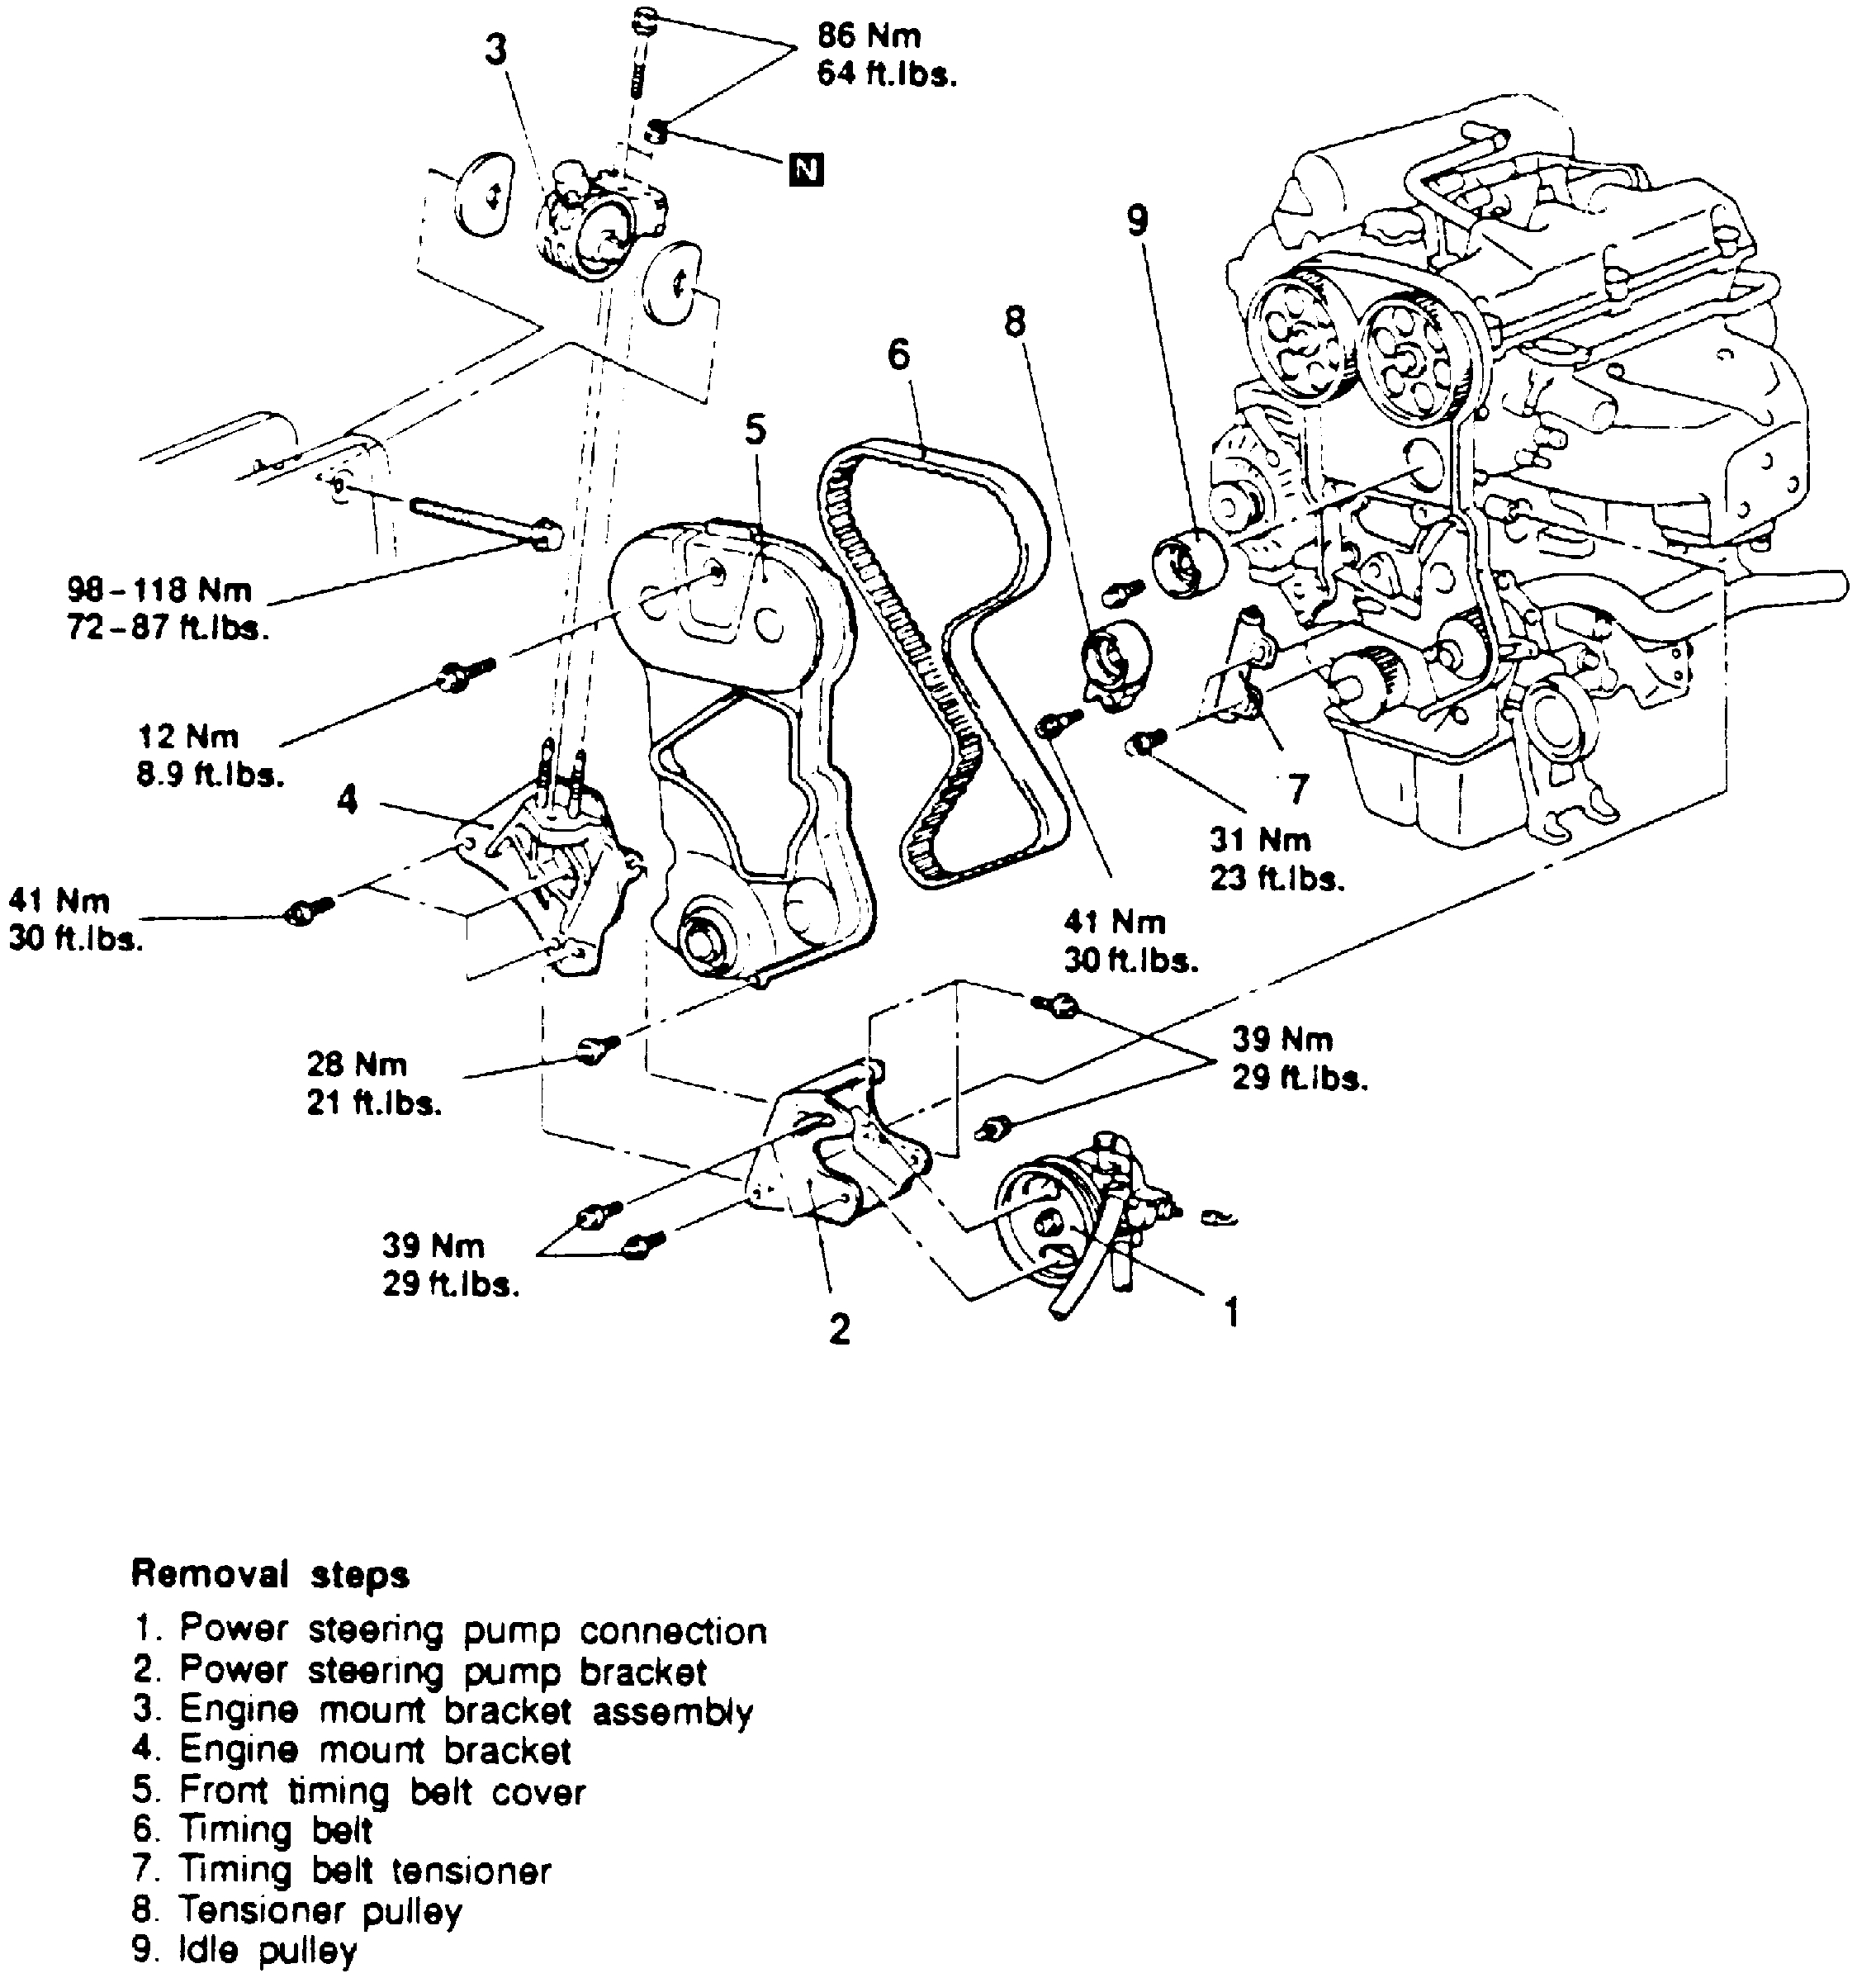
Fig. 54 Timing Belt Replacement
pic 2

Remove timing belt in numbered sequence as shown, noting the following:

Fig. 55 Crankshaft Pulley Removal
pic 3

1. Remove crankshaft pulley as shown.
2. Remove power steering pump from the bracket with hose attached and secure out of the way.
3. Place a suitable jack and wood block beneath engine and slightly raise engine to remove engine mount bracket.

Pic 4

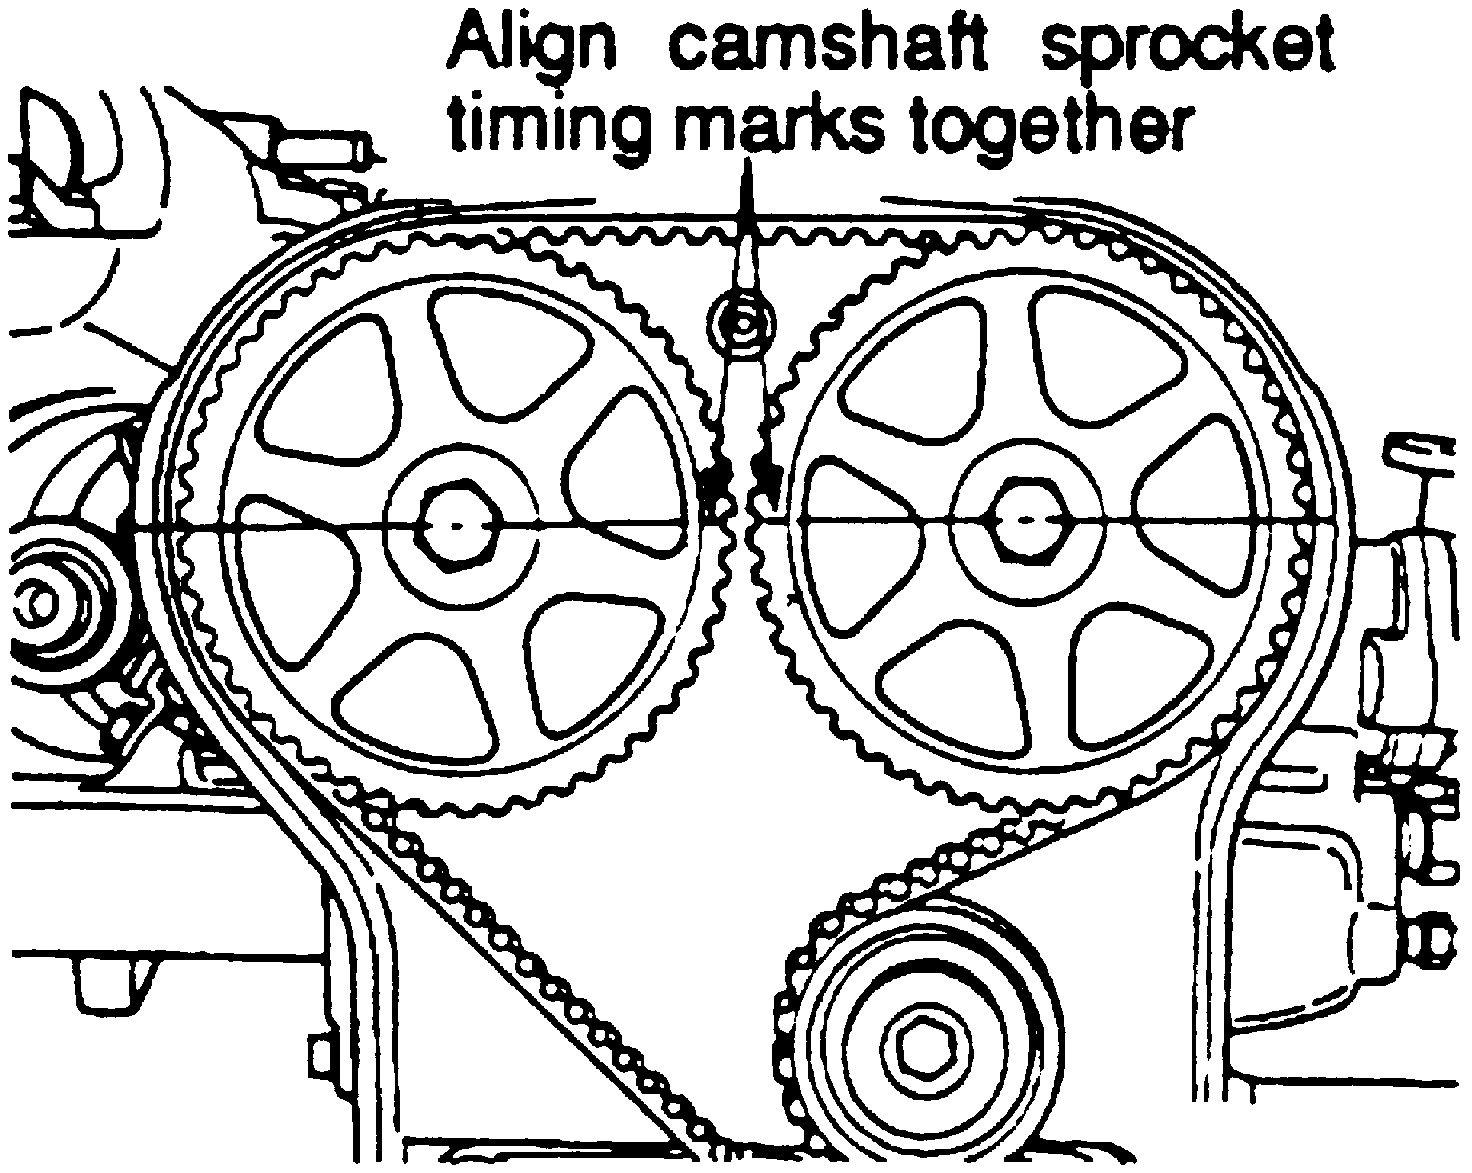
4. Align timing marks on camshaft intake and exhaust sprockets before loosening belt tensioner to remove timing belt, Ensure camshaft and crankshaft are not rotated after belt is removed.
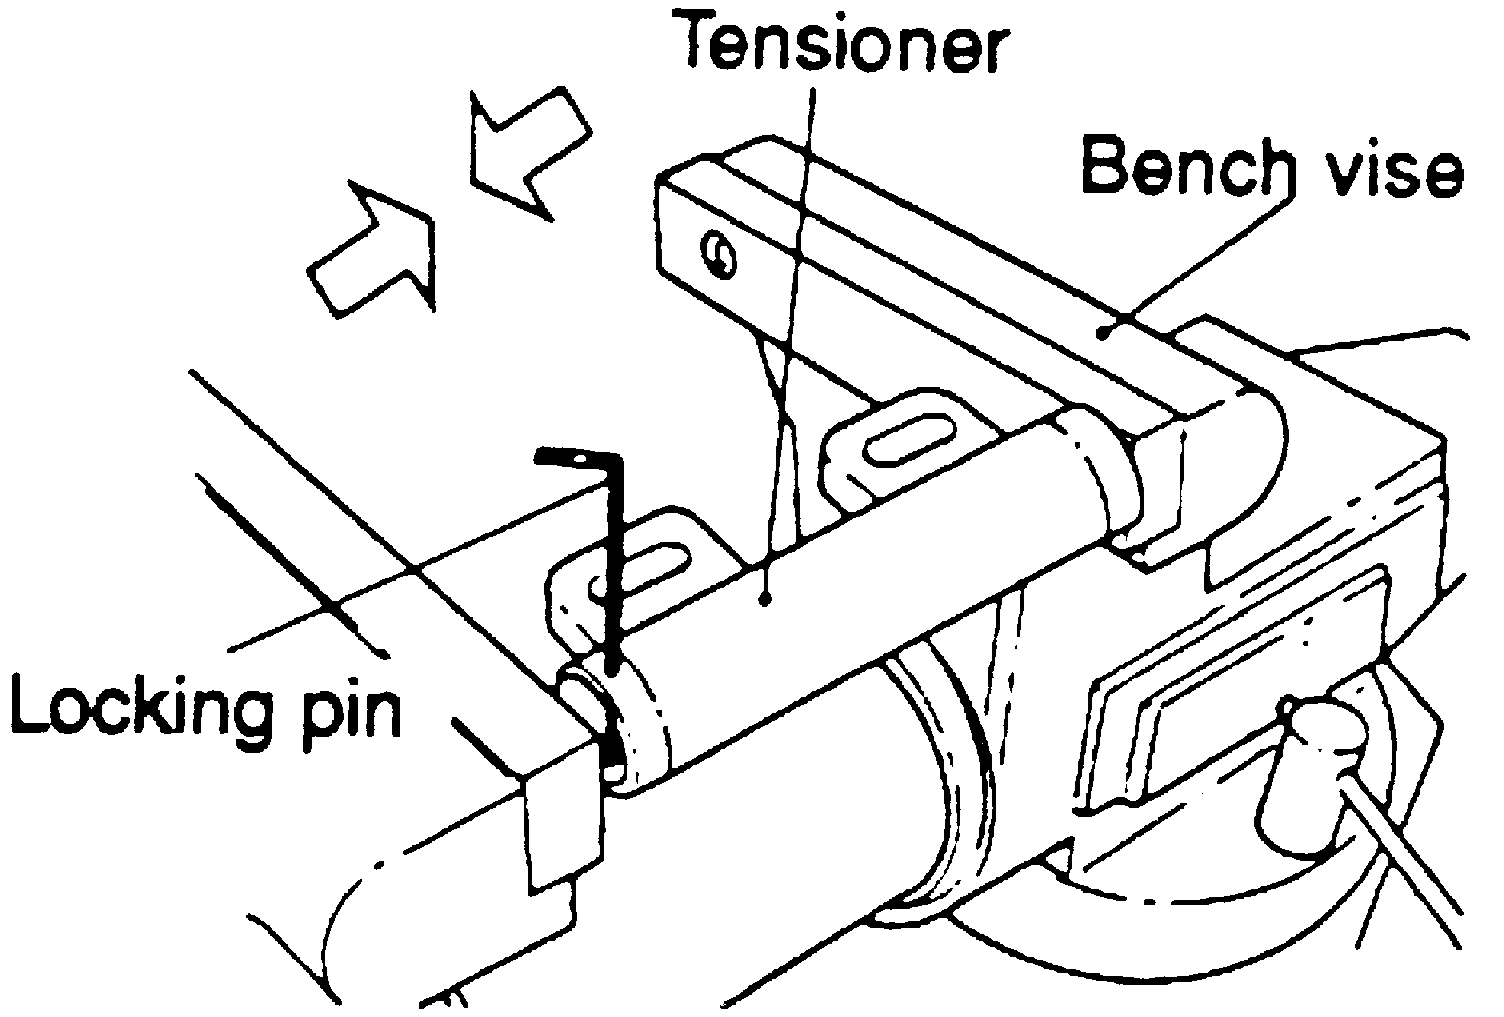
5. When belt tensioner is removed, it is necessary to compress the plunger into the tensioner body:

Fig. 57 Timing Belt Tensioner Compression

pic 5

a. Place tensioner in a suitable vise and slowly compress the plunger.
B. Index tensioner in vise the same way it is installed on engine to ensure proper pin orientation when installed on engine.
C. When plunger is compressed into tensioner body, install a pin through body and plunger to retain plunger in place until tensioner is installed.
CAUTION:
Do not loosen, remove or tighten tensioner pivot bolt. If this bolt is disturbed, entire pivot bracket assembly must be replaced.

INSTALLATION

Reverse removal procedure to install noting:

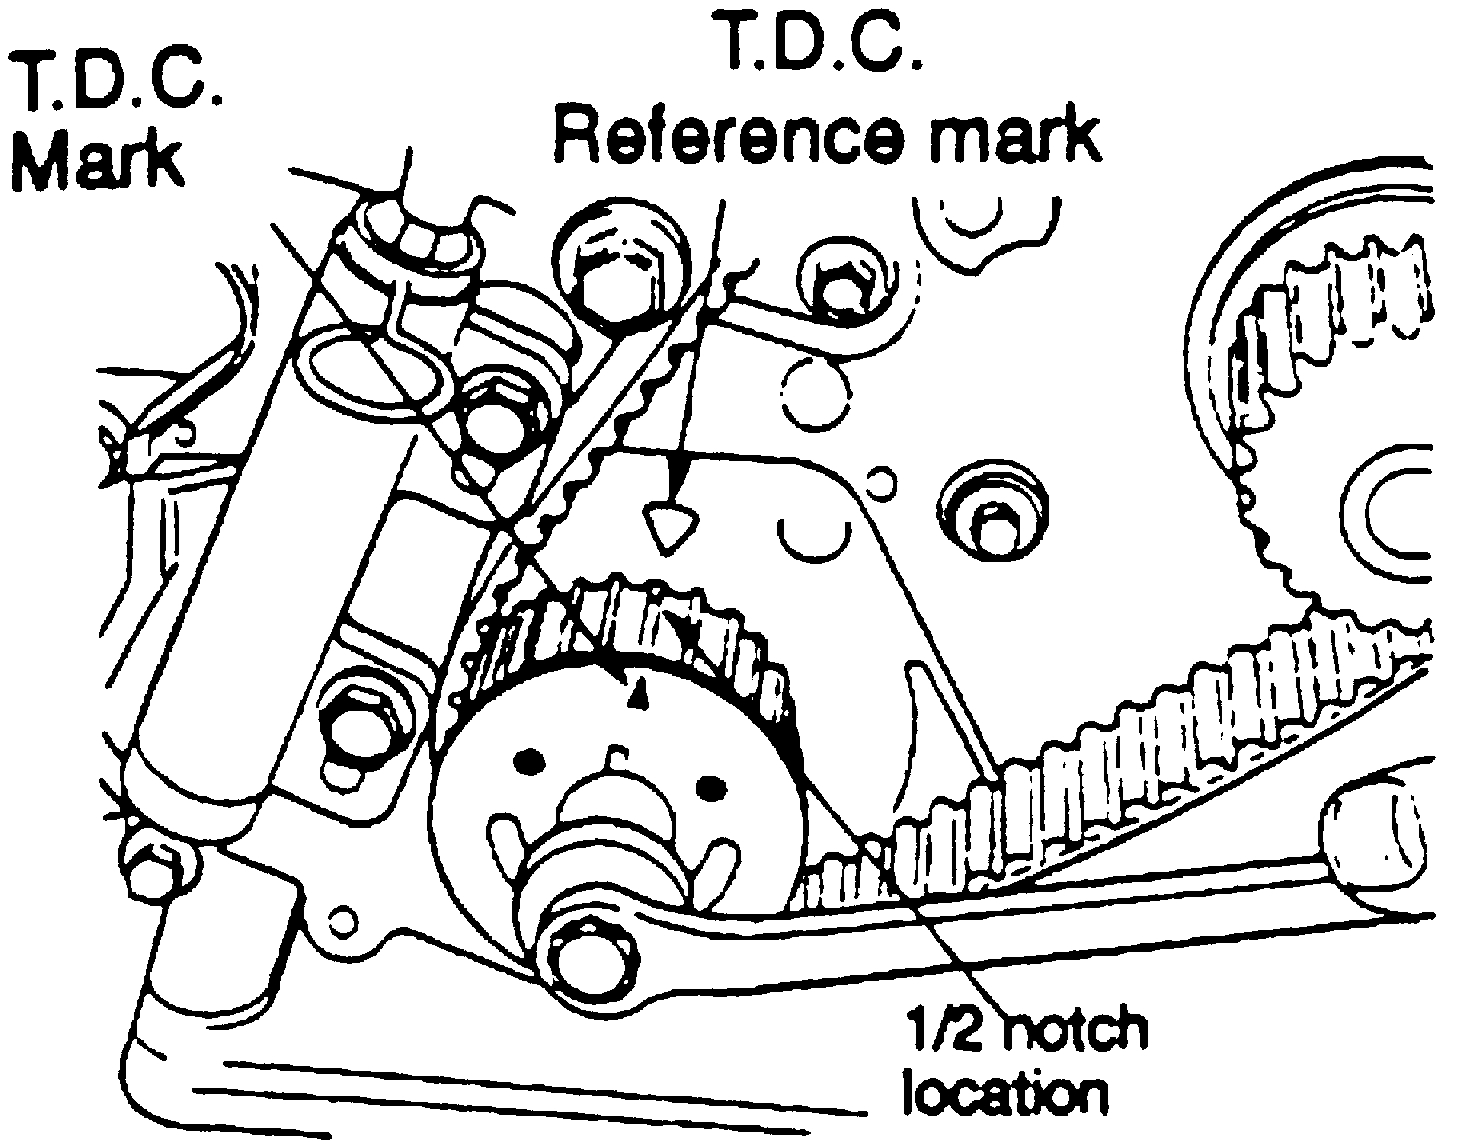
Fig. 59 Crankshaft Sprocket Alignment
pic 6

1. Set the crankshaft sprocket to TDC by aligning the sprocket with the arrow on the oil pump housing.
2. Using a suitable wrench, move crankshaft to 1/2 notch before TDC.

Pic 7

3. Set the camshaft timing marks by aligning the notches on sprockets.

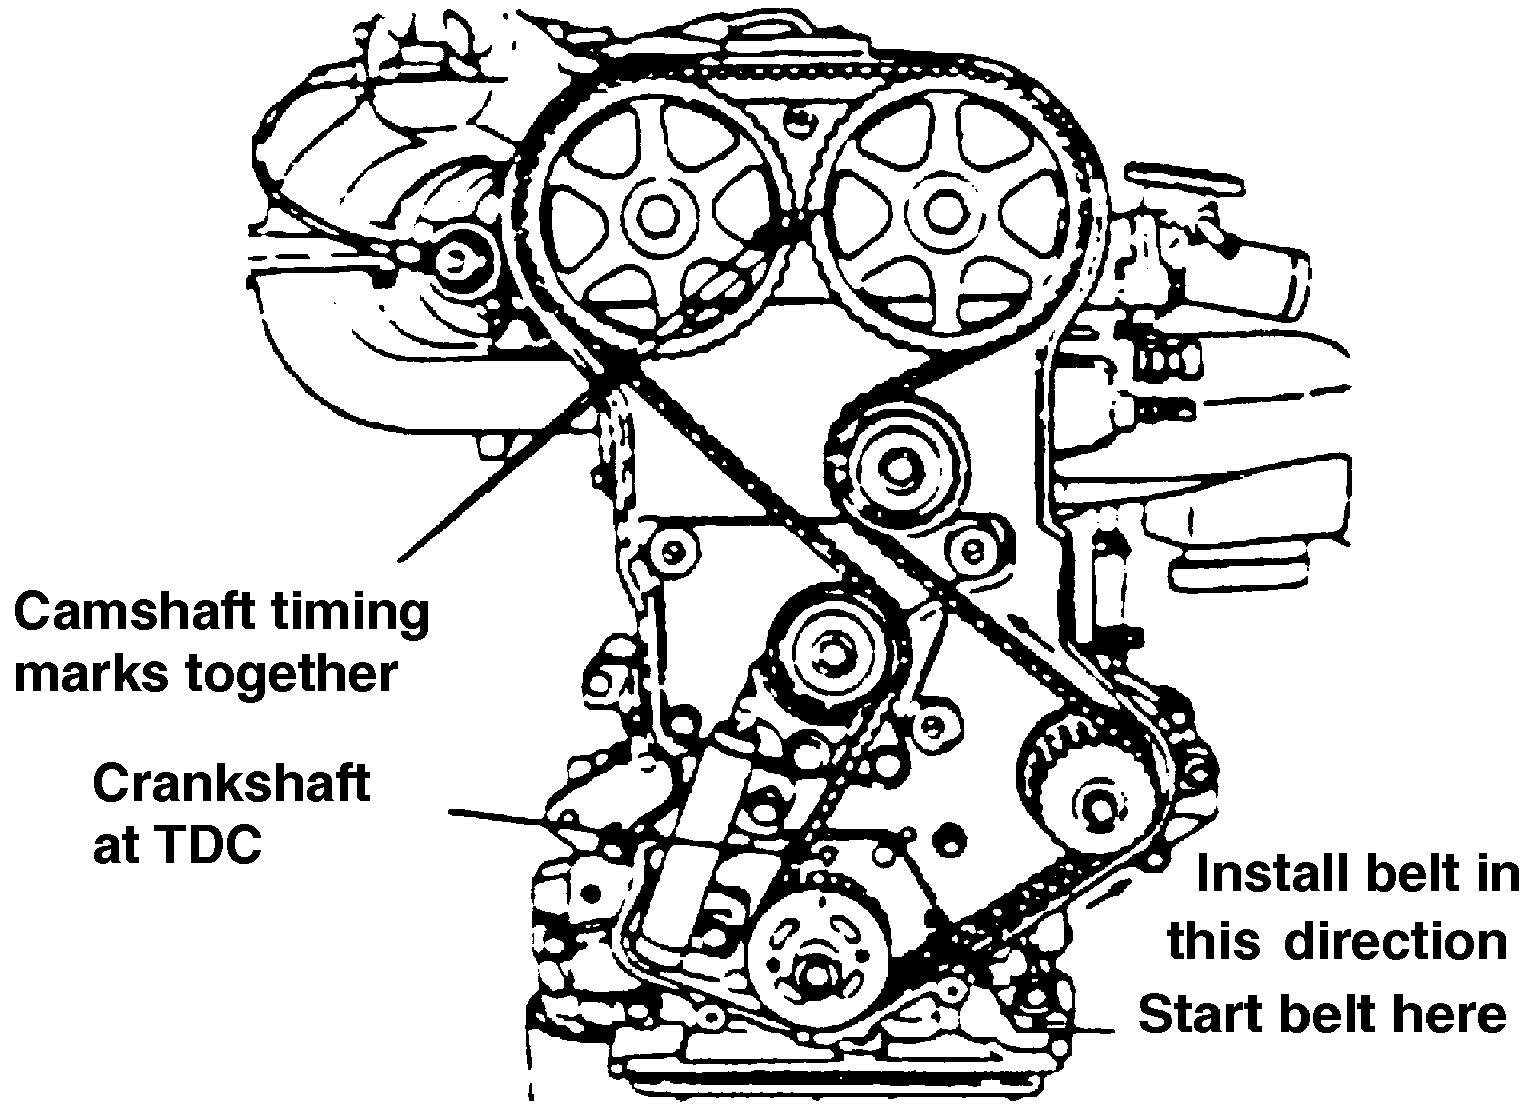
Fig. 60 Timing Belt Installation

pic 8

4. Install timing belt, starting at crankshaft, around water pump sprocket, idler pulley, camshaft pulleys and tensioner pulley.
5. Move crankshaft sprocket to TDC to take up belt slack.
6. Install belt tensioner to engine block but do not tighten fasteners.
7. Using a suitable torque wrench on the tensioner pulley, torque to 28 ft.-Lbs.

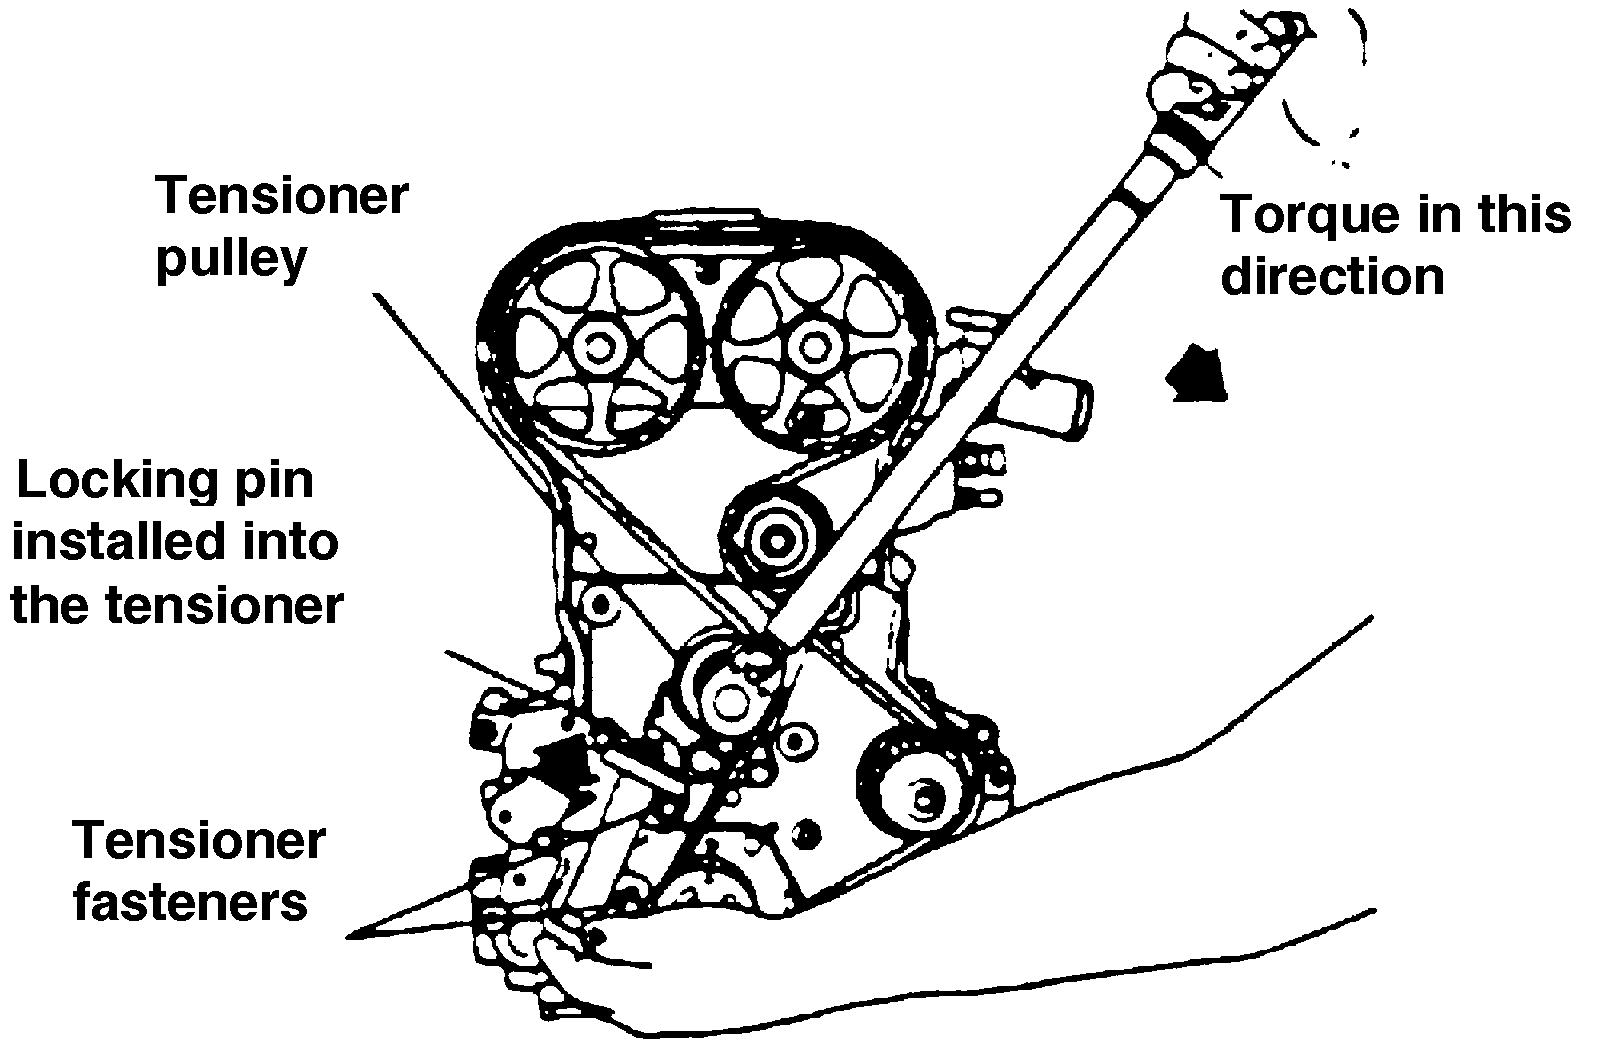
Fig. 61 Timing Belt Adjustment

pic 9

8. With torque being applied to the tensioner pulley, move the tensioner up against the tensioner pulley bracket and torque fasteners to 23 ft.-Lbs.
9. Pull the tensioner plunger pin. Pretension is proper when pin can be easily removed or installed.
10. Rotate crankshaft two revolutions and inspect alignment of timing marks. If not proper, repeat procedure.

_________________________________________

If you decide to do this, let me know. Also, feel free to ask questions if you have them. I was also wondering how much coolant was coming out and if it started while the engine was still cold?

Let me know,

Take care,
Joe
Was this
answer
helpful?
Yes
No
+1
Saturday, September 26th, 2020 AT 10:18 AM (Merged)
Tiny
KATHY FERRELL
  • MEMBER
  • 4 POSTS
LMAO, Wow! Okay well. The car was cold when I did this and when I was adding the fluid it only took half gal I New this wasn’t right so I started car to see if it would open up and take more and it did I stood there and watched the bubbles for few minutes and it took rev engine up many times hoping that it was just trapped air before it blew some water out. Well the only good thing about all this was I did the timing belt when I changed the water pump and it only took me tearing it all apart three times before I got it right or think it is. So I know how to take all that apart. But think I might have to try the Blue Devil sealer. I will keep in touch to let you no how it goes. Quick question, I didn’t hook my A/C canister back up and could this be any part of my problem?
Was this
answer
helpful?
Yes
No
Saturday, September 26th, 2020 AT 10:18 AM (Merged)
Tiny
JACOBANDNICKOLAS
  • MECHANIC
  • 108,014 POSTS
Welcome back:

AC canister? Do you mean compressor? If so, no. Also, when you fill the coolant, make sure you have the heater on full heat. That way it allows air to escape from the heater core. If it was that low, maybe it will be okay? Perhaps the bubbles were what you said.

Regardless, let me know how things work out for you. Also, the brand you mentioned above is the only one I heard works. I'm sure there are others, but I did hear of Blue Devil. I'm not to provide brand names so I couldn't say it. I will tell you this. Make sure you follow the directions exactly the way they are listed.

I will watch for your reply. I hope everything goes well.

Take care,
Joe
Was this
answer
helpful?
Yes
No
+1
Saturday, September 26th, 2020 AT 10:18 AM (Merged)
Tiny
SHELLY41988
  • MEMBER
  • 1 POST
  • CHRYSLER SEBRING
I have a 1998 chrysler sebring coupe about 73000 miles. About a month agoi started having problems-when I was stopped at a stop light too long or just idling too long my temp would go up. It would go down if I put my car in neutral and revved the engine. It got to the point were nothing could help and it would always overheat.I took it in and they replaced my thermostat gasket. Everything was fine until today I had driven about 5 miles and looked at my tempurature gage and saw it was all the way overheated. I pulled over at the next exit and parked it and let it cool. The coolant was boiling, but full in the plastic tank.

I let the car cool down for about an hour. When I started it again it was fine tempurature wise, but was violently shaking(while in park) and making a weird noise. What coud it be. Help!
Was this
answer
helpful?
Yes
No
Saturday, September 26th, 2020 AT 10:18 AM (Merged)
Tiny
RASMATAZ
  • MECHANIC
  • 75,992 POSTS
Could be a blown H/Gasket and for it violently shaking could be a misfire being created by coolant and fuel mixing and being burn which is a no-no.
Was this
answer
helpful?
Yes
No
-1
Saturday, September 26th, 2020 AT 10:18 AM (Merged)

Please login or register to post a reply.

Sponsored links