Hi,
To replace the fuel pump on this vehicle, you must remove the fuel tank. I will first provide the directions for draining, removing and replacing the fuel tank, and then I will provide the directions for replacing the pump. The attached pics will correlate with the directions.
____________________________________
Change Vehicle Bookmarks Library Request Conversion Calculator Technician's Reference - Collision
fuel tank
57
Community 4 Create Quote
1996 Dodge or Ram Truck 1500 4x2 Pickup V6-239 3.9L Magnum
Fuel Tank Draining and Removal/Installation
Vehicle Powertrain Management Fuel Delivery and Air Induction Fuel Tank Service and Repair Procedures Fuel Tank Draining and Removal/Installation
FUEL TANK DRAINING AND REMOVAL/INSTALLATION
FUEL TANK DRAINING AND REMOVAL/INSTALLATION PROCEDURE
DRAINING FUEL TANK
1. Remove fuel tank filler tube cap to release fuel tank pressure.
2. Perform Fuel System Pressure Release procedure.
3. Raise vehicle on hoist.
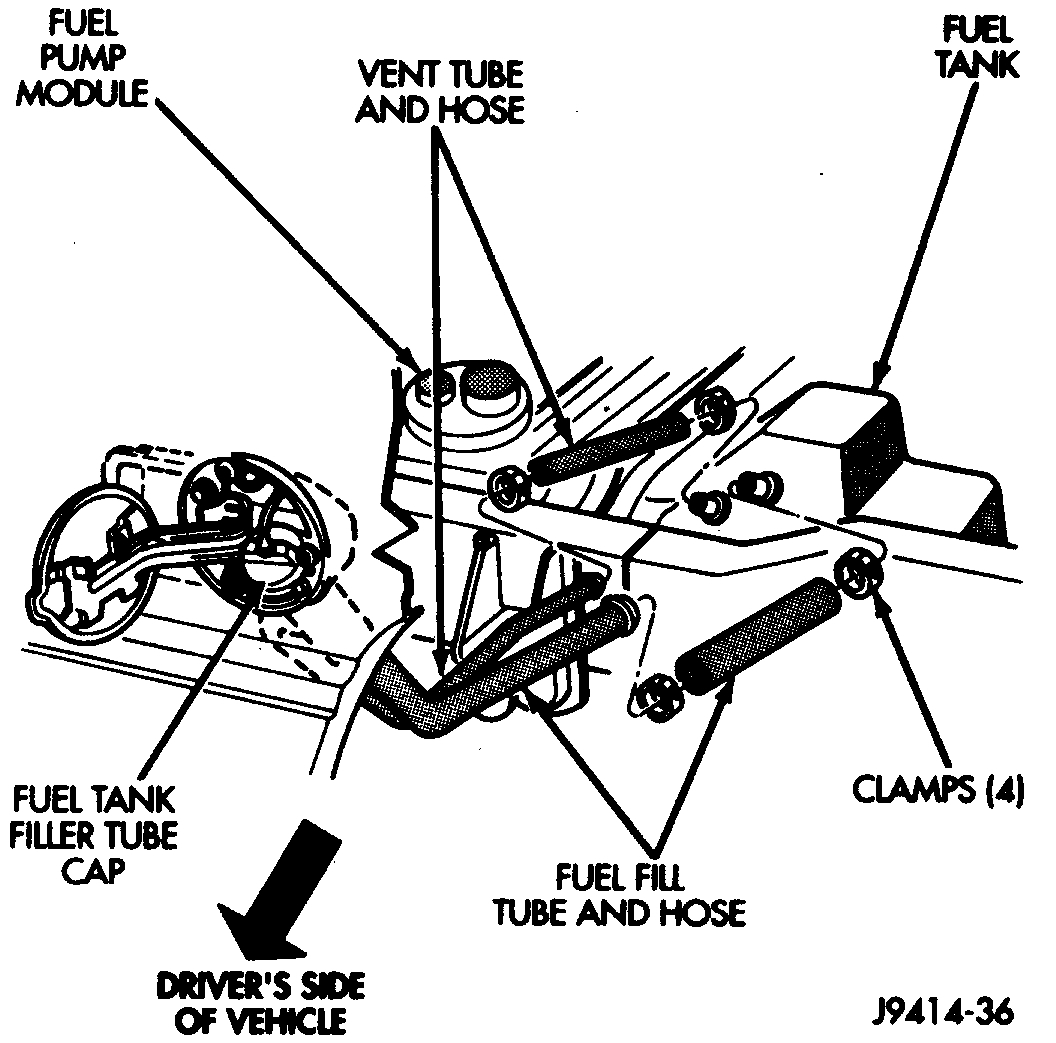
Fuel Tank Fill And Vent Hoses
pic 1
4. When working over the left rear tire/wheel, disconnect the rubber fuel filler hose and clamp at fuel tank. Position fuel siphoning/drain hose into this opening at tank.
5. Drain fuel into an approved portable holding tank or a properly labeled gasoline safety container.
TANK REMOVAL
1. Disconnect negative battery cable at battery.
2. Remove fuel tank filler tube cap.
WARNING: THE FUEL SYSTEM IS UNDER A CONSTANT PRESSURE EVEN WITH THE ENGINE OFF BEFORE SERVICING THE FUEL TANK, FUEL SYSTEM PRESSURE MUST BE RELEASED. REFER TO THE FUEL SYSTEM PRESSURE RELEASE PROCEDURE BEFORE SERVICING THE FUEL TANK.
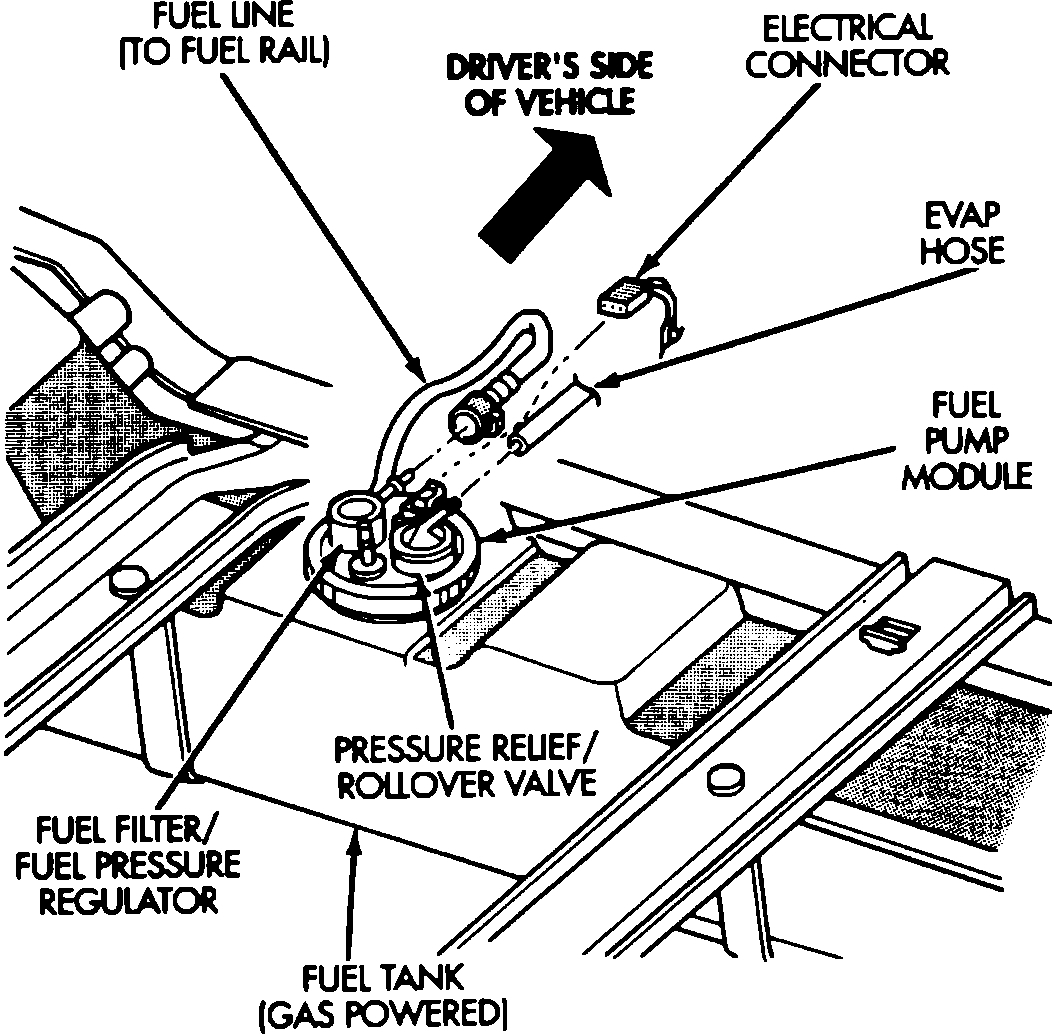
Fuel Tank Location (Gas)
pic 2
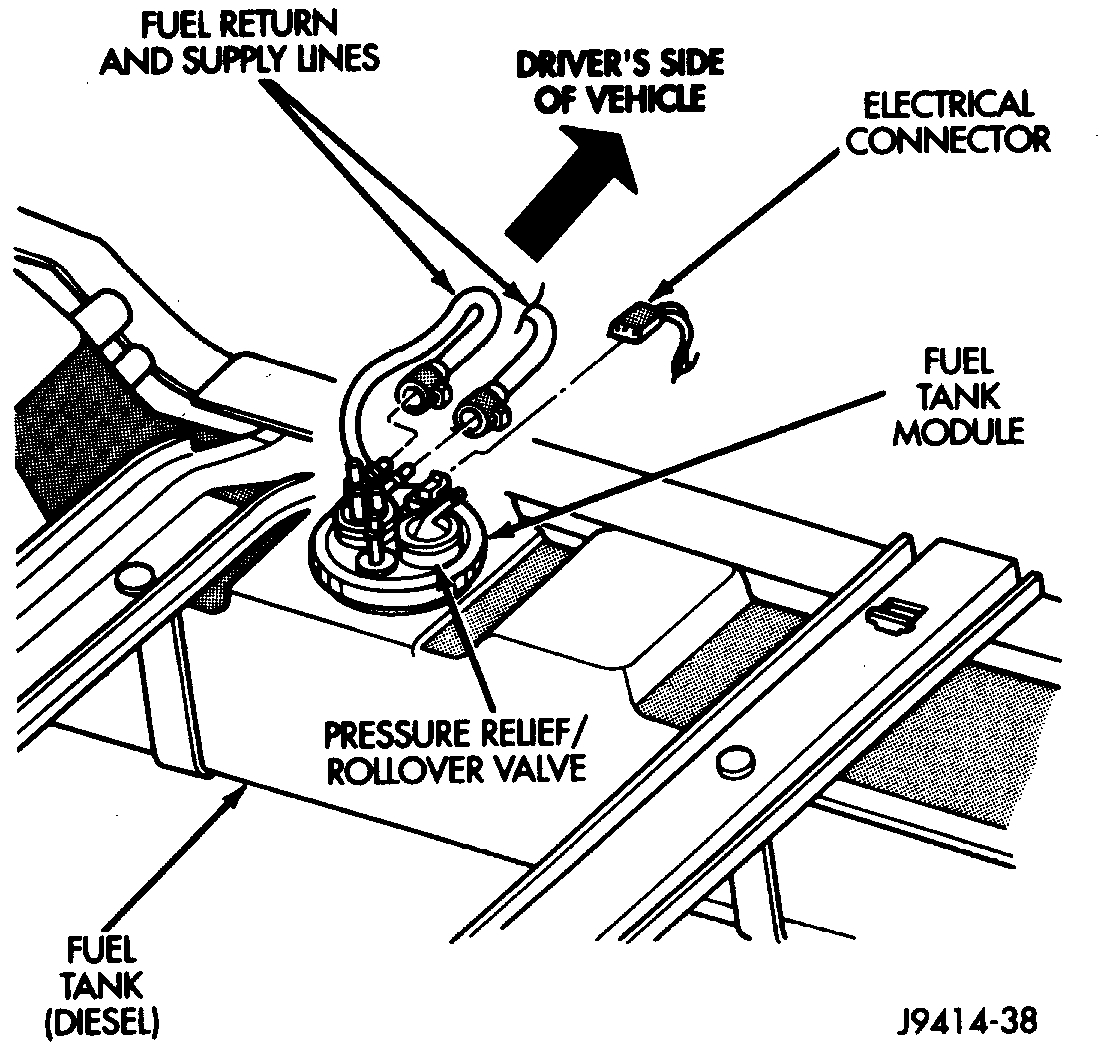
Fuel Tank Connections (Diesel)
pic 3
3. Drain fuel tank. Refer to Draining Fuel Tank.
4. Disconnect both the fuel fill and fuel vent rubber hoses at the fuel tank.
5. Gas Powered Engines:
a. While working over the left rear tire/wheel, disconnect the electrical connector from the fuel pump module.
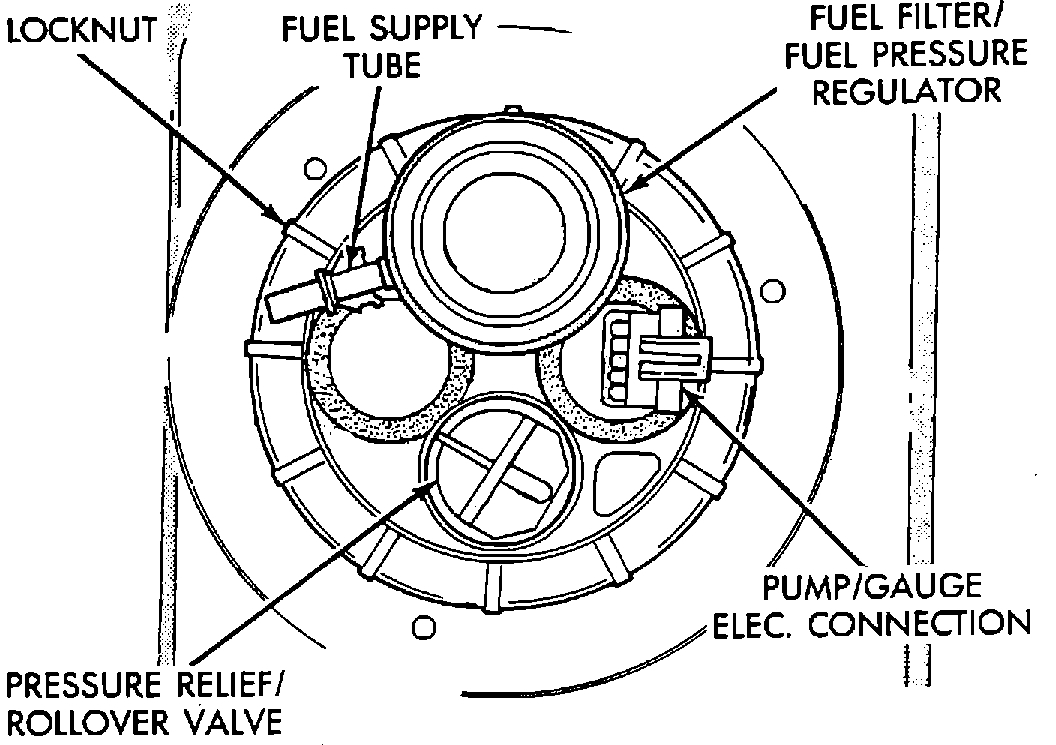
b. Disconnect the EVAP hose at the pressure relief/rollover valve.
c. Disconnect the fuel supply line at the fuel filter/fuel pressure regulator.
6. Diesel Powered Engines:
a. While working over the left rear tire/wheel, disconnect the electrical connector from the fuel tank module.
b. Disconnect the fuel supply and fuel return lines at the fuel tank module.
7. Place a transmission jack under the center of the fuel tank. Apply a slight amount of pressure to fuel tank with transmission jack.
WARNING: WRAP SHOP TOWELS AROUND HOSES TO CATCH ANY GASOLINE SPILLAGE.
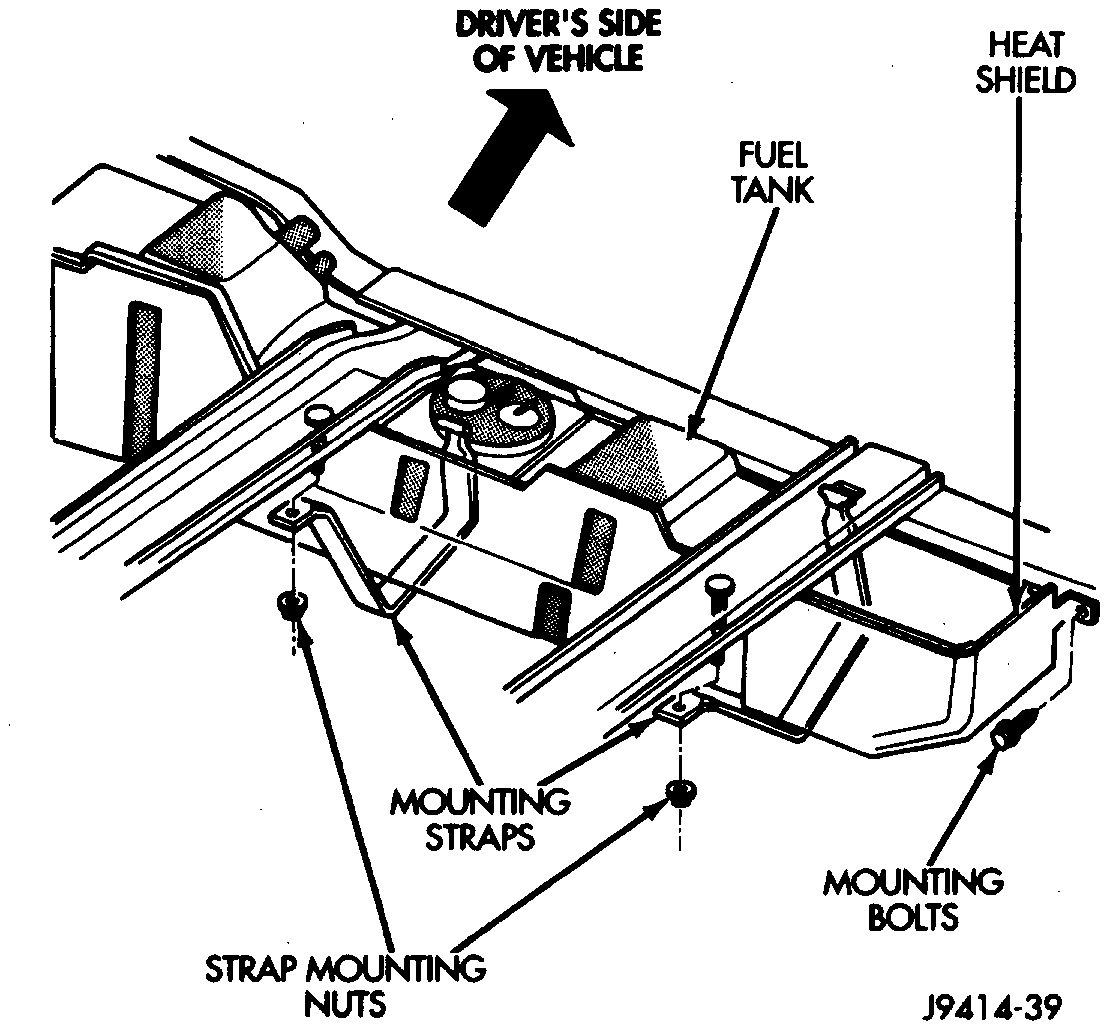
8. Remove the fuel tank mounting strap nuts at the mounting straps. If equipped, remove the fuel tank heat shield bolts.
Fuel Tank Mounting (Typical)
pic 4
9. Lower fuel tank for removal.
TANK INSTALLATION
1. Place fuel tank on top of transmission jack.
2. Raise tank into position in the frame crossmembers.
3. Connect the two mounting straps and mounting strap nuts.
4. Remove transmission jack. Tighten strap nuts 41 Nm 30 ft. lbs. torque. Do not over tighten retaining strap nuts.
5. Gas Powered Engines:
a. Connect the electrical connector to the fuel pump module.
b. Connect the EVAP hose at the pressure relief/rollover valve.
c. Connect the fuel supply line at the fuel filter fuel pressure regulator.
6. Diesel Powered Engines:
d. Connect the electrical connector to the fuel tank module.
e. Connect the fuel supply and fuel return lines at the fuel tank module.
6. Install the rubber fill and vent lines to tank. Tighten hose clamps to 2.3 Nm 20 in. lbs. torque.
7. Refill fuel tank and inspect all hoses and lines for leaks.
8. Connect negative battery cable to battery.
___________________________________________
1996 Dodge or Ram Truck 1500 4x2 Pickup V6-239 3.9L Magnum
Procedures
Vehicle Powertrain Management Fuel Delivery and Air Induction Fuel Pump Service and Repair Procedures
PROCEDURES
Pressure Relief/Rollover Valve
pic 5
REMOVAL
WARNING: The fuel system is under constant pressure, even when the engine is OFF. Always release fuel pressure before servicing any fuel system component.
NOTE: The fuel pump is not serviceable, if the pump is defective replace the whole fuel pump module.
1. Release fuel pressure.
2. Drain and remove fuel tank.
3. Note the direction of fuel nipples and electrical connector for assembly.
4. While holding the fuel pump module down, remove the locknut, (locknut is threaded onto tank). Use a brass drift to loosen the fuel pump locknut, if necessary. After the locknut has been removed release the fuel pump module and it will spring up from the fuel tank.
5. Remove the fuel pump module from the fuel tank, being careful not to bend the sending unit float arm.
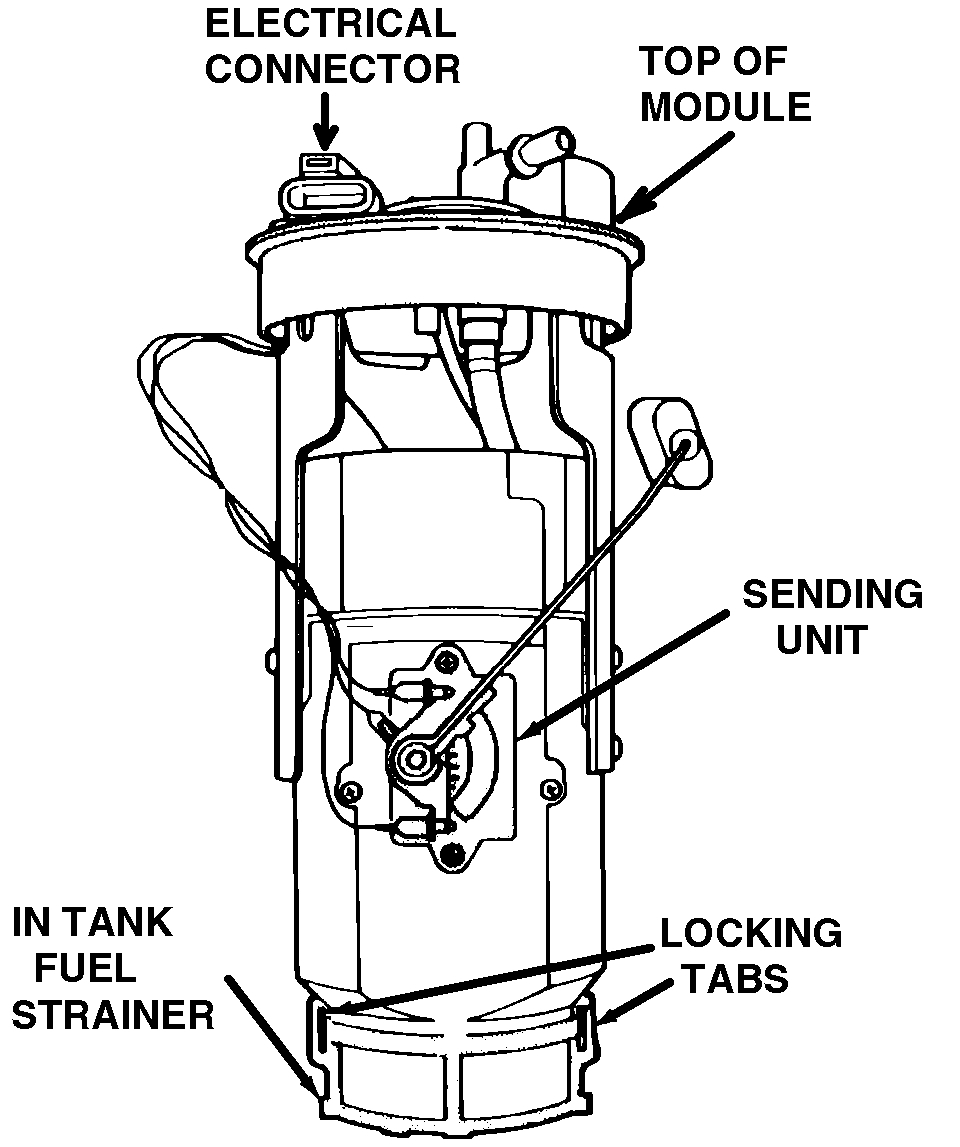
Fuel Gauge Sending Unit And In-Tank Filter
pic 6
FUEL GAUGE SENDING UNIT REMOVAL
1. Remove sending unit attaching screws from mounting bracket located on the side of the fuel pump reservoir.
2. Mark wires for installation, disconnect electrical connections from sending unit, and remove sending unit.
FUEL GAUGE SENDING UNIT INSTALLATION
1. Connect the electrical connections to the sending unit.
2. Install sending unit onto the fuel reservoir, and tighten the mounting screws.
IN-TANK FUEL STRAINER REMOVAL
1. Pry back the fuel strainer mounting tabs and pull the strainer off module.
Fuel Gauge Sending Unit And In-Tank Filter
pic 7
IN-TANK FUEL STRAINER INSTALLATION
1. Snap the fuel filter onto the mounting tabs of the fuel reservoir.
INSTALLATION
NOTE: Locknut and gasket must be replaced, whenever the fuel pump module is serviced.
1. Wipe seal area of tank clean, and install a new seal on pump.
2. Install new locknut over top of fuel pump module.
3. Push fuel pump module into the tank, being careful not to bend the sending unit float arm, and hold with one hand while tightening the locknut with the other hand.
4. Install fuel tank assembly.
5. Using scan tool, place ignition switch in "RUN" position and use Actuate Output Test "Auto Shutdown (ASD) Relay", to activate fuel pump and pressurize system.
6. Check for leaks.
__________________________________
Just a note, when you reinstall, make sure not to bend or damage the float unit. Also, make sure nothing is preventing it from moving.
Let me know if this helps or if you have other questions.
Take care,
Joe
Images (Click to enlarge)
Mar 27, 2020 at 6:21 PM