Here is a guide to help you give you an idea on what you are in for and the step by step is below
https://www.2carpros.com/articles/transmission-replacement-removal-manual
Step by Step
Remove the air cleaner assembly. .
NOTE:When the battery is disconnected and reconnected, some abnormal drive symptoms may occur while the vehicle relearns its adaptive strategy.
Remove the battery and tray. For additional information, refer to BATTERY, MOUNTING AND CABLES .
Disconnect the electrical connectors.
Disconnect the digital transmission range (TR) sensor electrical connector.
Disconnect the transaxle electrical connector.
Disconnect the wire harness from the bracket.
Disconnect the shift cable.
Remove the cable from the bracket.
Disconnect the wire harness from the bracket.
Remove the manual control lever.
Remove the hood.
Remove the wiper arm and pivot assembly. For additional information, refer to WIPERS AND WASHERS .
Remove the front upper radiator shield.
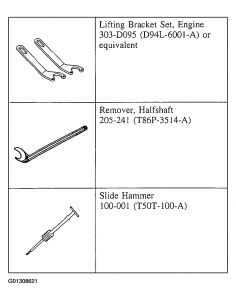
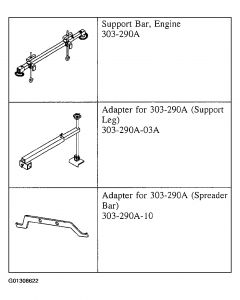
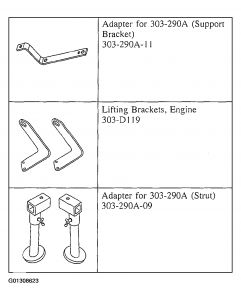
Install the special tool.
Install the special tool.
Install the special tools.
Install the special tool.
Remove the bolt and the upper fluid filler tube.
Remove the clips.
Depress the tabs on the plastic insert retainer and remove the cooler line from fitting.
Remove the transaxle retaining bolts.
Remove the rear transaxle mount nut.
Raise and support the vehicle. For additional information, refer to JACKING & LIFTING .
Remove the front wheel and tires. For additional information, refer to WHEELS & TIRES .
Drain the transmission fluid by lowering the transaxle pan.
NOTE:The transaxle fluid pan does not need to be torqued in this step.
Install the transaxle pan.
Remove the three way catalytic converter assembly.
Disconnect the LH knuckle assembly.
Disconnect the LH tie rod assembly.
Disconnect the LH sway bar assembly.
Remove the LH pinch bolt.
Disconnect the RH knuckle assembly.
Disconnect the RH tie rod assembly.
Disconnect the RH sway bar assembly.
Remove the RH pinch bolt.
Remove the nuts for the power steering rack.
Disconnect the retainer for the power steering line.
Disconnect the retainer for the power steering line.
Remove the front engine mount.
Remove the rear engine mount.
Position a suitable lift under the vehicle and raise it to the subframe.
Remove the left front subframe bolt.
Remove the right front subframe bolt.
Remove the left rear subframe bolt.
NOTE:Disconnect the heat shield from the subframe prior to lowering it from the vehicle.
Remove the right rear subframe bolt and lower the subframe assembly.
Remove two bolts from the LH sway bar assembly.
Remove two bolts from the RH sway bar assembly.
Remove the sway bar assembly.
Install the special tool.
The use of mechanic's wire will aid in holding the power steering rack up in the vehicle.
Remove the ground strap and harness bracket.
NOTE:The use of mechanic's wire will aid in positioning the starter out of the way.
Remove the starter and position it out of the way.
Loosen the inspection cover bolt, and remove the pushpin.
Remove both parts of the inspection cover.
Remove and discard the four nuts.
NOTE:The use of mechanic's wire will aid in positioning the halfshafts out of the way.
Using the special tools, remove the LH halfshaft from the transaxle and position out of the way.
NOTE:The use of mechanic's wire will aid in positioning the halfshafts out of the way.
Using the special tools, remove the RH halfshaft from the transaxle and position out of the way.
Disconnect the output shaft speed (OSS) sensor connector.
Disconnect the turbine shaft speed (TSS) sensor connector.
Position the high lift transmission jack under the transaxle.
Remove the rear lower retaining bolt.
Remove the front lower retaining bolt.
Remove the oil pan to transaxle retaining bolt.
Remove the oil pan to transaxle retaining bolt.
Remove the transaxle retaining bolts.
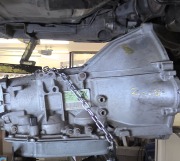
Lower the transaxle assembly from the engine compartment.
Remove the bracket.
Remove the rear support bracket.
Carry out the transmission fluid cooler backflushing/cleaning. For additional information, refer to TRANSMISSION FLUID COOLER - BACKFLUSHING AND CLEANING .
Please let us know happens so it will help others.
Best, Ken
Wednesday, November 30th, 2016 AT 10:29 AM