
Introduction
The CV (Constant Velocity) axle is a critical component of a vehicle’s drivetrain, transferring power from the transmission to the wheels while allowing for movement and suspension articulation, when a CV axle goes bad there will be distinct symptoms associated with the failure. A failing CV axle can cause clicking noises, vibrations, or loss of power delivery. This guide provides a step-by-step procedure for replacing a CV axle on most front-wheel-drive and some all-wheel-drive vehicles.
Tools and Materials Needed
- Jack and jack stands
- Wheel chocks
- Lug wrench
- Socket set (including axle nut socket)
- Breaker bar
- Torque wrench
- Hammer and punch
- Pry bar
- Ball joint separator
- CV axle puller (optional)
- Grease and thread-locking compound
- New CV axle
- New axle nut and cotter pin (if required)
Step-by-Step CV Axle Replacement
You will need to jack the car up, and support it on jack stands, you will then need to remove the wheels. Park the car on level ground and use protective gloves and eyewear.
1. Remove CV Axle Nut
It is a good idea to spray WD40 on the threads and retainer nut, then allow it to sit. This nut will be secured by a divot punched on the collar of the nut, while some use a simple cotter pin, in either case the a punch should be used to relax the divot, or use a pair of side cutters to remove the pin. There are various methods that can be used to loosen and remove the axle nut.
- Impact wrench, is the easiest.
- Hold the rotors via the wheel studs with a large pry bar
- Hold the brakes on
- Loosen the nut while the tire is still on the ground.
You will need to reverse this method to tighten the nut once the job is complete.

2. Disconnect Lower Ball Joint
The lower control arm will need to be disconnected from the spindle and bearing hub to allow the strut to be pulled out far enough to get the axle CV joint out of the bearing hub, to do this you must remove the three nuts holding the ball joint to the arm or undo the lower ball joint.

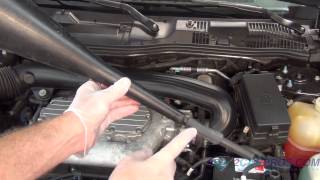
3. Pull CV Axle From Bearing Hub
Soak the CV axle spines with WD40 and allow it to sit, pull the spindle and bearing hub outward at the same time use a hammer to gently tap the end of the outer CV joint snout, while guiding the shaft out of the bearing hub. Don't worry about damaging the snout threads because the axle will be replaced anyway. If you will be reinstalling the axle, install the nut back onto the axle threads about three turns to offer protection to the threads.

This is how you it will look once the outer CV axle joint is loose.

4. Remove the CV Axle
Use a large pry bar and wedge it between the transmission case and inner axle joint and pry outward, this will "pop" the axle out from the transmission. Grasp the CV axle firmly and pull the axle out from the transmission, its normal for transmission fluid to leak, so have a fluid catch basin ready.

5. Install the New CV Axle
Match the new replacement axle to the old unit, they should match identically, (If old axle has an ABS stator ring on the outer CV joint, the new axle should have one as well). Grasp the new axle firmly and feed it back into the transmission being careful not to damage the transmission axle seal. The axle will need to be "popped" into the transmission with a inward thrusting motion, (If the axle is not completely installed it will pop out while driving causing the car to come to a stop). Center the C clip with grease for easy installation.
Then, feed the CV joint into the outer bearing hub, you may need to spin the hub to align the spines and fit the joint snout into the hub. While holding the lower control arm downward maneuver the lower ball joint into the control arm or spindle, then force the control arm upward to re-install the ball joint. Reinstall the CV joint axle nut by hand to avoid cross threading, then tighten the nut to manufactures specification with is usually between 125 and 145 foot pounds, (Some replacement axles will included a new nut). Install a new cotter pin, (if applicable) and reassemble in the reverse order you are all set.
Conclusion
Some cars will have an intermediate bearing mount that will need to be unbolted to remove the axle. After the the job completion, listen for any strange noises which means the job will need to be rechecked. Following this guide ensures a successful CV axle replacement, restoring the drivetrain’s efficiency and vehicle handling. Be sure to recheck the transmission fluid level.
Watch the Video!
Please watch this video of the job being done to glean additional helpful information.
Credits
This guide knowledge base was created by the 2CarPros Team, and by Ken Lavacot: Automobile repair shop owner and certified master automobile technician of over 30 years. If you have question or need help please ask one of our experts we are happy to help. Please visit our 2CarPros YouTube Channel.

Article published 2025-03-10

Axle Bearing and Seal Replacement

Wheel Stud Replacement Chevrolet Cavalier
Automatic Transmission Service