Water pump installation help needed

Tiny
SONNYBAHIA
  • MEMBER
  • 1999 CADILLAC DEVILLE
  • 4.2L
  • V8
  • 2WD
  • AUTOMATIC
  • 65,000 MILES
I managed to remove the waterpump on my car with minimal issues and used the special tool to accomplish this. On the flip side, installing the new water pump has been most challenging and I’d appreciate any feedback or tips that can help me get this done.

Using brand new OEM ac Delco water pump as replacement which is the correct replacement unit for my car listed above.

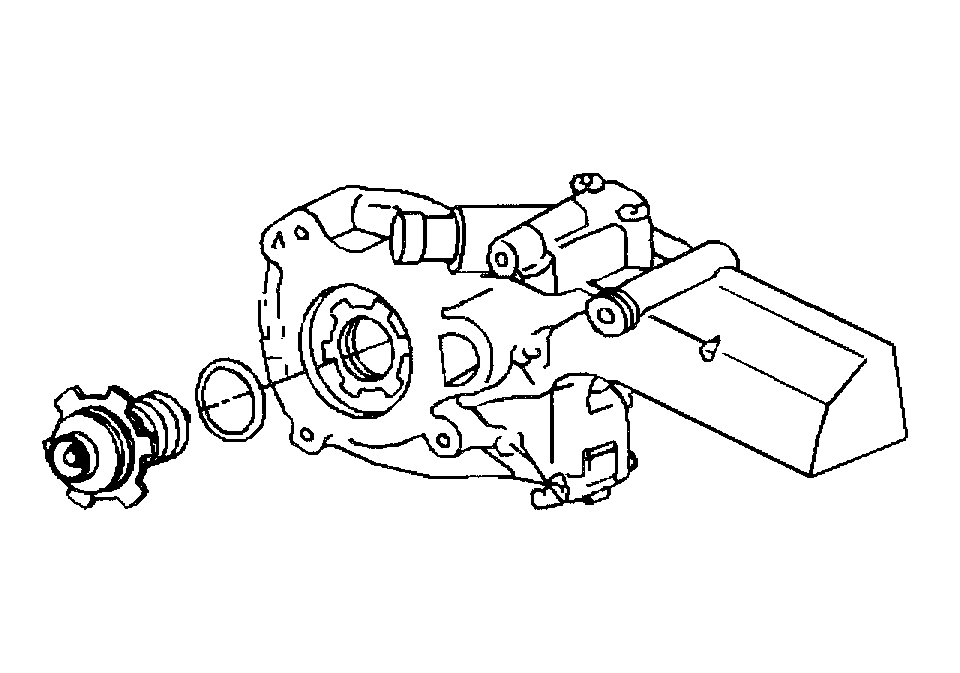
I am positioning the it at the 7 o’clock position (the tooth with the indent at 7) and turning counter clockwise.

I’ve used 2 ratchets, a breaker bar, and other different tools to install.

Today I used a additional bracket hold tool today and still a no-go.

Fasteners and rivets on the replacement and also on housing are not worn and still in good order (had to return 2 water pumps so far!).

Any help is greatly appreciated.

Thank you kindly,
Sonny
Tuesday, February 16th, 2021 AT 3:27 PM

1 Reply

Tiny
JACOBANDNICKOLAS
  • MECHANIC
  • 108,133 POSTS
Hi,

I'm not sure exactly what is happening. However, do me a favor. Here are the directions from my manual. See if anything there helps. The attached pics correlate with the directions.

_______________________________________________

1999 Cadillac DeVille V8-4.6L VIN Y
Water Pump Replacement
Vehicle Engine, Cooling and Exhaust Engine Water Pump Service and Repair Removal and Replacement Water Pump Replacement
WATER PUMP REPLACEMENT
Removal Procedure

- Tools Required
- J 38816-1A Water Pump Remover/installer

pic 1

1. Drain the cooling system.
2. Remove the air cleaner assembly. Refer to Air Cleaner Assembly Replacement in Powertrain Management.
3. Remove the water pump belt cover.
4. Remove the water pump drive belt.
5. Remove the bypass hose.

Pic 2

6. Remove the lower radiator hose from the thermostat housing.

Pic 3

7. Remove the bolts from the water pump cover.
8. Remove the water pump cover.

Pic 4

9. Remove the water pump, the pump seal, and the gasket from the housing using the J 38816-1A. Turn the tool clockwise in order to remove the water pump.
10. Remove the water pump from the vehicle.
11. Clean the water pump and the pump cover sealing surfaces.

Installation Procedure

- Tools Required
- J 38816-1A Water Pump Remover/Installer

Notice: Use the correct fastener in the correct location. Replacement fasteners must be the correct part number for that application. Fasteners requiring replacement or fasteners requiring the use of thread locking compound or sealant are identified in the service procedure. Do not use paints, lubricants, or corrosion inhibitors on fasteners or fastener joint surfaces unless specified. These coatings affect fastener torque and joint clamping force and may damage the fastener. Use the correct tightening sequence and specifications when installing fasteners in order to avoid damage to parts and systems.

Pic 5

1. Install the water pump using J 38816-1A. Turn the tool counterclockwise in order to install the pump.

- Tighten the water pump to 100 Nm (73 lb ft).

Pic 6

2. Install the water pump housing cover and the bolts.

- Tighten the water pump housing cover bolts to 10 Nm (89 lb in).

Pic 7

3. Install the lower radiator hose to the thermostat housing.

Pic 8

4. Install the thermostat bypass hose.
5. Install the water pump drive belt.
6. Install the water pump belt cover.
7. Install the air cleaner assembly.
8. Refill the cooling system.

_____________________________

Let me know if that helps or if you have other questions.

Take care and God Bless,

Joe
Was this
answer
helpful?
Yes
No
Tuesday, February 16th, 2021 AT 7:05 PM

Please login or register to post a reply.

Sponsored links