VVT solenoid Bolt

Tiny
KIEFYTREATS
  • MEMBER
  • 2016 CHRYSLER 200
  • 2.4L
  • 4 CYL
  • 2WD
  • AUTOMATIC
  • 92,000 MILES
There is no bolt holding on the VVT solenoid for cylinder one. How do I replace it?
Monday, June 17th, 2019 AT 9:25 AM

16 Replies

Tiny
JACOBANDNICKOLAS
  • MECHANIC
  • 108,199 POSTS
Welcome to 2CarPros.

Here are the directions for removal and replacement:

VARIABLE VALVE TIMING SOLENOID - REMOVAL
LEFT

pic 1

Disconnect and isolate the negative battery cable. If equipped with an Intelligent Battery Sensor (IBS), disconnect the IBS connector first before disconnecting the negative battery cable.
NOTE:
Mark the variable valve timing solenoid connectors (1) with a paint pen or equivalent so that they may be reinstalled in their original locations.

Mark the intake variable valve timing solenoid (4) and the exhaust variable valve timing solenoid (2) with a paint pen or equivalent so that they may be reinstalled in their original locations.
Disconnect the electrical connector (1) from the variable valve timing solenoid.
Remove the variable valve timing solenoid mounting bolts (3).

Pic 2

Pull the variable valve timing solenoid from the cylinder head cover.
The seal (1) can be reused if not damaged.

Install

LEFT

pic 3

Install the variable valve timing solenoid seals (1). The seals can be reused if not damaged.

Pic 4

Refer to the markings made at disassembly and install the intake variable valve timing solenoid (4) and the exhaust variable valve timing solenoid (2) in their original locations.
Install the variable valve timing solenoid mounting bolts (3) and hand tighten.
Connect the electrical connector (1) to the variable valve timing solenoid.
Connect the negative battery cable. If equipped with an Intelligent Battery Sensor (IBS), connect the IBS connector.

Note
The Cam/Crank Variation Relearn procedure must be performed using the scan tool anytime there has been a repair/replacement made to a powertrain system, for example: flywheel, valvetrain, camshaft and/or crankshaft sensors or co

Let me know if this helps.

Joe
Was this
answer
helpful?
Yes
No
+1
Monday, June 17th, 2019 AT 1:39 PM
Tiny
KIEFYTREATS
  • MEMBER
  • 8 POSTS
It shouldn't look like this? I got obd2 code P1066.
Was this
answer
helpful?
Yes
No
Monday, June 17th, 2019 AT 1:50 PM
Tiny
JACOBANDNICKOLAS
  • MECHANIC
  • 108,199 POSTS
Welcome back.

Take a look picture 1. Number 1 in the pic is the VVT solenoid. Picture 2 shows the solenoid (circled), number 2 is the spool valve, number 3 is the oil control valve, and number 4 is the solenoid pintle.

Can you take a picture and upload where you are working on the car, so I know exactly what we are dealing with? I will also tell you that the code is most often caused by low oil, dirty oil, or a plugged screen.

Let me know.

Joe
Was this
answer
helpful?
Yes
No
+2
Tuesday, June 18th, 2019 AT 5:07 PM
Tiny
KIEFYTREATS
  • MEMBER
  • 8 POSTS
I was driving when I heard what sounded like a slight knock, when I went to pull over the check engine light came on. Got code P1066, site for scanner said (cylinder 1 oil supply solenoid valve switches off time out of range). Thought it was solenoid on the VVT actuator (picture) (firewall side of engine, next to fuel rail). Picture 2 is from that side of engine I found online. But if your right I need that solenoid in your picture? Your help is so appreciated.
Car was one quart low when this happened. I always change oil when dash menu says change soon.
Was this
answer
helpful?
Yes
No
Wednesday, June 19th, 2019 AT 12:15 AM
Tiny
JACOBANDNICKOLAS
  • MECHANIC
  • 108,199 POSTS
Welcome back.

Do me a favor. Before replacing anything, change the oil and filter and make sure it is full. Make sure to use a quality filter. Reset the check engine light and see if the light comes back on. Low or dirty oil can cause this code.

Try that and let me know.

Joe
Was this
answer
helpful?
Yes
No
Wednesday, June 19th, 2019 AT 7:42 PM
Tiny
KIEFYTREATS
  • MEMBER
  • 8 POSTS
What about the horrible sound that started first?
Was this
answer
helpful?
Yes
No
Wednesday, June 19th, 2019 AT 8:56 PM
Tiny
JACOBANDNICKOLAS
  • MECHANIC
  • 108,199 POSTS
The sound could have been from it being starved of oil. Does it still make the same sound now that you filled the oil? Was the oil very dirty?

Joe
Was this
answer
helpful?
Yes
No
Wednesday, June 19th, 2019 AT 11:04 PM
Tiny
KIEFYTREATS
  • MEMBER
  • 8 POSTS
It still made the noise after adding the quart after I towed it home, the oil was light brown/tan colored. Going to change oil/filter in the morning hoping you are right.
Was this
answer
helpful?
Yes
No
Wednesday, June 19th, 2019 AT 11:17 PM
Tiny
JACOBANDNICKOLAS
  • MECHANIC
  • 108,199 POSTS
Welcome back.

Let me know. I will keep my fingers crossed for you.

Joe
Was this
answer
helpful?
Yes
No
Thursday, June 20th, 2019 AT 6:38 PM
Tiny
KIEFYTREATS
  • MEMBER
  • 8 POSTS
Just put on the new filter and filled up with new oil after work. Still sounds rough, when I shut it off it sounds like it is sputtering.
Was this
answer
helpful?
Yes
No
Thursday, June 20th, 2019 AT 8:53 PM
Tiny
JACOBANDNICKOLAS
  • MECHANIC
  • 108,199 POSTS
I'm sorry to hear that. I need to go back to the beginning. You sent a picture of a VVT solenoid which is different than what I sent you. Are you sure that part is for your car? As far as replacing the solenoid, the directions I originally provided are specific to your vehicle. Once the VVT cover bolts are removed, then you can replace the sensor.

Do you think for any reason there is a problem with oil pressure?

Joe
Was this
answer
helpful?
Yes
No
Friday, June 21st, 2019 AT 7:48 PM
Tiny
KIEFYTREATS
  • MEMBER
  • 8 POSTS
I thought the solenoid could be replaced on its own, but Dodge dealer technician told me the entire multi-air actuator has to be replaced to fix the problem, was he mistaken? I'm just trying to follow the P1066 code that came up. Just worried about my car. Thanks again.
Was this
answer
helpful?
Yes
No
Friday, June 21st, 2019 AT 8:21 PM
Tiny
KIEFYTREATS
  • MEMBER
  • 8 POSTS
How would I go about testing the oil pressure? Going back to your original picture, how do I know if it would be the one for intake or exhaust? Also, where would mine be at, only have 1 cam. Next to that on the head is the multi-air actuator (picture).
Was this
answer
helpful?
Yes
No
Friday, June 21st, 2019 AT 8:22 PM
Tiny
JACOBANDNICKOLAS
  • MECHANIC
  • 108,199 POSTS
Welcome back.

It's really easy to do, but it does require a mechanical oil pressure gauge. Most parts stores will lend one to you. Basically, all you need to do is remove the electric oil pressure sensor on the engine and screw in the mechanical gauge. When the engine starts, the mechanical gauge will indicate what pressure is being produced.

Here are the directions for checking VVT oil pressure. The attached pics correlate with the directions. If you get a gauge at the parts store, tell them you need a 1/8th x 28 pitch BPT adapter for your vehicle. Don't use the incorrect thread type or we will end up with a new problem, oil leaks or worse.

__________________________________

CHECKING VVT OIL PRESSURE
This test can be used to help diagnose VVT faults.
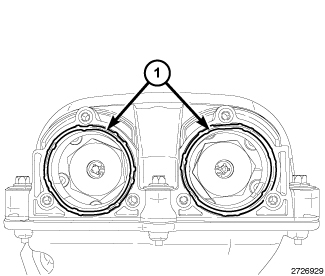
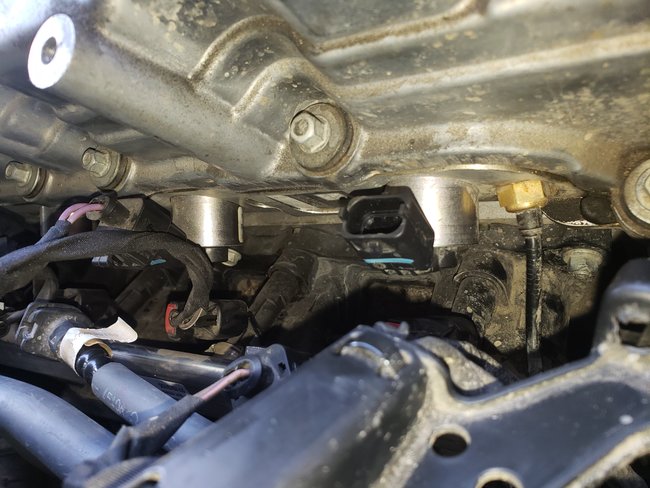
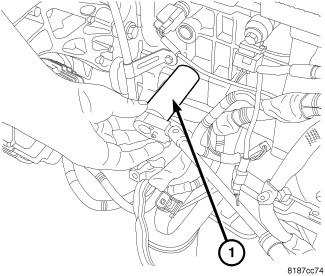
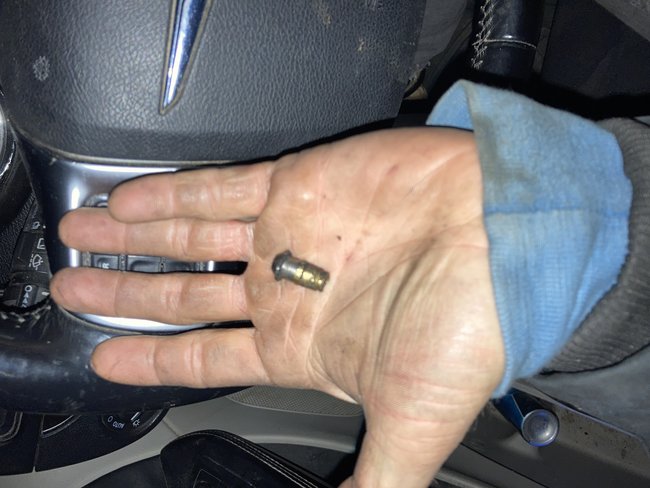
Pic 1

Disconnect and remove oil pressure sensor (1).
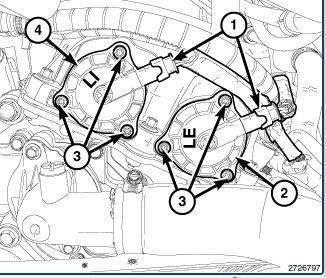
Pic 2

CAUTION:
Threads in block are 1/8”-28 British Standard Pipe (BSP). Do not install a National Pipe Thread (NPT) threaded adapter, this could crack the cylinder block.

Install an 1/8-28 BSP male to 1/8-27 female threaded adapter (2).
Install oil pressure gauge (1).
Start engine and record oil pressure.

CAUTION:
If oil pressure is 0 at idle, do not perform the 3000 RPM test

If oil pressure is 0 at idle, shut off engine. Check for pressure relief valve stuck open or a clogged oil pick-up screen.
Remove oil pan and inspect for debris (Refer to 09 - Engine/Lubrication/PAN, Oil - Removal).
Remove oil pressure relief valve (Refer to 09 - Engine/Lubrication/VALVE, Oil Pressure Relief - Removal) and inspect, if damaged replace pressure relief valve.
If pressure relief valve is ok, replace balance shaft module assembly (Refer to 09 - Engine/Lubrication/Pump, Engine Oil - Removal).
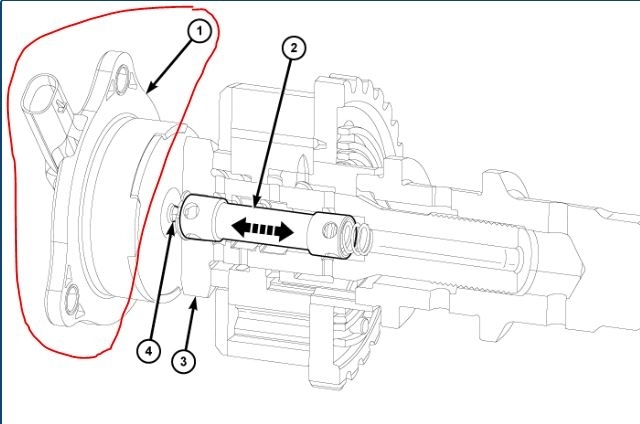
Pic 3

After test is complete, remove test gauge (1) and fitting (2).

Pic 4

Install oil pressure sensor and electrical connector.

____________________________________

If you do this, let me know the results.

Joe
Was this
answer
helpful?
Yes
No
Friday, June 21st, 2019 AT 8:51 PM
Tiny
JOSH WILLIAMSON
  • MEMBER
  • 1 POST
Hello, I found this thread very informative thank you for the pictures it’s been so hard to find some description. The guys at AutoZone had no idea what the VVT solenoid was. I was changing Mine for a 2012 Town and Country p0020 code, and when I unscrewed the last bolt, the cylinder that it goes into, came out of the actuator and I can’t get them apart for the life of me.
Am I able to order this?
Was this
answer
helpful?
Yes
No
Saturday, November 13th, 2021 AT 4:37 PM
Tiny
JACOBANDNICKOLAS
  • MECHANIC
  • 108,199 POSTS
Hi, Josh.

What exactly am I looking at in the pic? As far as the solenoid, when you removed the three bolts, were you able to remove the solenoid? If so, did part of the phaser come with it?

If that is the case, the phasers are not serviceable. They are replaced as a unit. I'm trying to picture what you can't get apart.

Let me know. Hang in there. We'll get it figured out.

Joe
Was this
answer
helpful?
Yes
No
Saturday, November 13th, 2021 AT 9:11 PM

Please login or register to post a reply.

Related General Content

Sponsored links