Uni-body side assembly replacement

Tiny
JIMB2020
  • MEMBER
  • 2006 PONTIAC G6
  • 3.9L
  • 2WD
  • AUTOMATIC
  • 160,000 MILES
Will taking the spot welds off result in detachment of the uni-body side assembly? Or is it more complicated? Cutting? Removing adhesives? Note: I am interested in removing the entire panel with its quarter panel, above and below the doors perimeters, front and rear pillars (this piece looks like it spans the entire side of the car but does it wrap around the firewall as well to connect to the other uni-body side assembly on the passenger side?).
Tuesday, May 5th, 2020 AT 1:17 AM

9 Replies

Tiny
ASEMASTER6371
  • MECHANIC
  • 52,797 POSTS
Good morning,

Are you just replacing the rear quarter panel behind the rear door?

That would be from the roof line to the floor and back to the trunk.

Pleas attach a larger clearer picture of what you are replacing.

Roy
Was this
answer
helpful?
Yes
No
+1
Tuesday, May 5th, 2020 AT 3:28 AM
Tiny
JIMB2020
  • MEMBER
  • 106 POSTS
The entire side of the car excluding the front and rear door shells and their inner frames: I want to replace the quarter panel, the front pillar and the rear pillar only (but they appear to be one continuous piece with the inner door frames that we see when we open the doors). What I am trying to find out is this: can it all be removed in one piece just by removing the spot welds (that way I won't have to cut)?
Was this
answer
helpful?
Yes
No
+1
Tuesday, May 5th, 2020 AT 7:12 AM
Tiny
ASEMASTER6371
  • MECHANIC
  • 52,797 POSTS
The simple answer is no.

The rocker panels are separate. The pillars are separate and they tie into the roof so you will be into the roof as well.

It will be piece by piece.

Roy
Was this
answer
helpful?
Yes
No
+1
Tuesday, May 5th, 2020 AT 7:16 AM
Tiny
STEVE W.
  • MECHANIC
  • 12,963 POSTS
As Roy said these are not a uni-side vehicle. The rear quarter goes from the bumper area up into the roof-line and stops about 8 inches behind the B pillar. At the bottom it goes to the middle of the door. It is welded and bonded on with structural foam in some areas. The B pillar goes from the rear quarter seam to 5 inches forward into the door opening on top and about 3 inches forward of the kick-up area in the front door. It also has welds and structural foam. The attached has lines where the panels meet. The reason for this is that the quarter and front cowl area is normal steel, the B pillar however is high strength steel.
The panels are all welded to the roof structure under the trim strip.
GM has a process on sectioning them as well because of the high strength steel in the B pillar.
Was this
answer
helpful?
Yes
No
+1
Tuesday, May 5th, 2020 AT 9:00 AM
Tiny
JIMB2020
  • MEMBER
  • 106 POSTS
So, you're saying the panels aren't uniside and have to be cut out? I could not remove a pillar or a quarter panel after removing their spot welds because they are adhered to the frame with structural foam? Meaning, we can only remove them from Car A but we cannot reinstall them on Car B because they became damaged in the process of removal? I do see cars with their roof or pillars or sides entirely cut out along with the structural frame the outer panels were adhered and welded to and to each other, but in my case, the GTP's frame isn't damaged. The reason I am doing this is because hail wreaked havoc through the entire car. I replaced the hood, the trunk, the door shells and I still have the sliding sunroof perimeter (only the metal part was damaged), the quarter panels and the pillars. I was planning to remove spot welds and carefully remove the outer shells. But, from what you are revealing to me this will prove impossible without literally cutting the entire sections (shell and steel frame) and re-welding unto the new car. Right? Do you think that is wise? I mean, I can try but would not that compromise the original structural integrity? And is there a link to what you were referring about how to section them?
Was this
answer
helpful?
Yes
No
Tuesday, May 5th, 2020 AT 4:37 PM
Tiny
ASEMASTER6371
  • MECHANIC
  • 52,797 POSTS
It is not only shells. It is structures that you will remove. They are what makes up the strength of the car.

Roy
Was this
answer
helpful?
Yes
No
+1
Tuesday, May 5th, 2020 AT 4:53 PM
Tiny
STEVE W.
  • MECHANIC
  • 12,963 POSTS
For hail damage I would replace what panels I could unbolt and bolt back on and then go with paint less dent removal for the rest to preserve as much of the original panels and welds as possible.

As for the sectioning process, it is simple, you cut the outer skins at a certain distance from the factory seams and weld in the replacements using backer panels at the new seams. The trick is that for most of the panels the cut lines are in very visible places right at eye level for the B pillar and rocker. However the process is written assuming that you are using OEM repair panels and that you will be removing the parts without regard to damage because you are putting new ones on. To use the parts off a parts car or salvage yard you would want to cut the entire side off the donor car, then lay it on a padded surface and cut the parts free from the back side so you don't damage the outer panels. Then trim those in the proper places to section them in.

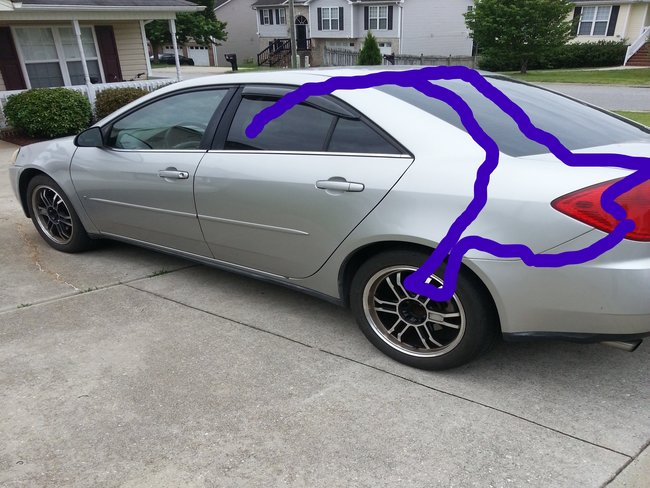
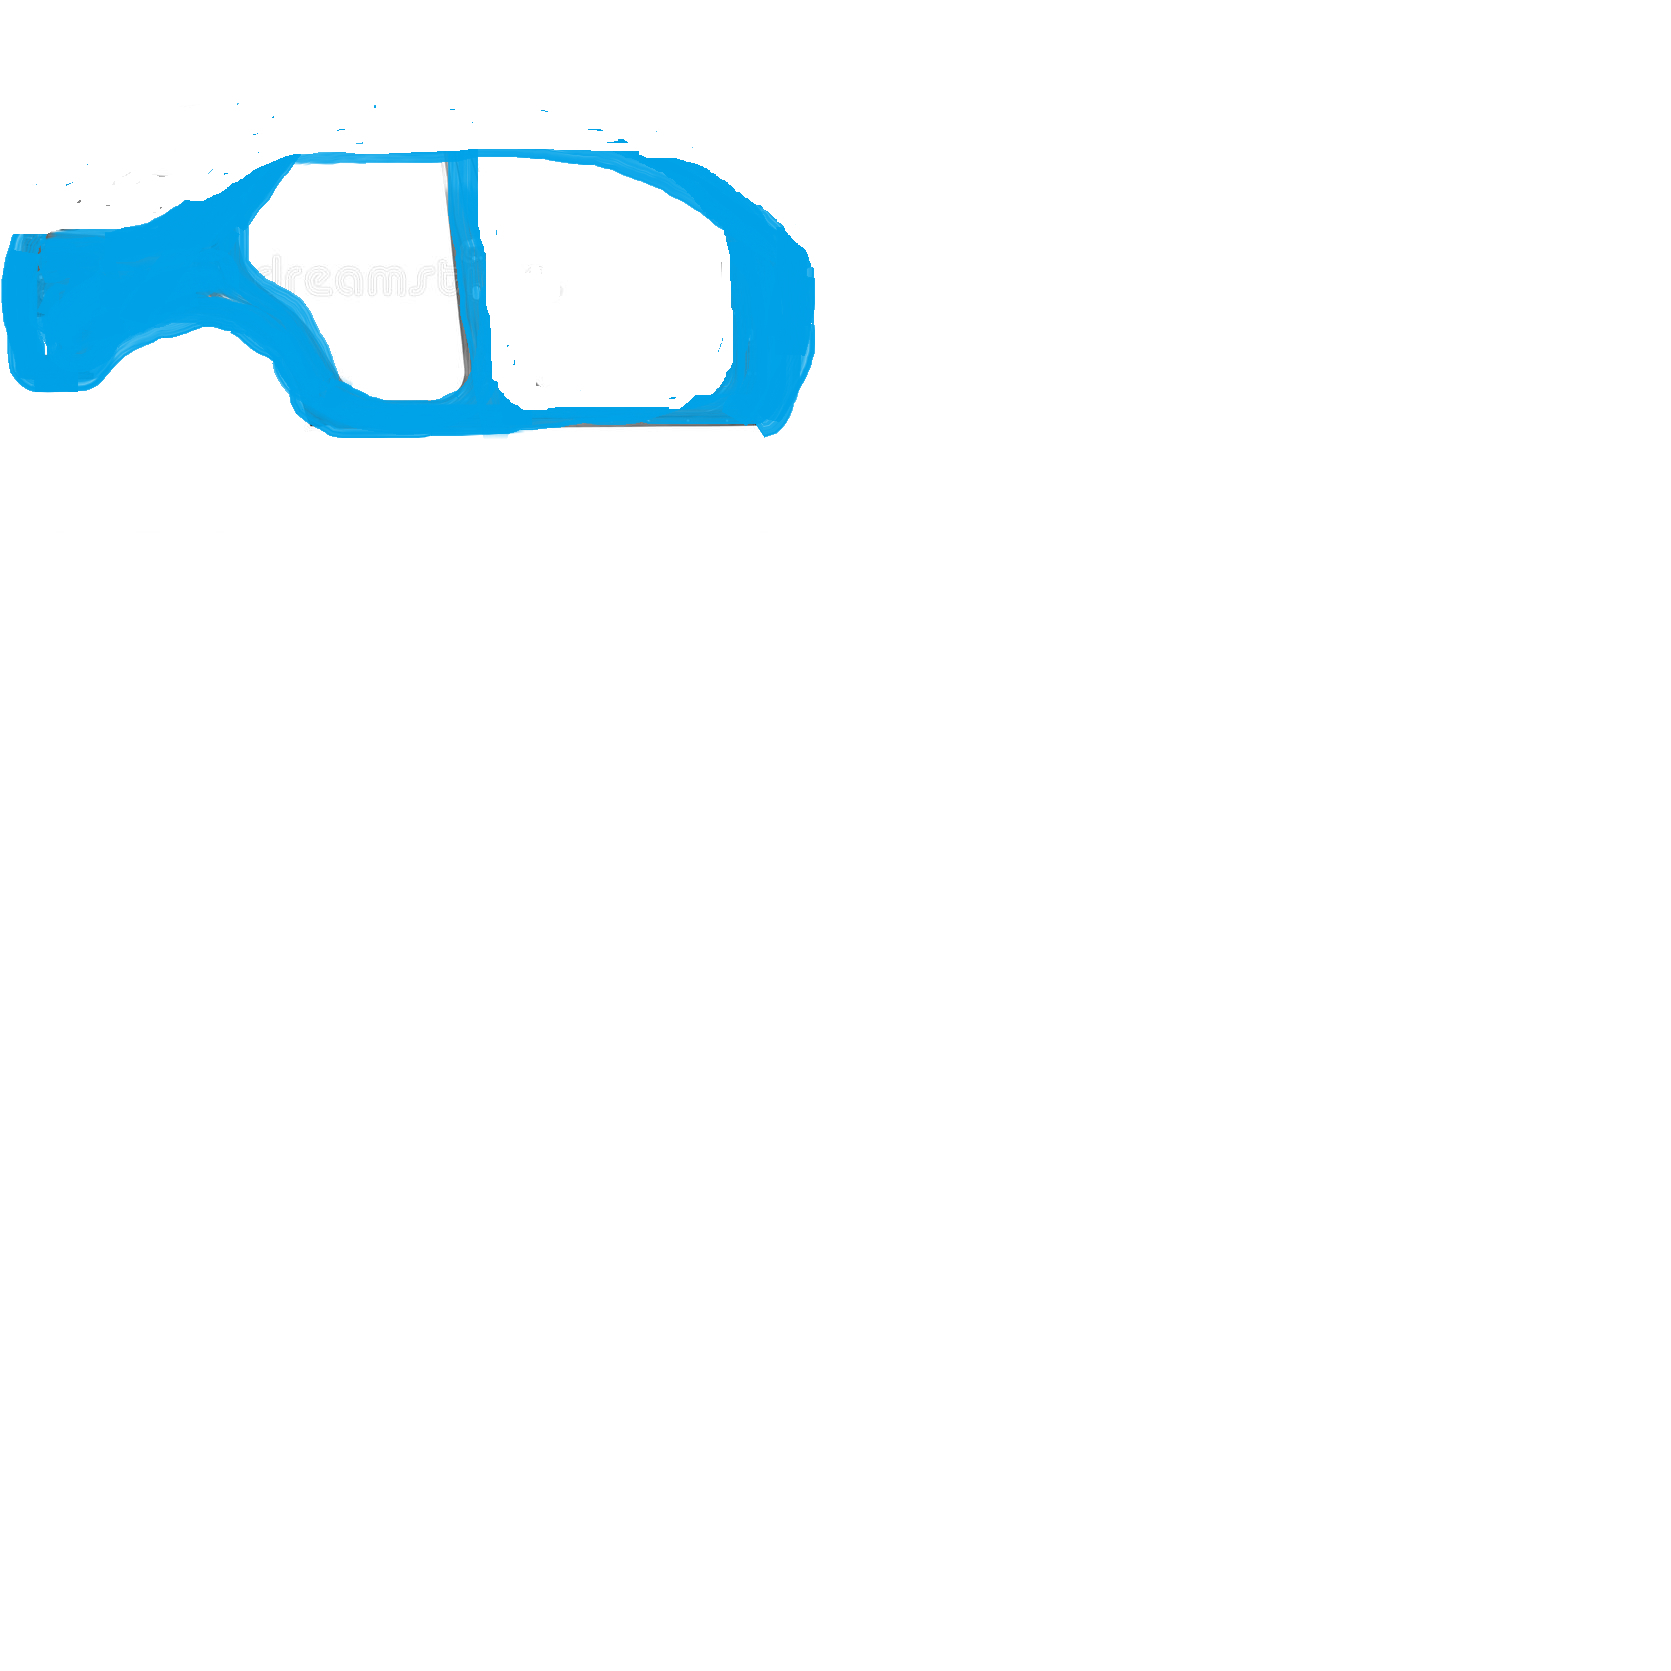
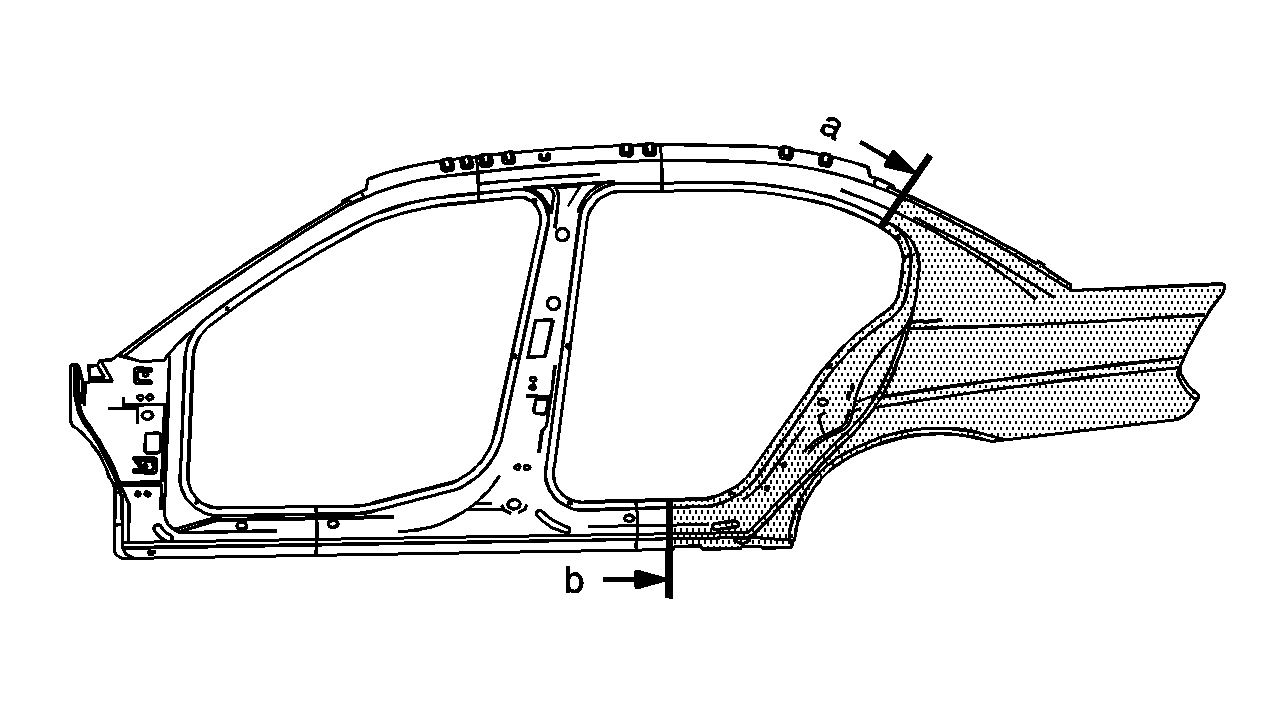
For instance this is the process for the rear quarter panel. It goes with the image below.

1. Fit the service panel to the vehicle to ensure a proper fit.
2. Measure and mark a line at the sail panel 120 mm ( 4 3/4 in ) from the back glass opening and 70 mm ( 2 3/4 in ) rearward from the rocker panel locating hole edge of the service panel.
3. Cut along the line to trim the service panel.
4. Fabricate a 50 mm ( 2 in ) backer plate so that the panel will fit behind the sectioning joint at the sail panel.
5. Fabricate a 100 mm ( 4 in ) backer plate for the rocker panel.
6. Drill 8 mm ( 5/16 in ) plug weld holes as necessary in the locations noted from the original panel.
7. Bevel the sail panel and service panel edges at the sectioned area to approximately 10 degrees.
8. Grind a 50 mm (2 in) area of the outer surface on the vehicle to remove any corrosion, E-coat, primers, coatings and galvanizing that may be present.
9. At the section area on the service panel, grind a 50 mm ( 2 in ) area of the back side to remove any corrosion, E-coat, primers, coatings and galvanizing that may be present.
10. Drill plug weld holes approximately 13 mm (1/2 in) from the edge of the cuts the sectioning areas of the service panel and the original panel.
11. Prepare all mating surfaces as necessary.
12. Apply GM-approved weld-thru coating or equivalent to all mating surfaces. Refer to Anti-Corrosion Treatment and Repair.
13. Position and clamp or screw the backer plate with half of the backer plate exposed at the sectioning joint.

Important:Leave a gap of 1 1/2 times the thickness of the metal at the sectioning joint to the original panel.

14. Position the service panel to overlap the backer plate and 1 1/2 times the thickness up to the original panel.
15. Check for proper fit and alignment to the vehicle. Clamp the panels together.
16. Plug weld the backer plate accordingly.
17. Stitch weld along the entire sectioning joint, make 25 mm (1 in) welds along the seam with 25 mm (1 in) gaps between them.
18. Complete the stitch weld.
19. Clean and prepare all welded surfaces of the entire sectioning joint.
20. Apply a lightweight body filler to the backer plate area.

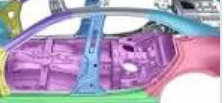
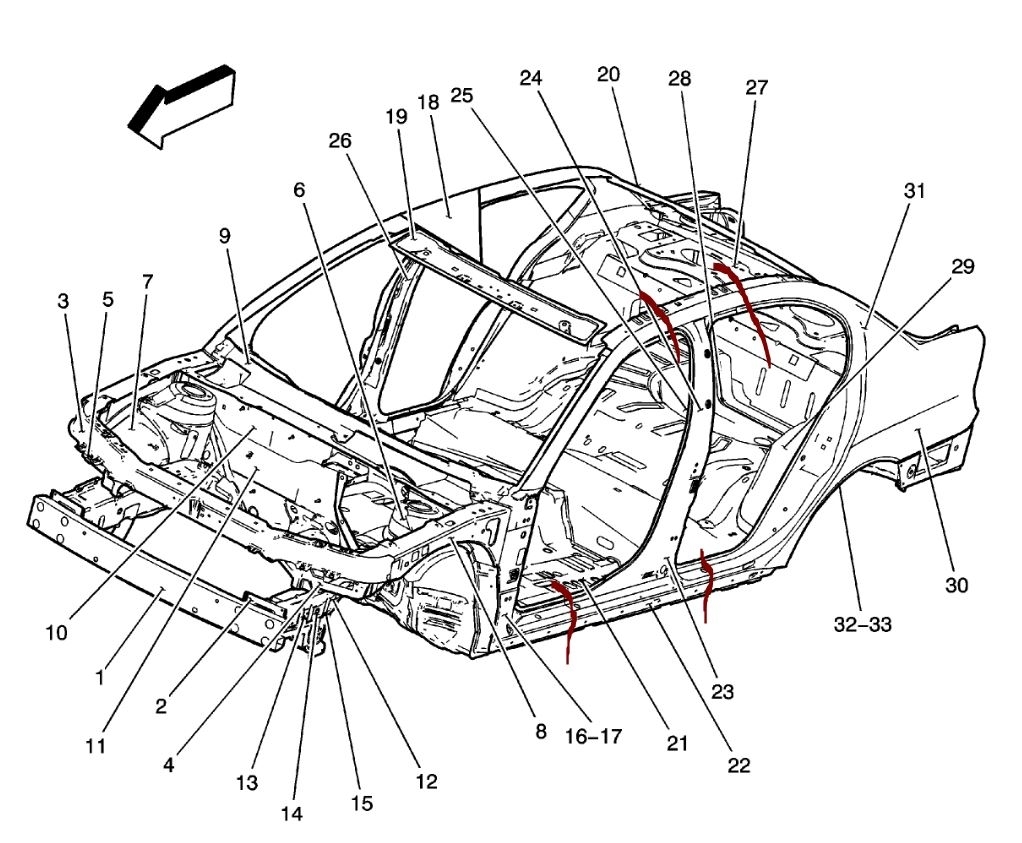
As for structural, all of the panels on a unit body vehicle contribute to the structures strength.
Was this
answer
helpful?
Yes
No
+1
Tuesday, May 5th, 2020 AT 11:21 PM
Tiny
JIMB2020
  • MEMBER
  • 106 POSTS
Okay, I think I am going to section and cut what I cannot repair into smaller pieces to make the task more manageable now that you have provided me with measurements. I will let you know how it's going.
Was this
answer
helpful?
Yes
No
Wednesday, May 6th, 2020 AT 5:04 AM
Tiny
ASEMASTER6371
  • MECHANIC
  • 52,797 POSTS
Keep us updated.

We are always glad to help.

Roy
Was this
answer
helpful?
Yes
No
+1
Wednesday, May 6th, 2020 AT 5:09 AM

Please login or register to post a reply.

Sponsored links