Transmission service required (alarm code is P0705)

Tiny
PETROYADA
  • MEMBER
  • 66 POSTS
Hi,
How to clean and test o2 sensor?
How to clean throttle and sensor for it?
How to clean and test MAF sensor?
Was this
answer
helpful?
Yes
No
Sunday, April 7th, 2019 AT 7:11 AM
Tiny
JACOBANDNICKOLAS
  • MECHANIC
  • 108,117 POSTS
Welcome back:

There really isn't anything as far as cleaning an o2 sensor, but you can test them Here is a link that explains how:

https://www.2carpros.com/articles/how-to-test-an-oxygen-sensor-02-sensor

As far as the MAF and throttle body service/cleaning, take a look through these links:

https://www.2carpros.com/articles/mass-air-flow-service

https://www.2carpros.com/articles/throttle-actuator-service

I hope this helps.

Take care,
Joe
Was this
answer
helpful?
Yes
No
Sunday, April 7th, 2019 AT 4:13 PM
Tiny
PETROYADA
  • MEMBER
  • 66 POSTS
Hi, what happen in this video?What problem?
Was this
answer
helpful?
Yes
No
Friday, April 19th, 2019 AT 10:03 PM
Tiny
PETROYADA
  • MEMBER
  • 66 POSTS
During driving, I sense shock.
Was this
answer
helpful?
Yes
No
Friday, April 19th, 2019 AT 10:05 PM
Tiny
JACOBANDNICKOLAS
  • MECHANIC
  • 108,117 POSTS
Welcome back:

You really need to have the transmission control module scanned to determine what is causing that to flash. My first guess is the range sensor, but it could also be a loose or corroded connector. However, my first suspect is the transmission range sensor.

Joe
Was this
answer
helpful?
Yes
No
Saturday, April 20th, 2019 AT 4:48 PM
Tiny
PETROYADA
  • MEMBER
  • 66 POSTS
Hi,
I have noise from front wheel, it seems front wheel bearing are dry. It needs to inject grease to housing. So could you please send to me exploded drawing related to front wheel bearing?
And I need part number for bearing type.
Thanks
Was this
answer
helpful?
Yes
No
Sunday, May 26th, 2019 AT 3:22 AM
Tiny
PETROYADA
  • MEMBER
  • 66 POSTS
VIN for my car as below:
4p3xtga2wee801499
Was this
answer
helpful?
Yes
No
Sunday, May 26th, 2019 AT 3:22 AM
Tiny
JACOBANDNICKOLAS
  • MECHANIC
  • 108,117 POSTS
Welcome back:

The front wheel bearing is a sealed bearing and not serviceable. When they go bad, they are replaced.

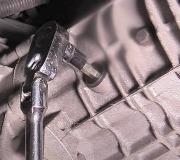
Here are the directions for replacement. The attached pics correlate with the directions.

_____________________
DISASSEMBLY AND ASSEMBLY

pic 1

pic 2

Required Special Tools:

- MB990326: Preload Socket
- MB990890: Rear Suspension Bushing Base
- MB990935: Installer Adapter
- MB990938: Installer Bar
- MB991000: Spacer
- MB991017: Front Hub Remover and Installer
- MB991355: Knuckle Arm Bridge
- MB991388: Bush Remover Base
- MB991576: Base
- MB992150: Oil Seal Installer
- MB992250: Knuckle Arm Bridge Attachment
- MD999528: Adapter
- MD998801: Remover
- MD998812: Installer Cap
- MD998813: Installer

DISASSEMBLY SERVICE POINTS
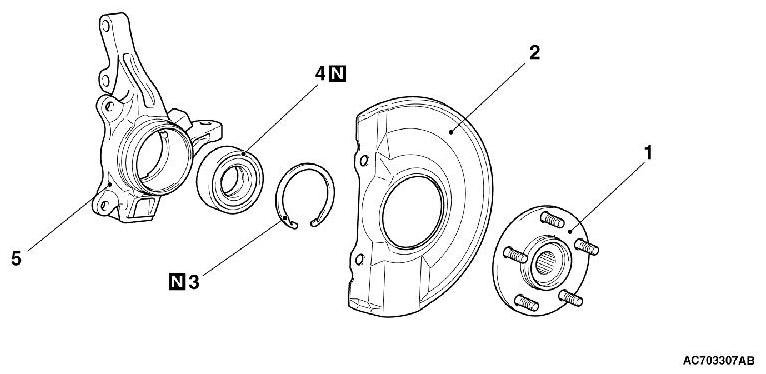
[[A]]
HUB REMOVAL

CAUTION:
In the hub removal operation, make sure to replace the wheel bearing with new one.
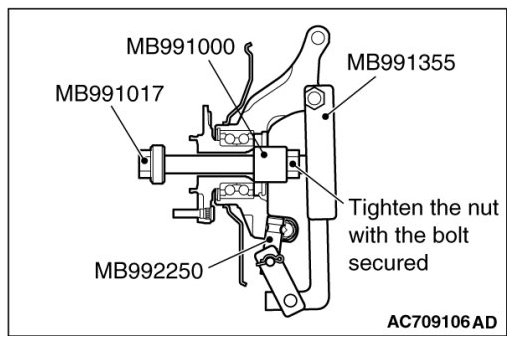
Pic 3

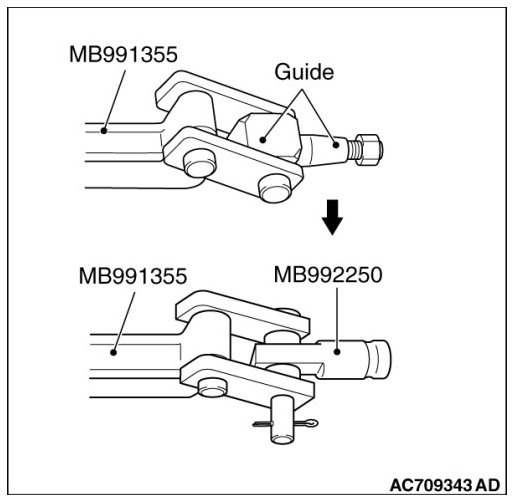
1. Replace special tool MB992250 with a guide of special MB991355 as shown in the figure.

Pic 4

2. Insert special tool MB992250 in the knuckle and tighten it with a bolt and nut.
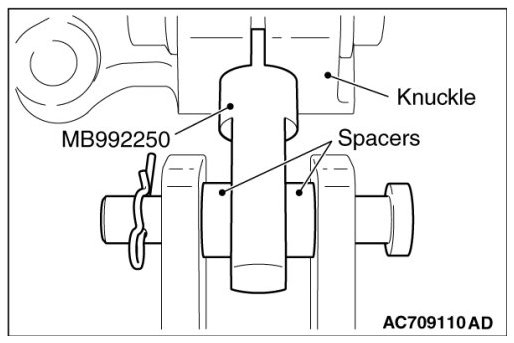
NOTE:
Set the spacers of special tool MB992250 as shown in the figure.

Pic 5

3. Use special tools MB991000, MB991017, MB991355 and MB992250 to remove the hub.

[[B]]
WHEEL BEARING REMOVAL
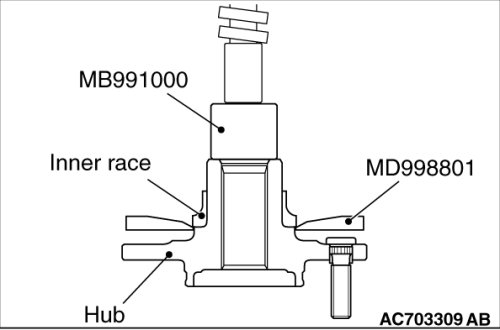
pic 6

1. Use special tools MD998801 and MB991000 to remove the wheel bearing inner race (outside) from the hub.
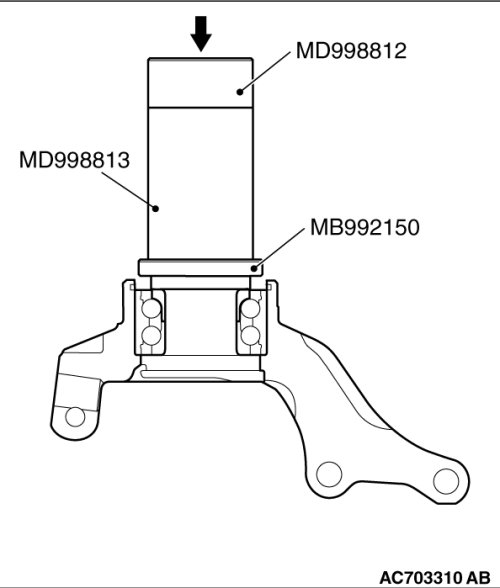
Pic 7

2. Use special tools MB992150, MD998812 and MD998813 to assemble the inner race (outside) removed from the hub to the wheel bearing.
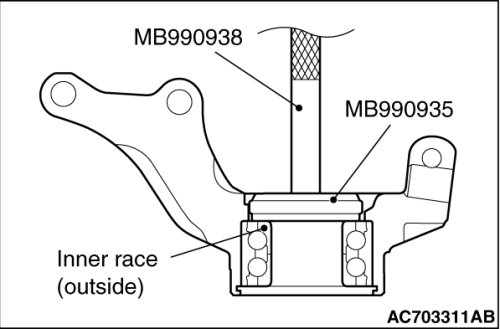
Pic 8

3. Use special tools MB990935 and MB990938 to remove the wheel bearing.

ASSEMBLY SERVICE POINTS

]]A[[
WHEEL BEARING INSTALLATION
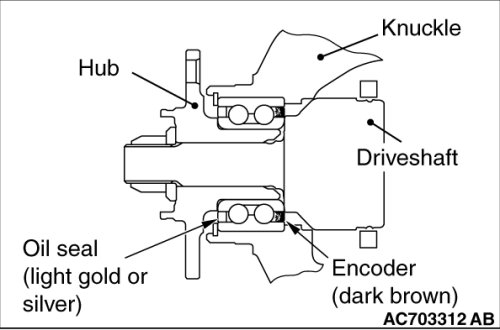
pic 9

CAUTION:

- The magnetic encoder for wheel speed sensor is installed in the wheel bearing. Install the wheel bearing so that the encoder is positioned in the direction shown in the figure.
- When press-fit the wheel bearing, push the outer race.
- After press-fit the wheel bearing, wipe off the extra grease in order not to remain on the magnetic encoder.

1. Remove grease and foreign material cleanly from the inside of knuckle bore.

Pic 10

2. Apply the specified grease thinly and evenly to the inside of knuckle as shown in the figure.
Specified grease: Dowcorning/Molykote BR2 Plus
Amount to use: as required 1.0 - 1.5 g (0.04 -0.05 ounce)
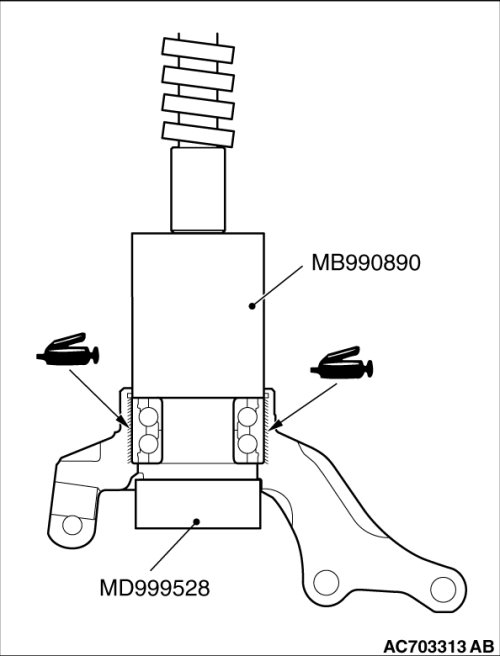
3. Use special tools MD999528 and MB990890 to press-fit the wheel bearing.
4. Remove excessive grease seeped out between knuckle and wheel bearing outer race after press-fitting the wheel bearing.

]]B[[
DUST SHIELD INSTALLATION
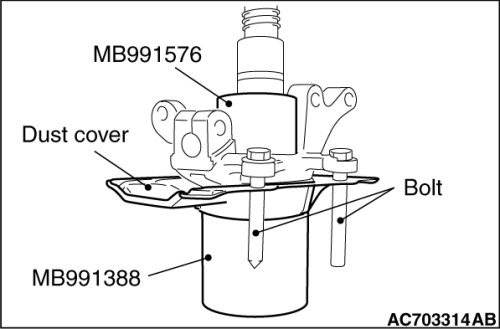
pic 11

Use special tools MB991388 and MB991576 to press-fit the knuckle into the dust shield.
NOTE:
Use the bolts (M12) to align the caliper mounting holes.

]]C[[
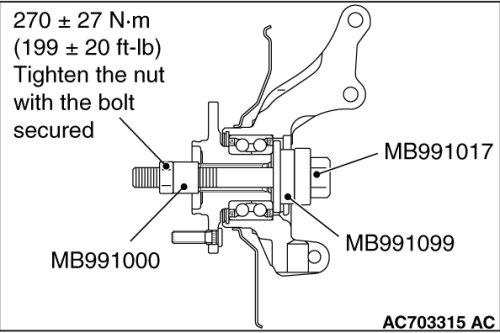
HUB ROTATION STARTING TORQUE CHECK

pic 12

1. Set special tools MB991000, MB991017 and MB991099 as shown in the figure, tighten the nut to the specified torque, and press-fit the hub into the knuckle.
Tightening torque: 270 ± 70 Nm (199 ± 20 ft-lb)
2. Rotate the hub to make the bearing well-greased.
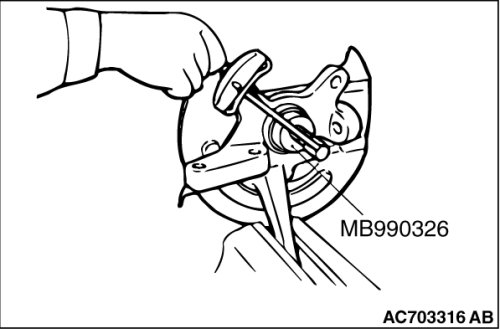
Pic 13

3. Use Special tool MB990326 to measure the hub rotation starting torque.
Limit: 1.5 Nm (13 in-lb)
4. Hub rotation starting torque should be within the limit value, and there should be no roughness and gritty feeling in rotation.

]]D[[
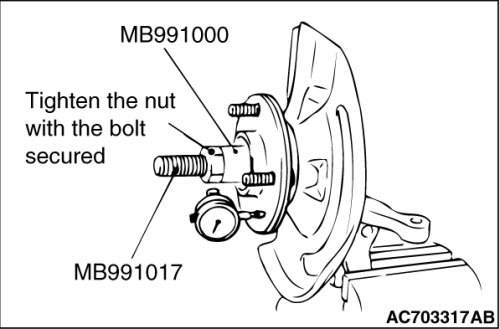
WHEEL BEARING END PLAY CHECK

pic 14

1. Use special tools MB991000 and MB991017 to measure to determine whether the wheel bearing end play is within the specified limit or not.
Limit: 0.05 mm(0.002 inch)
2. If the end play is not within the limit range while the nut is tightened to specified torque, the bearing, hub and/or knuckle have probably not been installed correctly.
Replace the bearing and re-install.
Tightening torque: 270 ± 70 Nm (199 ± 20 ft-lb)

________________________

Let me know if this helps.

Joe
Was this
answer
helpful?
Yes
No
+1
Sunday, May 26th, 2019 AT 5:30 PM
Tiny
PETROYADA
  • MEMBER
  • 66 POSTS
Hi,

One question.
Could you tell me how to connect new rear camera to DVD player?
Was this
answer
helpful?
Yes
No
Friday, August 23rd, 2019 AT 9:48 AM
Tiny
JACOBANDNICKOLAS
  • MECHANIC
  • 108,117 POSTS
Welcome back:

That is one I can't help with. The new camera should have come with the directions needed. All manufacturers are different, so I wouldn't know where to start. I hope you understand.

Joe
Was this
answer
helpful?
Yes
No
+1
Friday, August 23rd, 2019 AT 11:57 AM
Tiny
PETROYADA
  • MEMBER
  • 66 POSTS
Many thanks
Was this
answer
helpful?
Yes
No
Friday, August 23rd, 2019 AT 9:13 PM
Tiny
PETROYADA
  • MEMBER
  • 66 POSTS
Hi,
Could you tell me please how much I should be replaced CVT flush oil. How much oil should be refilled?
Also I needed procedure for this instruction.
Was this
answer
helpful?
Yes
No
Friday, August 23rd, 2019 AT 9:25 PM
Tiny
JACOBANDNICKOLAS
  • MECHANIC
  • 108,117 POSTS
Here are the directions for servicing the transmission. The directions include how much fluid is needed. The attached pics correlate with the directions.

______________

2014 Mitsubishi Truck Outlander AWD L4-2.4L (4J12)
Transmission Fluid Change
Vehicle Maintenance Fluids Fluid - CVT Service and Repair Procedures Transmission Fluid Change
TRANSMISSION FLUID CHANGE

pic 1

1. Remove the drain plug on the bottom of the transaxle case to drain the transmission fluid.
Draining amount: Approximately 5.5 dm3 (5.81 qt)
2. Install the drain plug with a new gasket to the transaxle case, and tighten it to the specified torque.
Tightening torque: 34 ± 2 Nm (25 ± 1 ft-lb)
3.
CAUTION:
If the transaxle case becomes full before filling 5.5 dm3 (5.81 qt) of transmission fluid, stop filling the transmission fluid.

Fill in the new transmission fluid through the oil filler tube.
Filling amount: Approximately 5.5 dm3 (5.81 qt)
Transmission fluid: Mitsubishi Motors Genuine CVTF-J4
4. Start up the engine and let it idle for 1 to 2 minutes.
5. Move the selector lever to every position, and then move it to the P or N range.
6. Stop the engine and perform the above steps 1 to 5 again.
7. Stop the engine, and discharge a small amount of transmission fluid to check for fouling. If fouling is found, repeat steps 1 to 5 until clean transmission fluid comes out.

Pic 2

8.

Pic 3

9. Drive the vehicle until the transmission fluid is warmed up to the normal operating temperature 70 - 80°C (158 - 176°F), and check the transmission fluid level. It must be within the "H" area on the oil level gauge.
NOTE:
The "C" level is for reference only. Use the "H" level as the criteria.

NOTE:
Use scan tool (M.U.T.-III) to measure the transmission fluid temperature.

NOTE:
When a certain amount of time is required to warm up the transmission fluid to the normal operating temperature 70 - 80°C (158 - 176°F), check the oil level referring to the characteristics chart.

10. Adjust the transmission fluid level to the specified level. Refill the transmission fluid when the fluid level is low, and drain the transmission fluid through the drain plug when the fluid level is high.
11. Securely insert the oil level gauge into the oil filler tube.
12. TCM records the deterioration level of the transmission fluid. After replacing the transmission fluid with new one, use scan tool (M.U.T.-III) to reset the deterioration level recorded in TCM.

__________________

Here is the fluid type.

2014 Mitsubishi Truck Outlander AWD L4-2.4L (4J12)
Fluid Types
Vehicle Maintenance Fluids Fluid - CVT Specifications Fluid Types
FLUID TYPES
CVT Fluid

Type. Mitsubishi Motors Genuine CVTF-J4

______________________________________________________________________________________
Hope this helps.

Take care,
Joe
Was this
answer
helpful?
Yes
No
Friday, August 23rd, 2019 AT 10:06 PM
Tiny
PETROYADA
  • MEMBER
  • 66 POSTS
Many thanks,

But I have asx or Outlander sport Mitsubishi model.
Could you checked the VIN for my car as below?
4p3xtga2wee801499
Was this
answer
helpful?
Yes
No
Saturday, August 24th, 2019 AT 12:15 AM
Tiny
PETROYADA
  • MEMBER
  • 66 POSTS
Also;
where do we find out that the time has come to replace the CVT oil?
Was this
answer
helpful?
Yes
No
Saturday, August 24th, 2019 AT 12:20 AM
Tiny
JACOBANDNICKOLAS
  • MECHANIC
  • 108,117 POSTS
I'm not sure what you needed or why you provided the VIN. As far as labor is involved with servicing the CVT, see the attached picture.

A maintenance schedule should be in the vehicle owner's manual.

Let me know if that helps.

Joe
Was this
answer
helpful?
Yes
No
+1
Saturday, August 24th, 2019 AT 7:04 PM
Tiny
PETROYADA
  • MEMBER
  • 66 POSTS
Hi,

Today in the road the AC cooler was off (over load maybe)and after disconnect battery clamp (+, - leads) and reconnect it, was rectified, but this problem was appeared again.
Could you tell me what happen?
I need electrical drawing for A/C cooler.
Thanks and regards
Was this
answer
helpful?
Yes
No
Tuesday, September 3rd, 2019 AT 9:30 AM
Tiny
JACOBANDNICKOLAS
  • MECHANIC
  • 108,117 POSTS
Welcome back:

I hate to ask this, but I need you to start a new thread related to the AC wiring questions. We are trying to keep the threads specific to one topic so they are more helpful to others.

I hope you understand.

Take care,
Joe
Was this
answer
helpful?
Yes
No
Tuesday, September 3rd, 2019 AT 8:18 PM
Tiny
RENEE L
  • ADMIN
  • 1,257 POSTS
Hello PETROYADA,

Here is the link for you to post your new question:

https://www.2carpros.com/questions/new

Make sure you are logged into the site before clicking on the link.

Thank you for using 2CarPros.

Renee
Admin
Was this
answer
helpful?
Yes
No
Wednesday, September 4th, 2019 AT 3:30 PM

Please login or register to post a reply.

Sponsored links