Hi,
This isn't a simple one simply because there is no dipstick. What needs done is the engine needs to be running, on a flat surface, and at operating temp. Then there is a check plug that is removed from the side of the transmission. When removed (engine running) ATF should slightly trickle out. If it does, it's full. If it doesn't, then you need to add fluid through the fill plug at the top of the trans until it begins coming out slowly from the check plug.
______________________________________
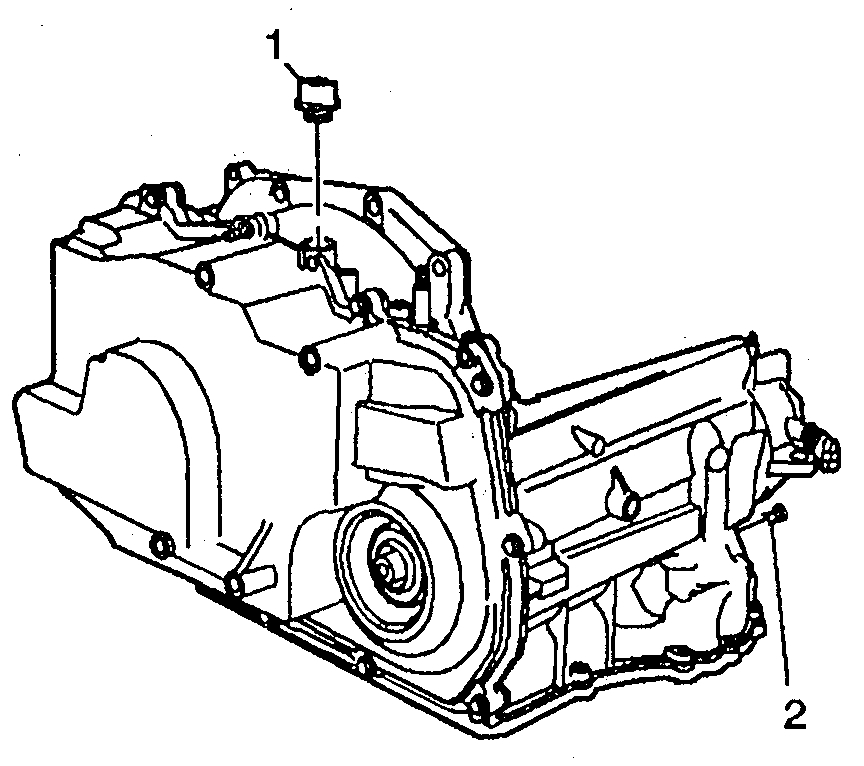
Here are the manufacturer's directions specific to your vehicle. The attached pic correlates with the directions, showing plug locations.
______________________________________
1997 Chevrolet Malibu L4-144 2.4L DOHC VIN T SFI
Fluid Level Service Procedure
Vehicle Maintenance Fluids Fluid - A/T Testing and Inspection Component Tests and General Diagnostics 4T40-E Automatic Transaxle Fluid Level Service Procedure
FLUID LEVEL SERVICE PROCEDURE
pic 1
You will use the fluid level screw (2) for diagnosing a transmission fluid leak or for resetting the transmission fluid level after service that involves a loss of fluid.
Fluid Level Diagnosis Procedure Check the fluid level when the transmission is above 40° C (104° F). This temperature can be reached by performing the following procedure:
1. Park the vehicle on a hoist, inspection pit, or similar raised level surface. The vehicle must be level to obtain a correct fluid level measurement.
2. Place a fluid container below the fluid level screw (2).
3. Start the engine and allow the engine to idle for approximately 5 minutes, or, if possible, drive the vehicle for a few miles to warm the transmission fluid.
4. Depress the brake pedal and move the shift lever through the gear ranges, pausing a few seconds in each range. Return the shift lever to the Park position.
5. Remove the fluid level screw (2). Because the transmission operates correctly over a range of fluid levels, fluid may or may not drain out of the screw hole when the screw is removed.
CAUTION: Do not remove the fluid level screw if the transmission fluid is hot this may cause injury if the fluid drains from the screw hole.
- If fluid drains through the screw hole, the transmission may have been overfilled. When the fluid stops draining, the fluid level is correct. Install the fluid level screw (2) and torque to the proper specification (12 Nm).
- If fluid does not drain through the screw hole (2), the transmission fluid level may be low. Add fluid through the fill cap (1) hole in 0.5-liter increments, up to 1.5 liters maximum, until fluid drains through the screw hole. If fluid drains through the screw hole, the fluid level was in the correct operating range. Allow the fluid to finish draining through the screw hole and install the fluid level screw. Torque the fluid level screw to the proper specification (12 Nm).
- If fluid does not drain through the screw hold after adding a total of 1.5 liters, then the transmission was either underfilled or the transmission is leaking fluid. Inspect the transmission for fluid leaks. Fix any leaks before setting the transmission fluid level.
6. When the fluid level checking procedure is completed, wipe any fluid from the transmission case with a rag or shop towel. also, check, that the fluid fill cap (1) and the vent tube are properly installed.
______________________________________________________________________
I hope this helps. Let me know if you have other questions.
Take care,
Joe
May 26, 2020 at 9:14 AM