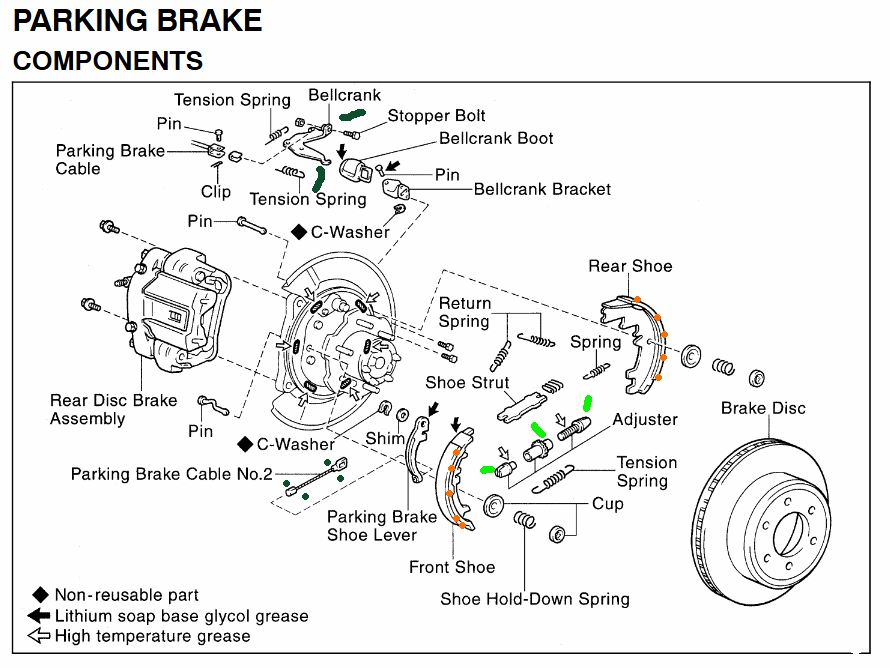
PARKING BRAKE SHOE CLEARANCE
1. Disconnect parking brake cable from bellcrank.
2. Remove bellcrank spring.
3. Loosen bellcrank adjusting bolt.
4. Temporarily install 3 lug nuts.
5. Remove access plug.
6. Turn adjuster and expand shoes until disc locks. See Fig 1.
7. Back off adjuster 8 notches.
8. Install access plug.
9. Pull bellcrank until all play in interior linkage is taken up.
10. Screw in bellcrank adjusting bolt until it touches on dust seal. See Fig 2.
11. Loosen bellcrank adjusting bolt one turn, and lock with lock nut. Tighten to specification.
12. Install bellcrank spring. Connect parking brake cable. Remove lug nuts.
13. Seat parking brake shoes and disc.
14. Recheck and adjust parking brake lever travel. See PARKING BRAKE LEVER
PARKING BRAKE LEVER [ DISC BRAKES : ADJUSTMENTS ]
0. Pull parking brake lever all the way up and count the number of clicks which should be 4-6. If incorrect, adjust parking brake.
0. Adjust rear brake shoe clearance. See PARKING BRAKE SHOE CLEARANCE .
0. Remove parking brake lever hole cover. Loosen lock nut and turn adjusting nut until lever travel is correct.
0. Tighten lock nut to specification. See TORQUE SPECIFICATIONS .
0. Install parking brake lever hole cover.
PARKING BRAKE LEVER [ DISC BRAKES : ADJUSTMENTS ]
NOTE: Before adjusting parking brake, make sure that rear brake shoe clearance has been adjusted. See PARKING BRAKE SHOE CLEARANCE .
0. Pull parking brake lever up as far as possible and count number of clicks. There should only be 4-6 clicks. If incorrect, continue procedure.
0. Ensure rear brake shoe clearance has been adjusted. See PARKING BRAKE SHOE CLEARANCE .
0. Loosen lock nut and turn buckle until lever travel is correct. See Fig 1.
0. Tighten lock nut to specification
Thank you for using 2carpros
Images (Click to make bigger)
Wednesday, April 14th, 2021 AT 2:18 PM
(Merged)