Hi,
Here are the directions for timing belt replacement. The timing marks and specifications are included in the directions. The pics correlate with the directions.
_____________________________
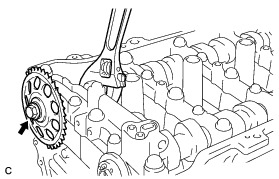
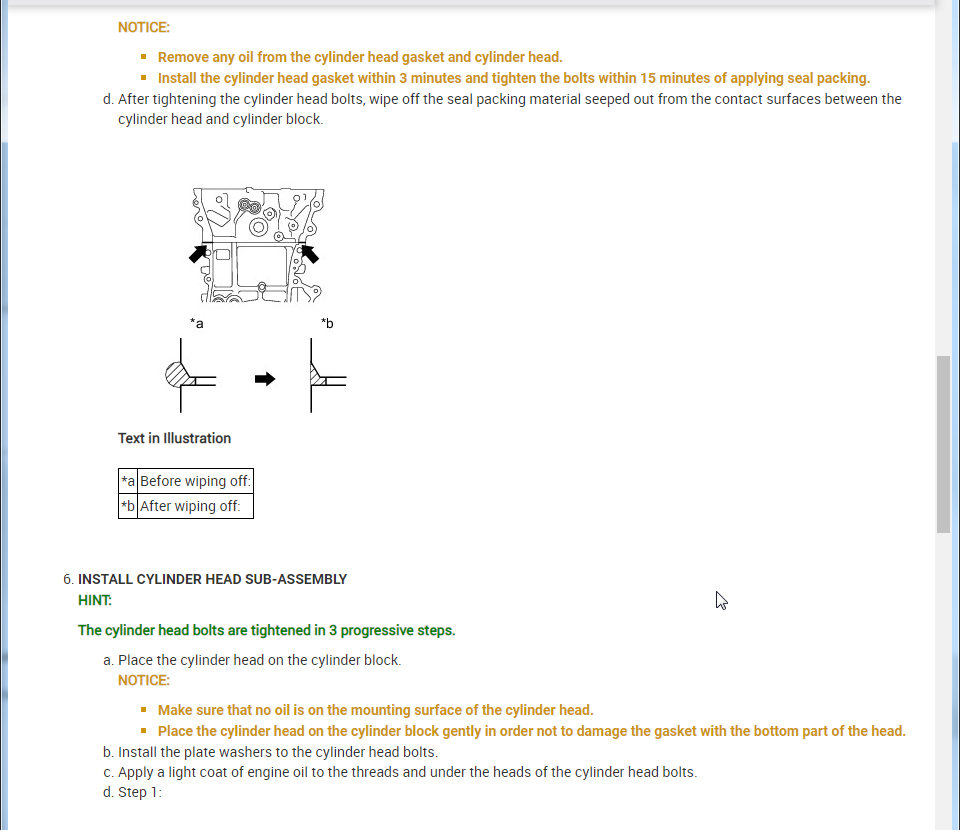
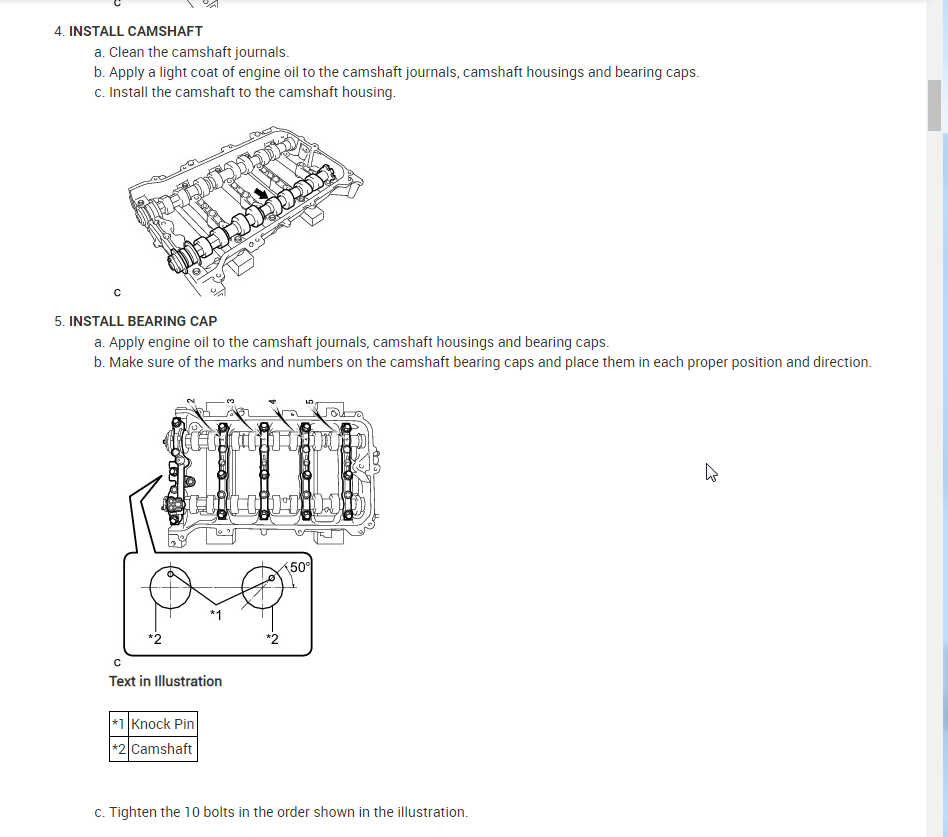
INSTALL CAMSHAFT TIMING SPROCKET
Tighten the flange bolt with the camshaft timing sprocket secured in place.
pic 1
Torque : 54 Nm (551 kgf-cm, 40 ft-lbf)
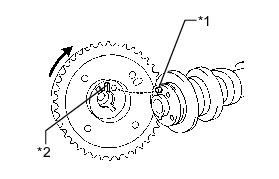
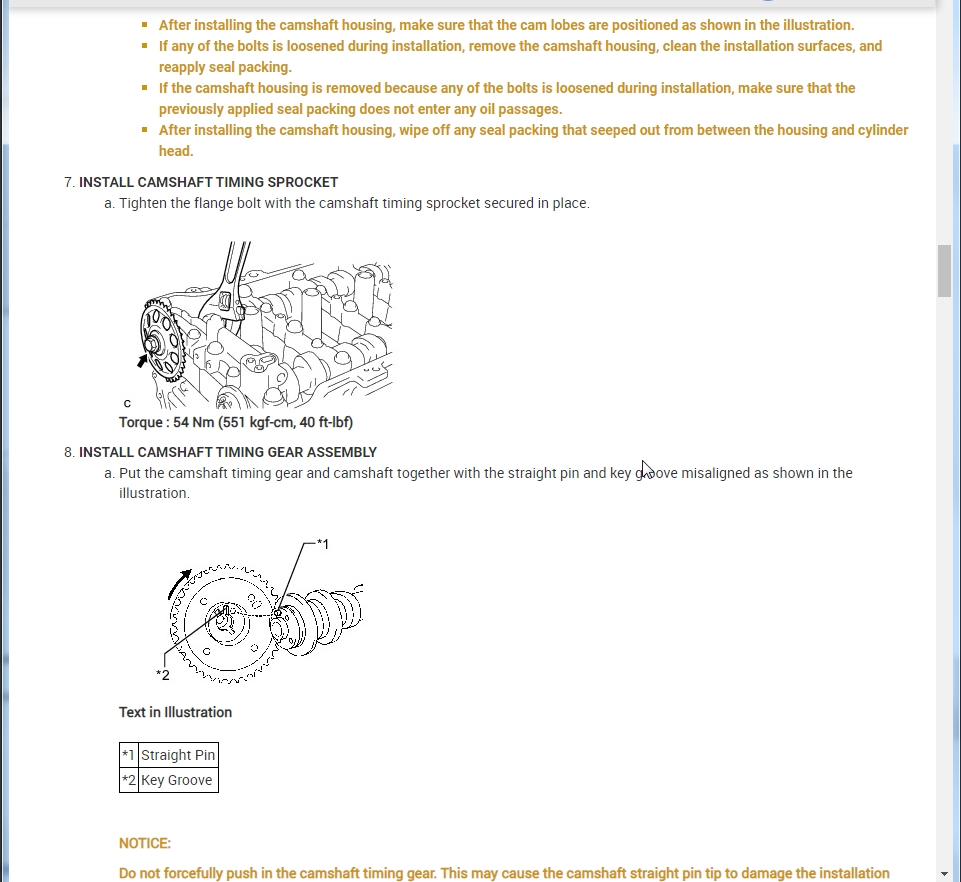
INSTALL CAMSHAFT TIMING GEAR ASSEMBLY
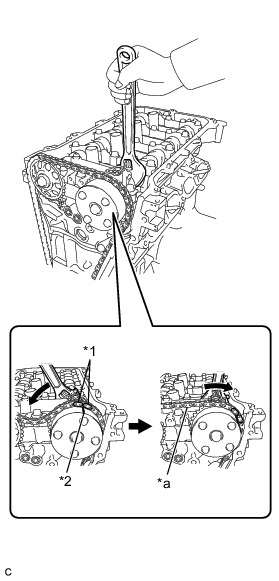
Put the camshaft timing gear and camshaft together with the straight pin and key groove misaligned as shown in the illustration.
pic 2
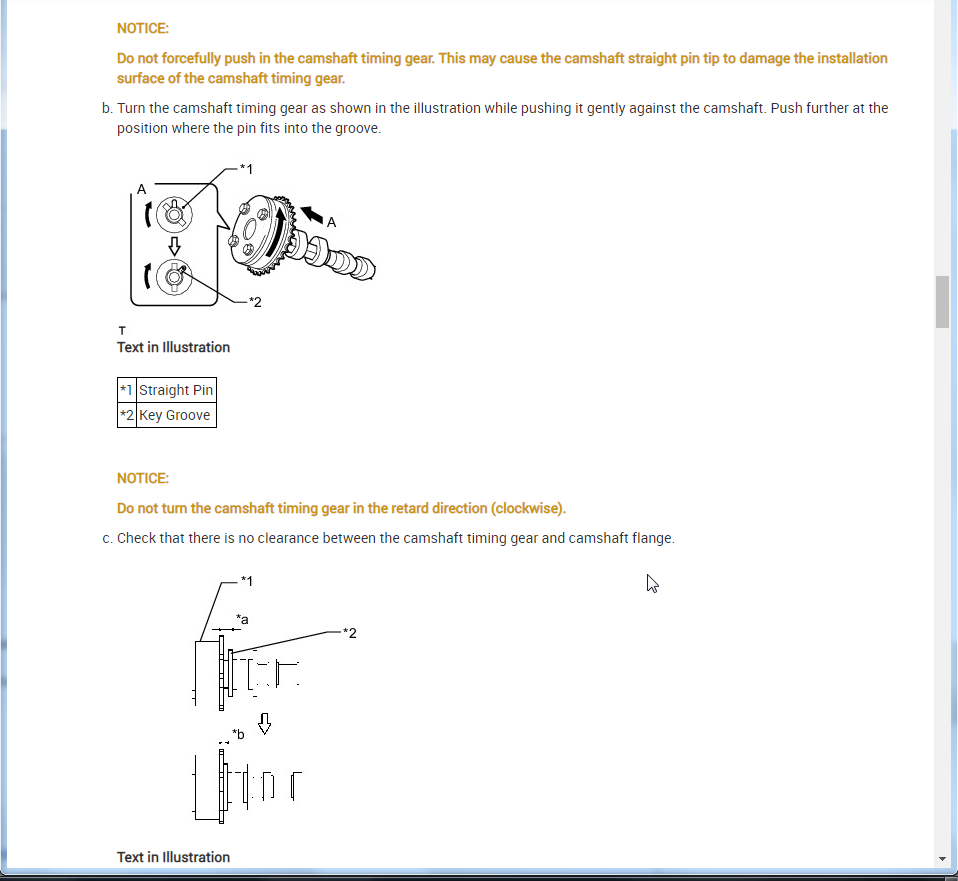
NOTICE:
Do not forcefully push in the camshaft timing gear. This may cause the camshaft straight pin tip to damage the installation surface of the camshaft timing gear.
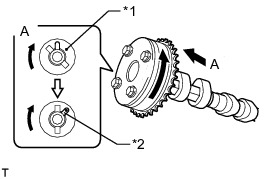
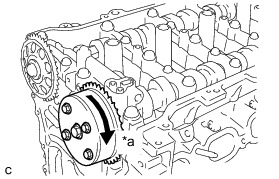
Turn the camshaft timing gear as shown in the illustration while pushing it gently against the camshaft. Push further at the position where the pin fits into the groove.
pic 3
Text in Illustration
NOTICE:
Do not turn the camshaft timing gear in the retard direction (clockwise).
Check that there is no clearance between the camshaft timing gear and camshaft flange.
pic 4
*1 Camshaft Timing Gear
*2 Flange
*a Clearance
*b No Clearance
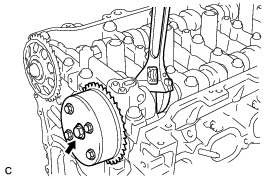
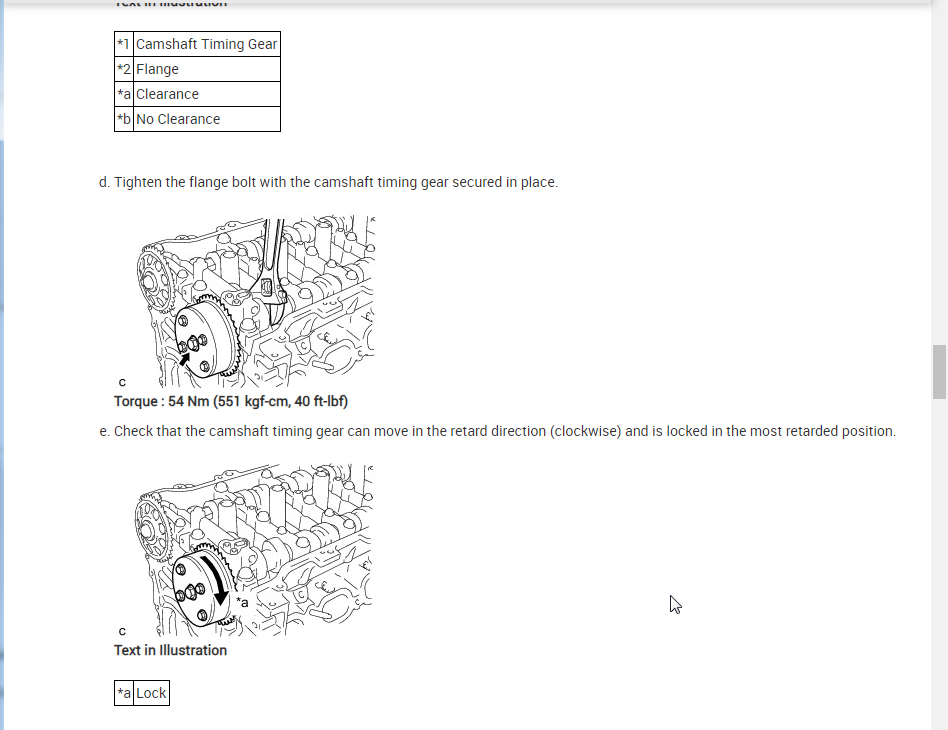
Tighten the flange bolt with the camshaft timing gear secured in place.
pic 5
Torque : 54 Nm (551 kgf-cm, 40 ft-lbf)
Check that the camshaft timing gear can move in the retard direction (clockwise) and is locked in the most retarded position.
pic 6
Text in Illustration
*a Lock
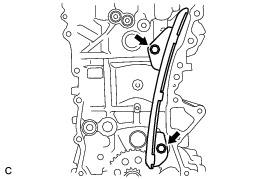
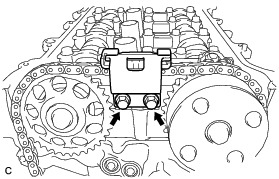
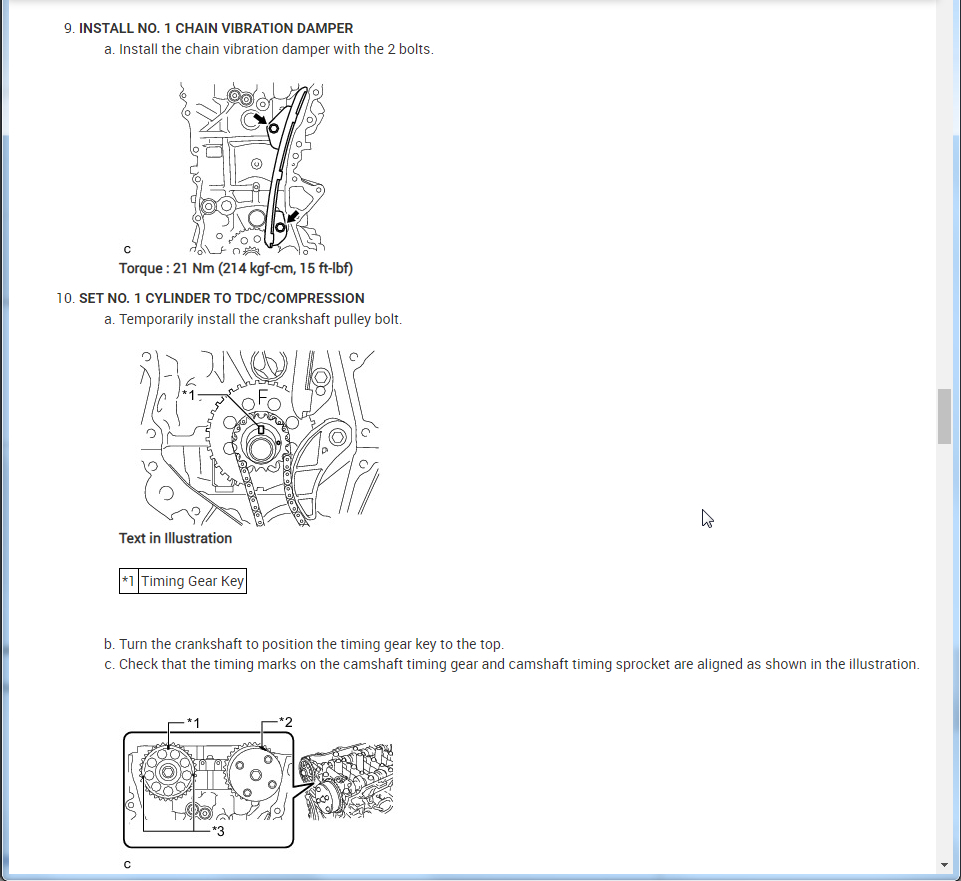
INSTALL NO. 1 CHAIN VIBRATION DAMPER
Install the chain vibration damper with the 2 bolts.
image
Torque : 21 Nm (214 kgf-cm, 15 ft-lbf)
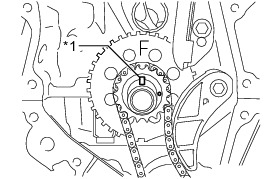
SET NO. 1 CYLINDER TO TDC/COMPRESSION
Temporarily install the crankshaft pulley bolt.
pic 7
*1 Timing Gear Key
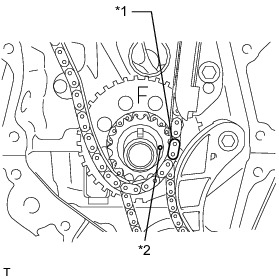
Turn the crankshaft to position the timing gear key to the top.
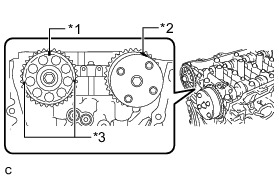
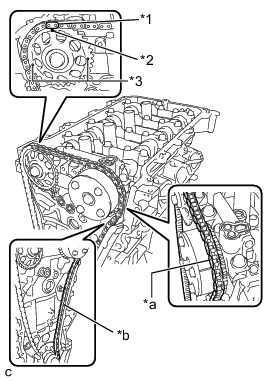
Check that the timing marks on the camshaft timing gear and camshaft timing sprocket are aligned as shown in the illustration.
pic 8
*1 Timing Mark (Rectangle)
*2 Timing Mark
*3 Mark (Circle)
HINT:
There are 3 marks on the camshaft timing sprocket. Make sure that the timing mark (rectangle) is at the top.
Remove the crankshaft pulley bolt.
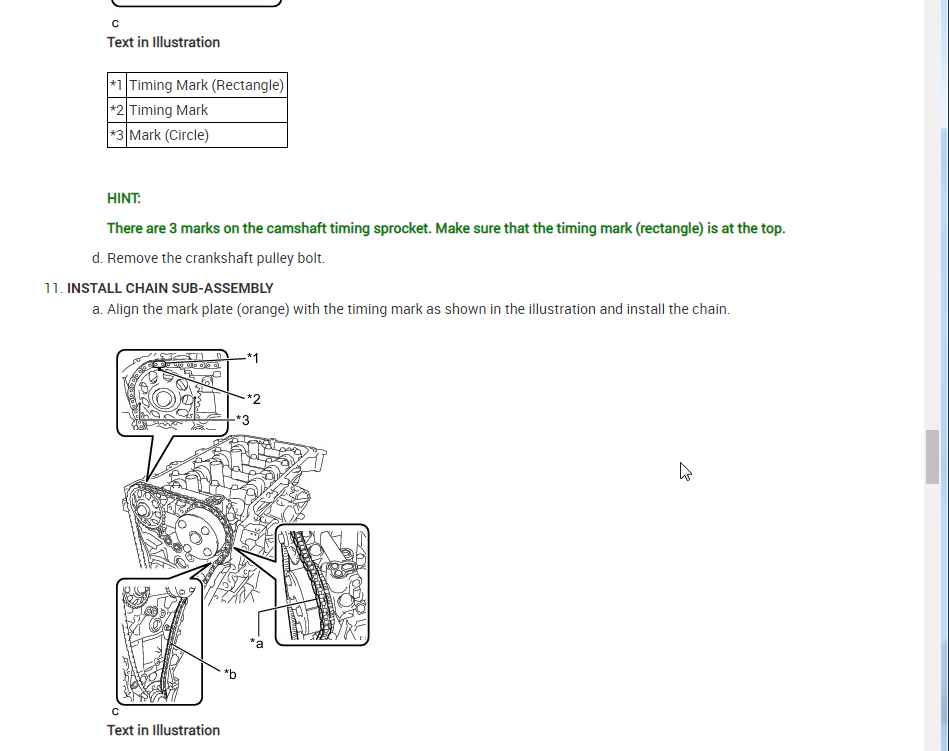
INSTALL CHAIN SUB-ASSEMBLY
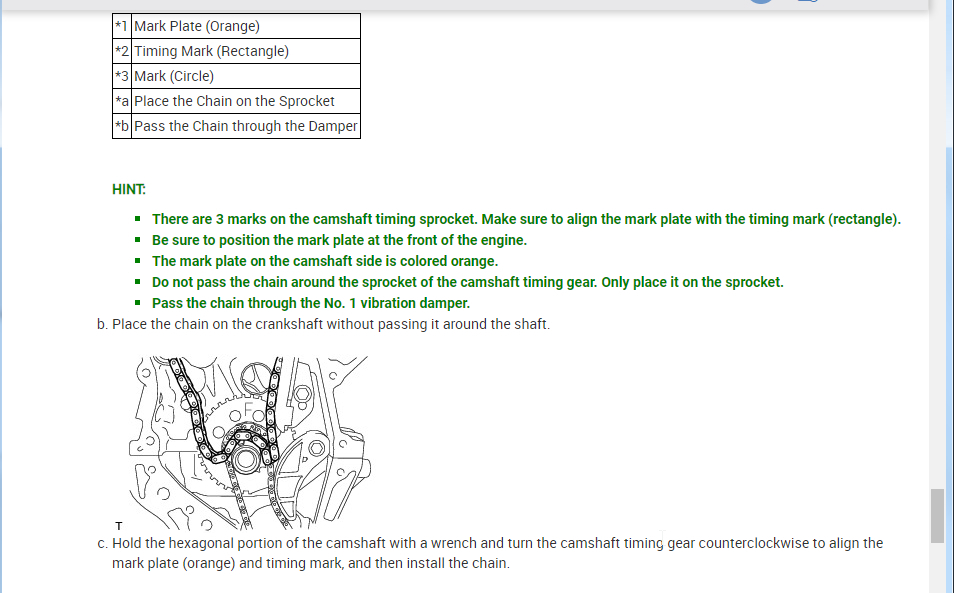
Align the mark plate (orange) with the timing mark as shown in the illustration and install the chain.
pic 9
*1 Mark Plate (Orange)
*2 Timing Mark (Rectangle)
*3 Mark (Circle)
*a Place the Chain on the Sprocket
*b Pass the Chain through the Damper
HINT:
There are 3 marks on the camshaft timing sprocket. Make sure to align the mark plate with the timing mark (rectangle).
Be sure to position the mark plate at the front of the engine.
The mark plate on the camshaft side is colored orange.
Do not pass the chain around the sprocket of the camshaft timing gear. Only place it on the sprocket.
Pass the chain through the No. 1 vibration damper.
Place the chain on the crankshaft without passing it around the shaft.
pic 10
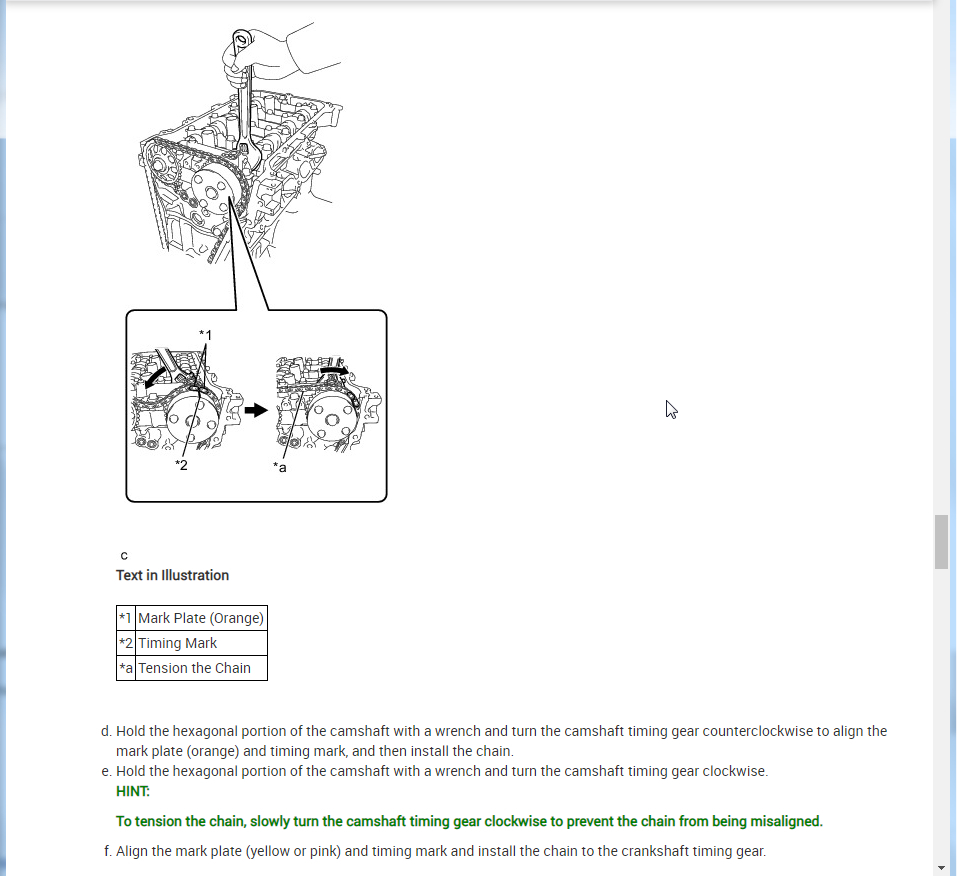
Hold the hexagonal portion of the camshaft with a wrench and turn the camshaft timing gear counterclockwise to align the mark plate (orange) and timing mark, and then install the chain.
pic 11
*1 Mark Plate (Orange)
*2 Timing Mark
*a Tension the Chain
Hold the hexagonal portion of the camshaft with a wrench and turn the camshaft timing gear counterclockwise to align the mark plate (orange) and timing mark, and then install the chain.
Hold the hexagonal portion of the camshaft with a wrench and turn the camshaft timing gear clockwise.
HINT:
To tension the chain, slowly turn the camshaft timing gear clockwise to prevent the chain from being misaligned.
Align the mark plate (yellow or pink) and timing mark and install the chain to the crankshaft timing gear.
pic 12
*1 Mark Plate (Yellow or Pink)
*2 Timing Mark
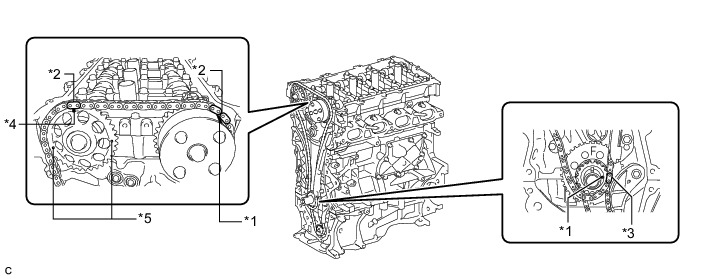
CHECK NO. 1 CYLINDER TO TDC/COMPRESSION
Check each timing mark at TDC/compression.
pic 13
*1 Timing Mark *2 Mark Plate (Orange)
*3 Mark Plate (Yellow or Pink) *4 Timing Mark (Rectangle)
*5 Mark (Circle) - -
HINT:
There are 3 marks on the camshaft timing sprocket. Make sure that the timing mark (rectangle) is at the top.
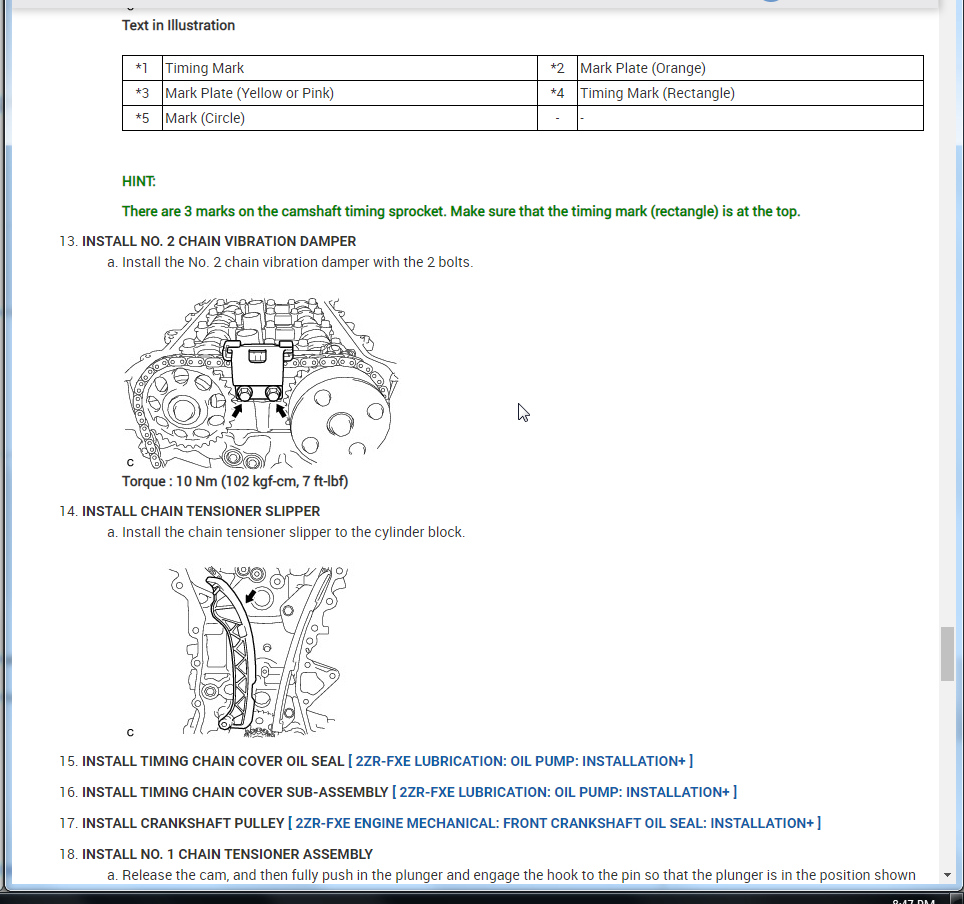
INSTALL NO. 2 CHAIN VIBRATION DAMPER
Install the No. 2 chain vibration damper with the 2 bolts.
pic 14
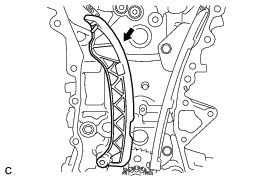
INSTALL CHAIN TENSIONER SLIPPER
Install the chain tensioner slipper to the cylinder block.
pic 15
INSTALL TIMING CHAIN COVER OIL SEAL [ 2ZR-FXE LUBRICATION: OIL PUMP: INSTALLATION+ ]
INSTALL TIMING CHAIN COVER SUB-ASSEMBLY [ 2ZR-FXE LUBRICATION: OIL PUMP: INSTALLATION+ ]
INSTALL CRANKSHAFT PULLEY [ 2ZR-FXE ENGINE MECHANICAL: FRONT CRANKSHAFT OIL SEAL: INSTALLATION+ ]
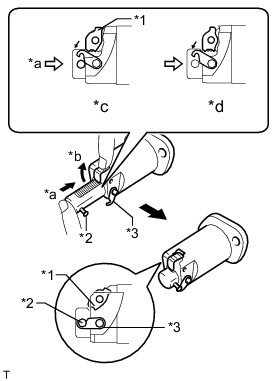
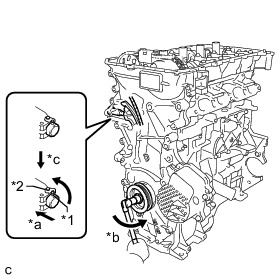
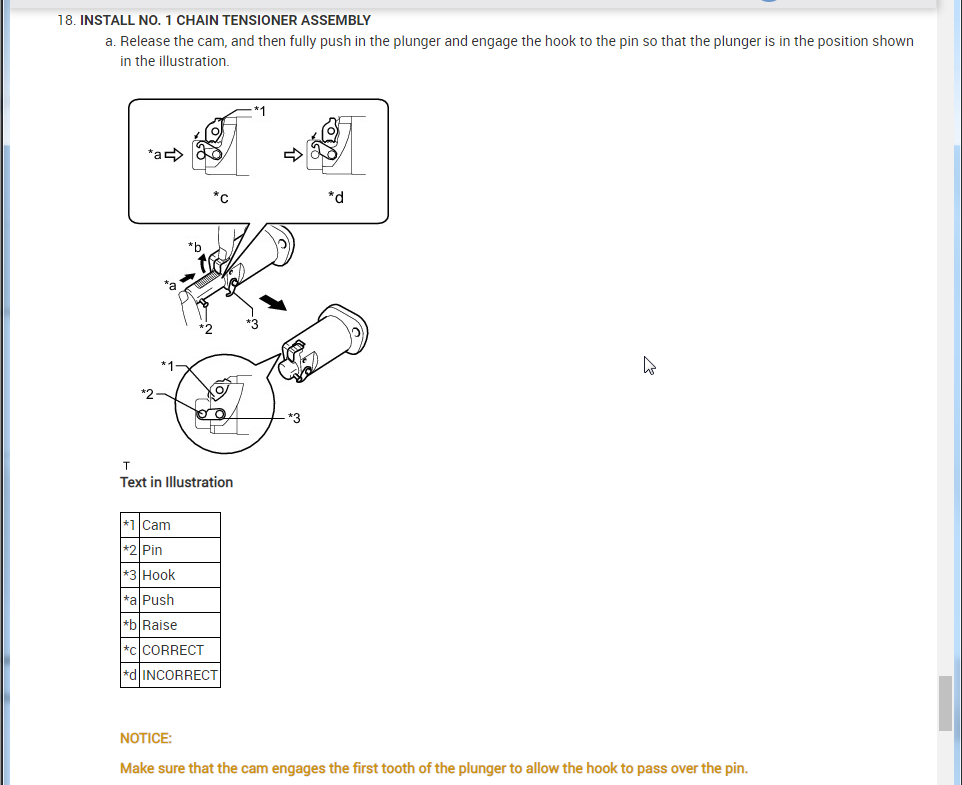
INSTALL NO. 1 CHAIN TENSIONER ASSEMBLY
Release the cam, and then fully push in the plunger and engage the hook to the pin so that the plunger is in the position shown in the illustration.
pic 16
*1 Cam
*2 Pin
*3 Hook
*a Push
*b Raise
*c CORRECT
*d INCORRECT
NOTICE:
Make sure that the cam engages the first tooth of the plunger to allow the hook to pass over the pin.
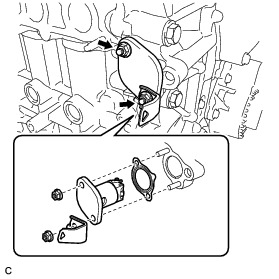
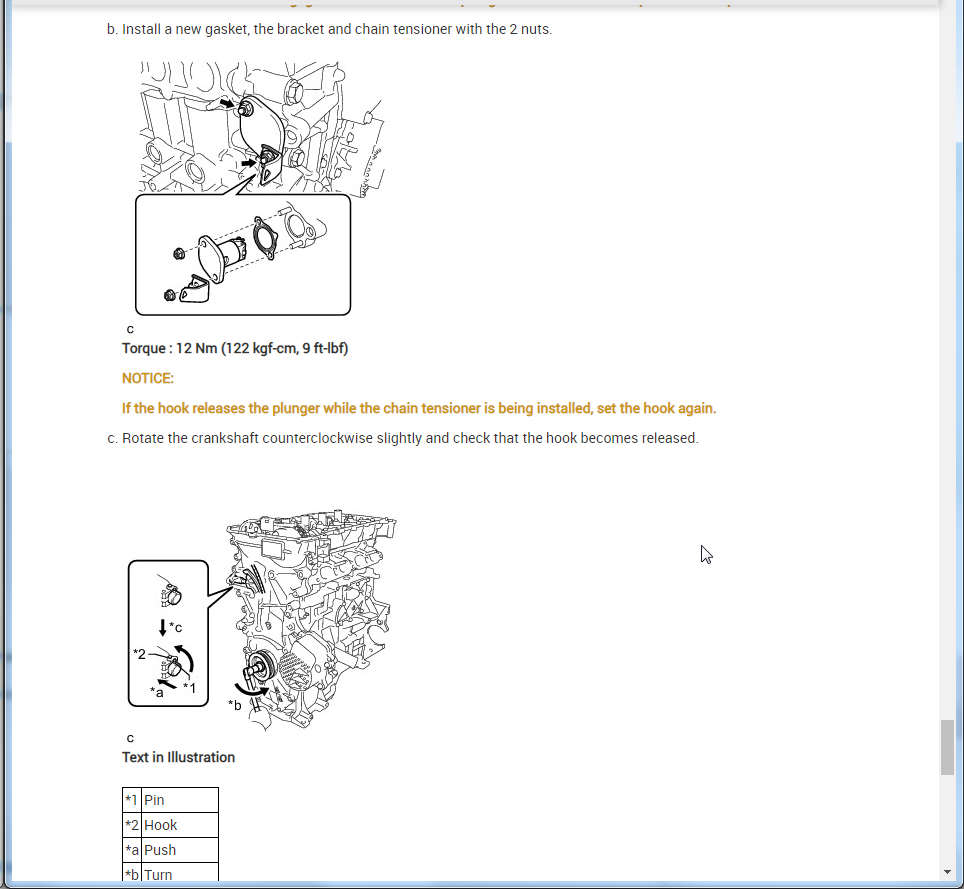
Install a new gasket, the bracket and chain tensioner with the 2 nuts.
pic 17
NOTICE:
If the hook releases the plunger while the chain tensioner is being installed, set the hook again.
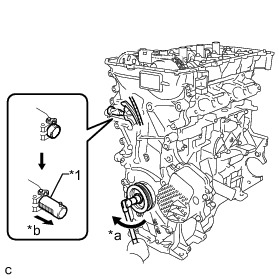
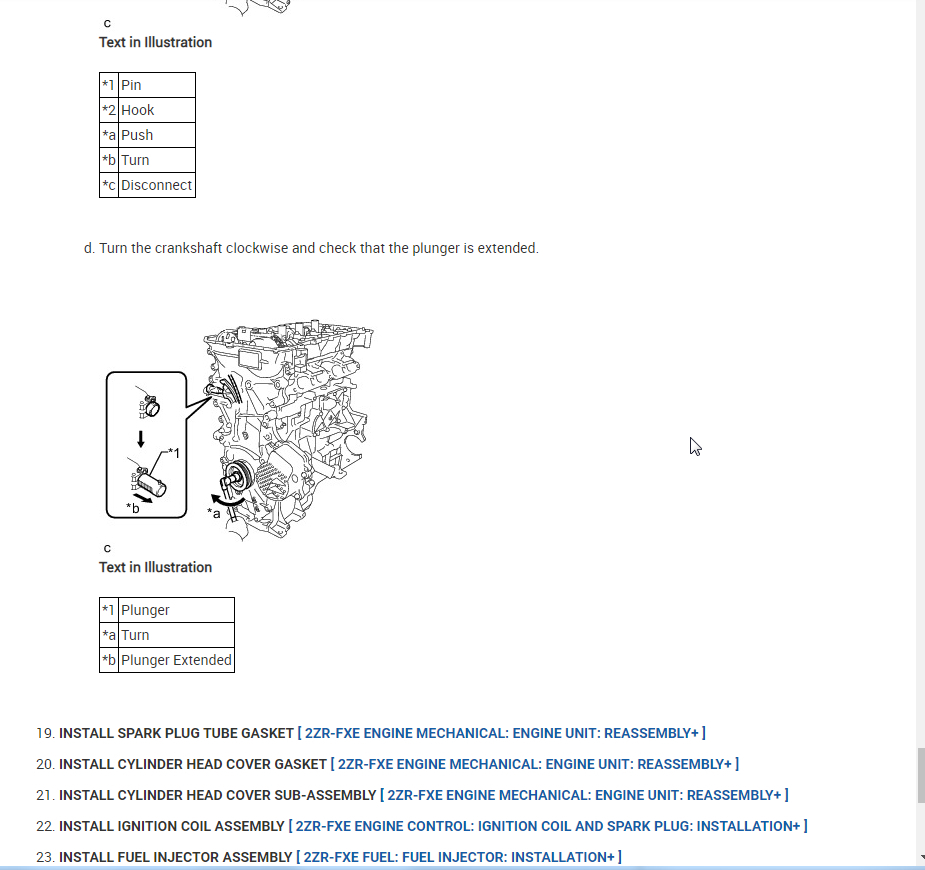
Rotate the crankshaft counterclockwise slightly and check that the hook becomes released.
pic 18
*1 Pin
*2 Hook
*a Push
*b Turn
*c Disconnect
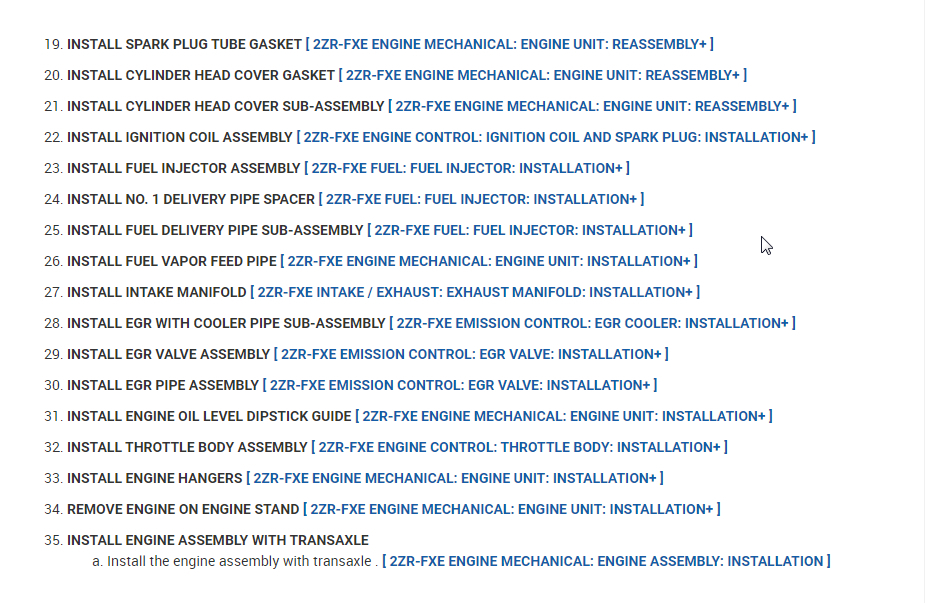
Turn the crankshaft clockwise and check that the plunger is extended.
pic 19
________________________
Let me know if this helps.
Joe
Images (Click to enlarge)
Dec 25, 2020 at 5:45 PM