Timing chain tension-er replacement

Tiny
MARTIN FUJIMURA
  • MEMBER
  • 2010 FORD RANGER
  • 2.3L
  • 4 CYL
  • 2WD
  • AUTOMATIC
  • 140,000 MILES
Timing chain is rattling. How do you replace the timing chain tension-er's. Location and how difficult is this to do?
Sunday, May 27th, 2018 AT 6:03 AM

5 Replies

Tiny
ASEMASTER6371
  • MECHANIC
  • 52,797 POSTS
Good morning.

I would also replace the timing chain as well. A chain that is stretched will also cause this issue.

Have you ever done this repair?

Roy

Removal

NOTICE: Do not loosen or remove the crankshaft pulley bolt without first installing the special tools as instructed in the crankshaft pulley procedure. The crankshaft pulley and the crankshaft timing sprocket are not keyed to the crankshaft. The crankshaft, the crankshaft sprocket and the pulley are fitted together by friction, using diamond washers between the flange faces on each part. For that reason, the crankshaft sprocket is also unfastened if the pulley bolt is loosened. Before any repair requiring loosening or removal of the crankshaft pulley bolt, the crankshaft and camshafts must be locked in place by the special tools, otherwise severe engine damage may occur.

1. Remove the engine front cover. For additional information, refer to Engine Front Cover See: Timing Cover > Removal and Replacement > Engine Front Cover.

2. Compress the timing chain tensioner in the following sequence.

1. Using a small pick, release and hold the ratchet mechanism.

2. While holding the ratchet mechanism in the released position, compress the tensioner by pushing the timing chain arm toward the tensioner.

3. Insert a paper clip into the hole to retain the tensioner.

ImageZoom/Print

3. Remove the 2 bolts and the timing chain tensioner.

ImageZoom/Print

4. Remove the RH timing chain guide.

ImageZoom/Print

5. Remove the timing chain.

ImageZoom/Print

6. Remove the 2 bolts and the LH timing chain guide.

ImageZoom/Print

7. NOTICE: Do not rely on the Camshaft Alignment Plate to prevent camshaft rotation. The tool or the camshaft may be damaged.

If necessary, remove the 2 bolts and the camshaft sprockets.

- Use the flats on the camshaft to prevent camshaft rotation.

ImageZoom/Print
Was this
answer
helpful?
Yes
No
+1
Sunday, May 27th, 2018 AT 6:13 AM
Tiny
MARTIN FUJIMURA
  • MEMBER
  • 3 POSTS
No I have not ever changed a timing chain. I had read on some Rangers you can replace the timing chain tension-er without removing the engine cover. Depending on how difficult it is to remove the engine cover I may or may not try to tackle this but I will over replace the tension-er. If the chain needs to be replaced, I will take it to mechanic. Thanks for your help.
Was this
answer
helpful?
Yes
No
Sunday, May 27th, 2018 AT 6:30 AM
Tiny
ASEMASTER6371
  • MECHANIC
  • 52,797 POSTS
It is a little involved.

No, the tension-er cannot be accessed without removing the cover.

Roy

Removal

1. NOTICE: Do not loosen or remove the crankshaft pulley bolt without first installing the special tools as instructed in the crankshaft pulley procedure. The crankshaft pulley and the crankshaft timing sprocket are not keyed to the crankshaft. The crankshaft, the crankshaft sprocket and the pulley are fitted together by friction, using diamond washers between the flange faces on each part. For that reason, the crankshaft sprocket is also unfastened if the pulley bolt is loosened. Before any repair requiring loosening or removal of the crankshaft pulley bolt, the crankshaft and camshafts must be locked in place by the special tools, otherwise severe engine damage can occur.

Remove the crankshaft pulley. For additional information, refer to Crankshaft Pulley See: Harmonic Balancer - Crankshaft Pulley > Removal and Replacement > Crankshaft Pulley.

2. Disconnect the Crankshaft Position (CKP) sensor electrical connector and the wiring harness pin-type retainers.

3. NOTE: A new CKP sensor must be installed whenever the old sensor is removed.

Remove and discard the CKP sensor.

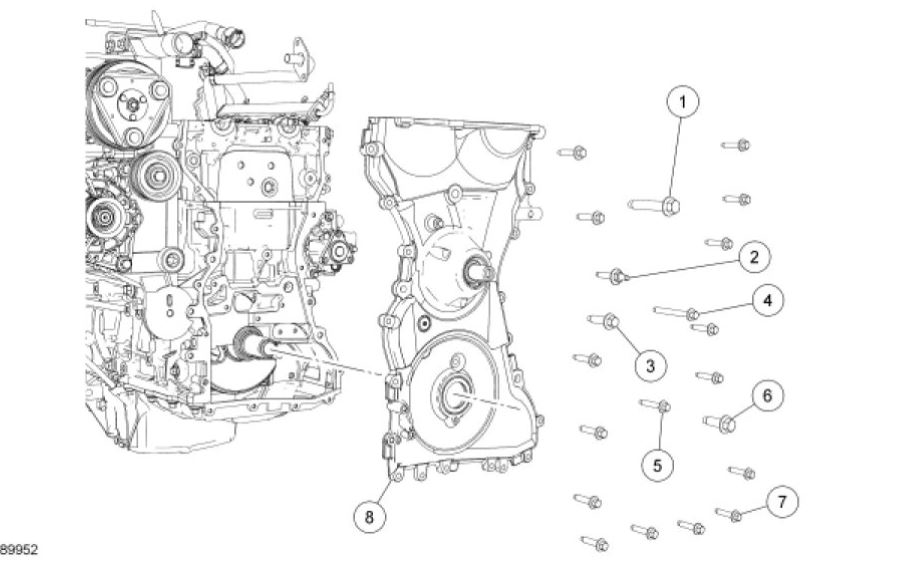
4. Remove the bolt and the accessory drive belt tensioner.

5. Remove the 3 bolts and the coolant pump pulley.

6. Disconnect the Power Steering Pressure (PSP) switch electrical connector.

7. Remove the 3 bolts and position the power steering pump aside.

8. NOTE: This step is needed only if a new front cover is being installed.

Using a 3 jaw puller, remove the fan drive pulley.

ImageZoom/Print

9. NOTE: There is one bolt behind the cooling fan drive pulley. This bolt can be accessed by lining up one of the holes in the pulley with the bolt.

Remove the 21 bolts and the engine front cover.

10. NOTICE: Do not use metal scrapers, wire brushes, power abrasive discs or other abrasive means to clean the sealing surfaces. These tools cause scratches and gouges, which make leak paths. Use a plastic scraping tool to remove all traces of old sealant.

Clean the sealing surface with silicone gasket remover and metal surface prep. Observe all warnings and cautions and follow all application directions contained on the packaging of the silicone gasket remover and metal surface prep.
Was this
answer
helpful?
Yes
No
+1
Sunday, May 27th, 2018 AT 6:35 AM
Tiny
MARTIN FUJIMURA
  • MEMBER
  • 3 POSTS
It looks that way. Just bought the truck so I will probable just drive it for awhile before I have somebody do this. Thanks again.
Was this
answer
helpful?
Yes
No
Sunday, May 27th, 2018 AT 6:37 AM
Tiny
ASEMASTER6371
  • MECHANIC
  • 52,797 POSTS
You are welcome.

Be careful how long you drive it. If the tension-er fails, the chain will come out of time and will bend valves causing major engine damage.

Roy
Was this
answer
helpful?
Yes
No
+1
Sunday, May 27th, 2018 AT 6:39 AM

Please login or register to post a reply.

Sponsored links